> For the complete documentation index, see [llms.txt](https://docs.daylite.app/help/llms.txt). Markdown versions of documentation pages are available by appending `.md` to page URLs; this page is available as [Markdown](https://docs.daylite.app/help/mac-fundamentals/contact-management/people.md).
# People
Create and work with Person records in Daylite. Learn about every field on the card, how to link a Person to a Company, custom labels, and the Activity timeline.
A Person in Daylite is a record representing an individual contact — a client, lead, colleague, or supplier. The Person record holds that individual's contact details, classification, and custom information, and it is what emails, Tasks, Appointments, Opportunities, and Projects link to so their full history stays in one place.
**Key facts:**
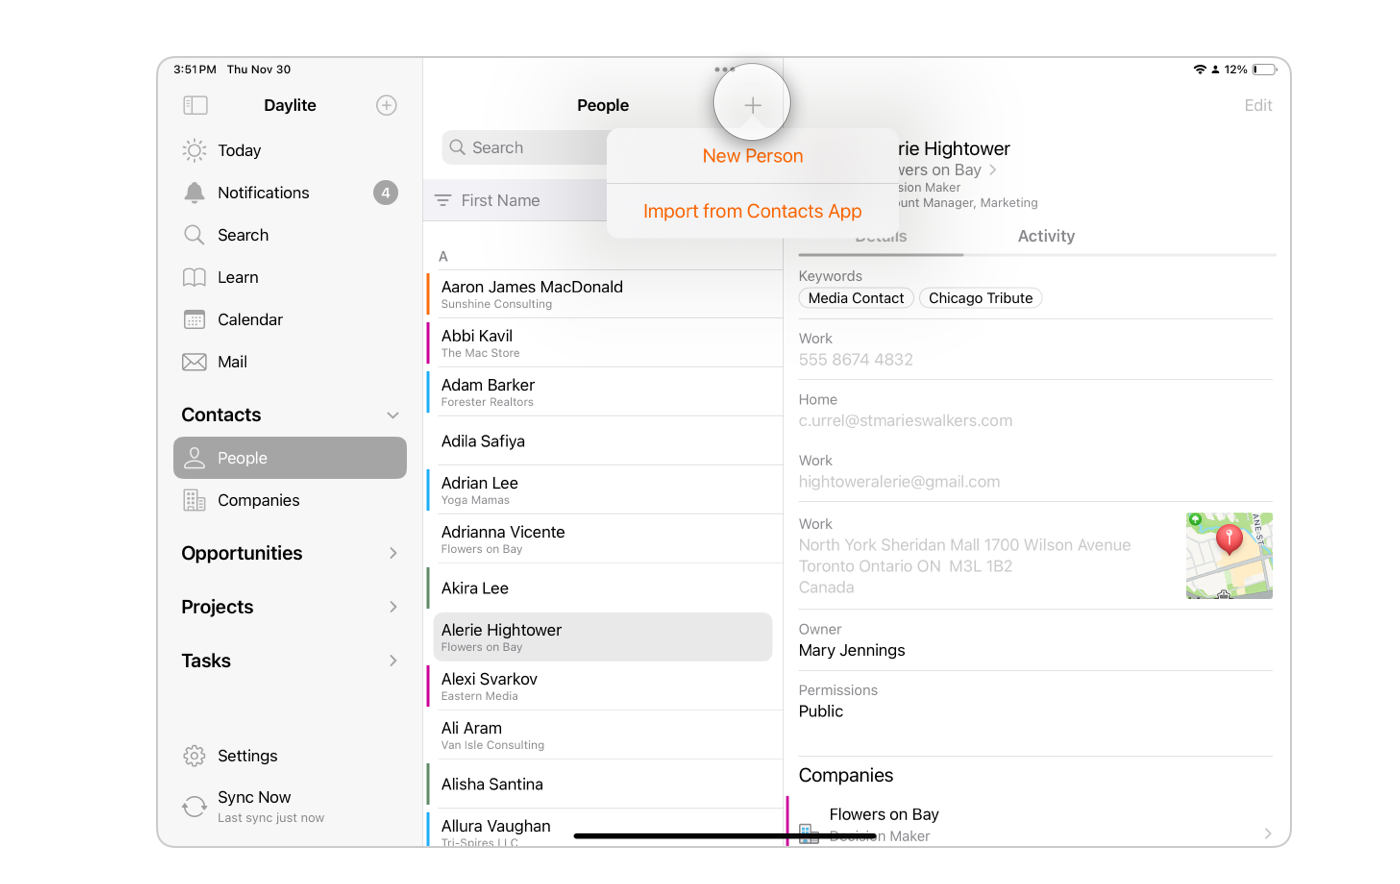
* Create a Person with **+ New Person** on Mac, or the **+** button on iPhone and iPad.
* A Person holds one Category at a time and any number of Keywords.
* A Person can be linked to more than one Company, and each link carries its own Role, Job Title, and Department.
* You can add up to 12 custom text fields and 4 custom date fields.
* Every Person has an Owner, set to whoever created the record, and the Owner can be changed later.
## What Is a Person Record in Daylite?
A Person record stores detailed information about a prospect, client, colleague, or supplier. A single Person can hold multiple email addresses, phone numbers, addresses, and web pages, along with general details such as hobbies, birthdays, or family names, and the Company they work for including their Job Title.
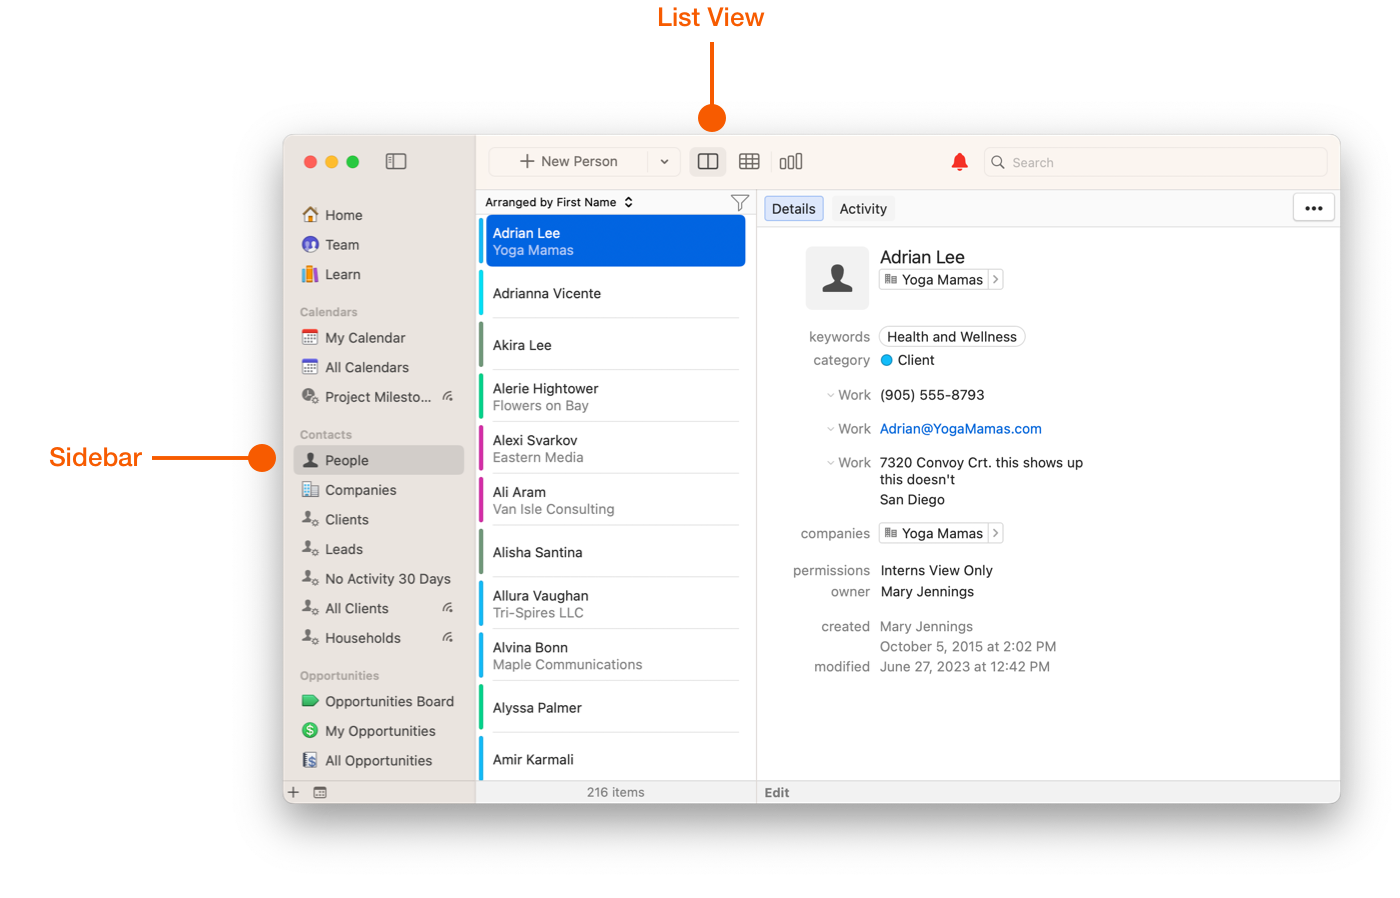
Selecting **People** in the Sidebar shows a list of every Person in your database, organized by first name, last name, or the date the record was created. The total number of People appears at the bottom of the list.
## How to Create a Person in Daylite
{% tabs %}
{% tab title="Mac" %}
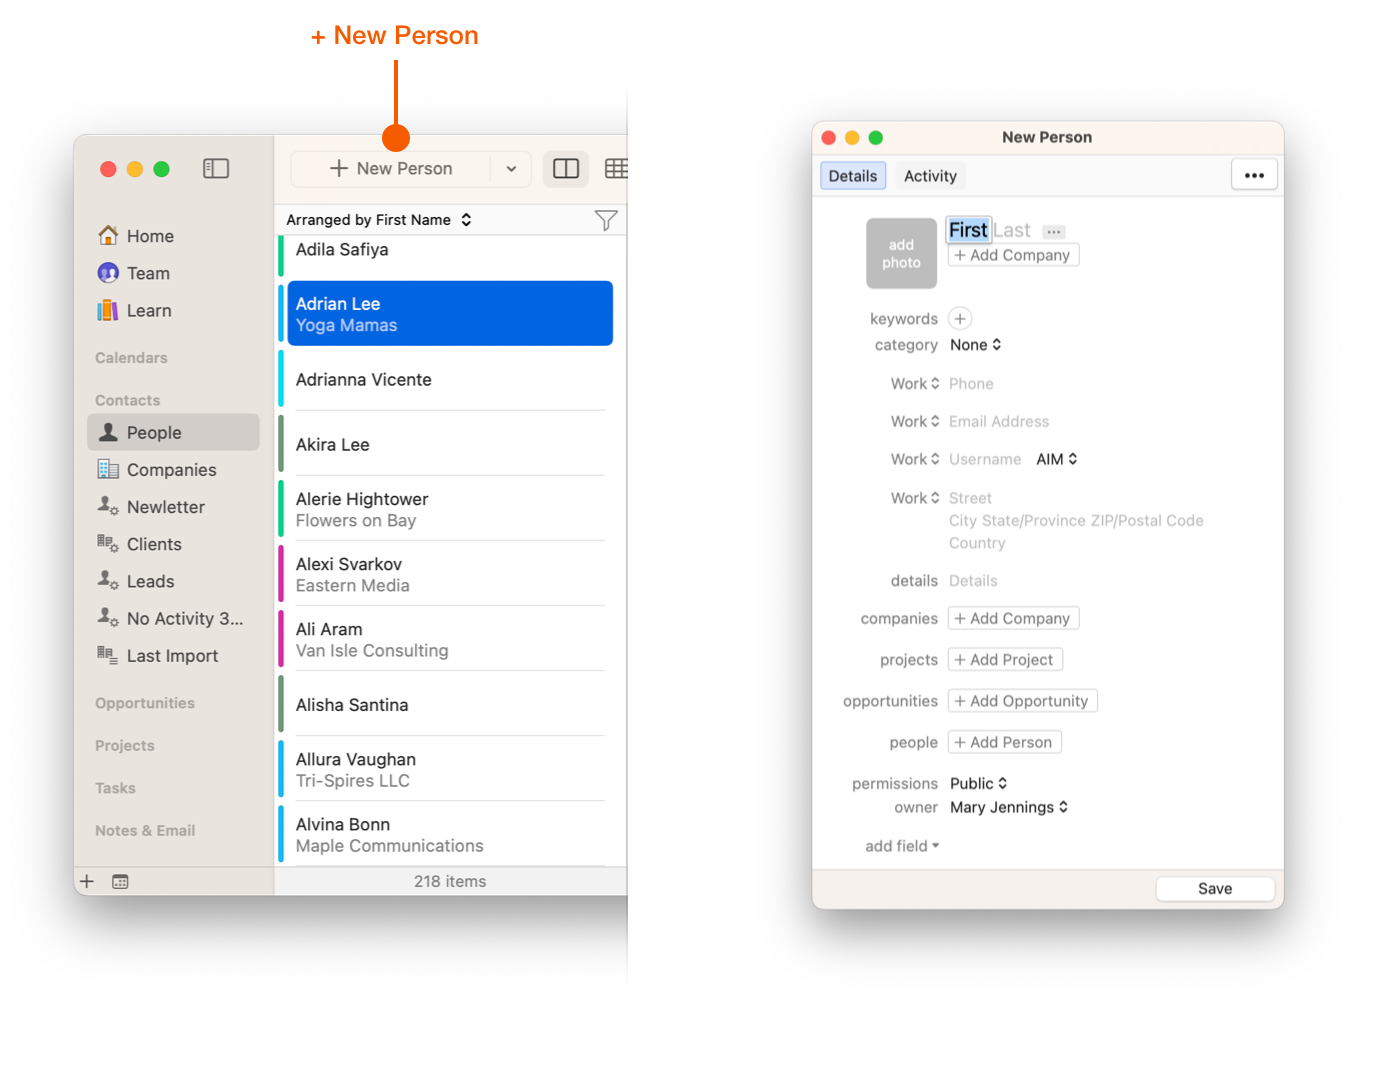
1. Click **People** in the Sidebar under **Contacts**.
2. Click **+ New Person**.
3. Enter the name and details.
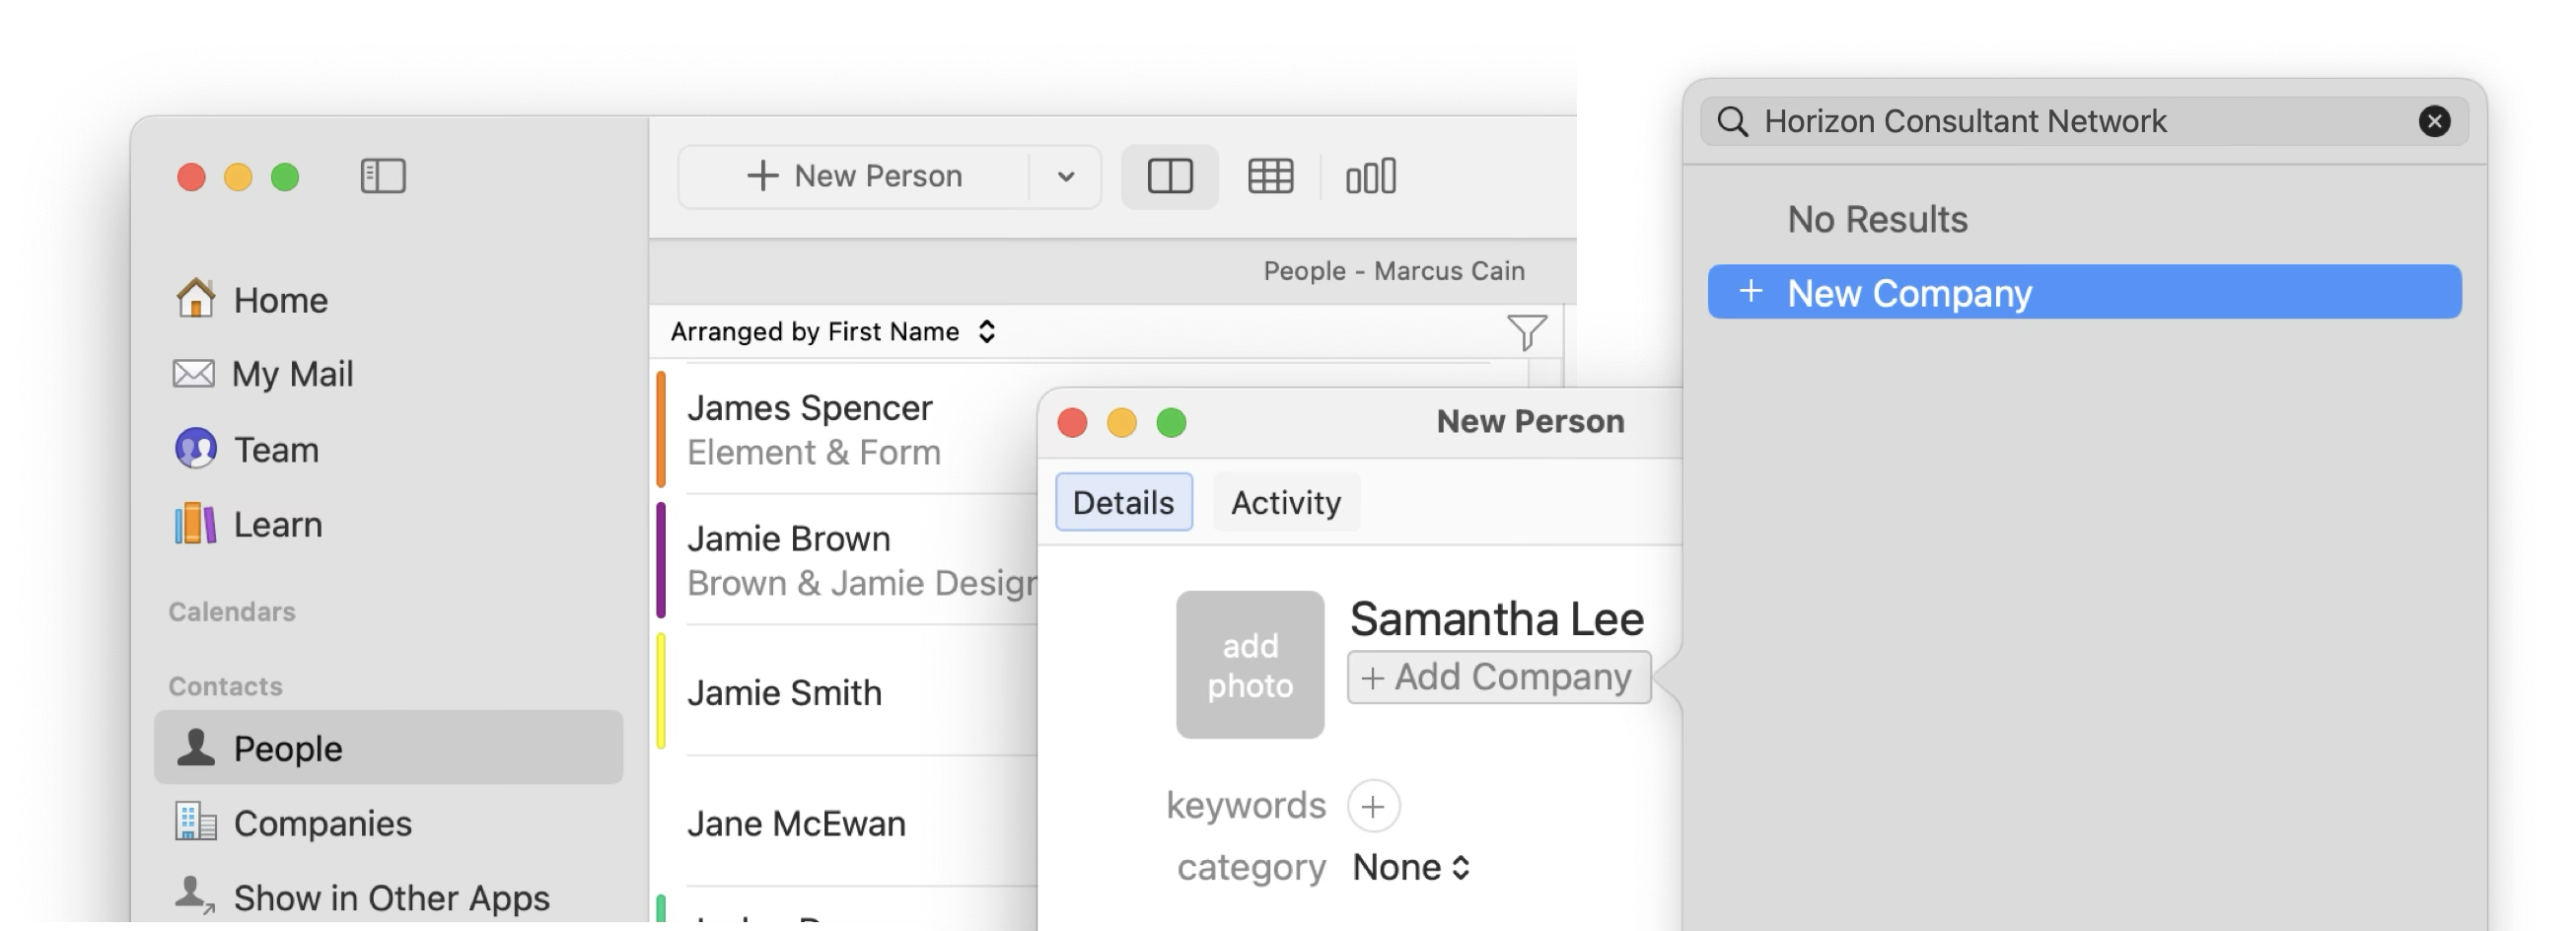
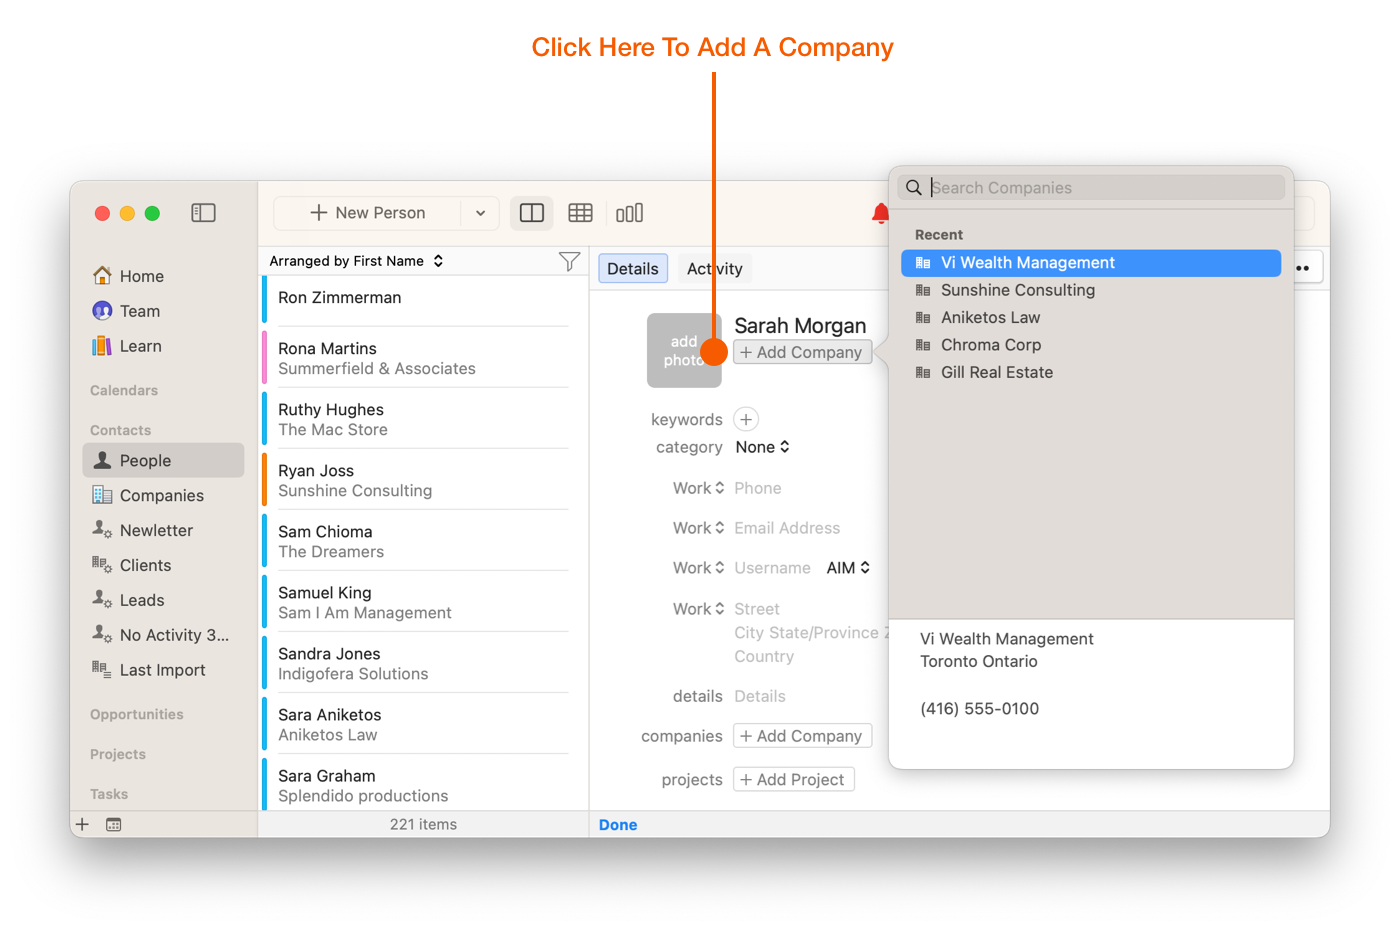
4. Click **+ Add Company** to link a Company to this Person.
5. Type the Company name, then click **+ New Company** to create it, or select an existing Company from the list.
6. Click **Save**.
{% endtab %}
{% tab title="iPhone & iPad" %}
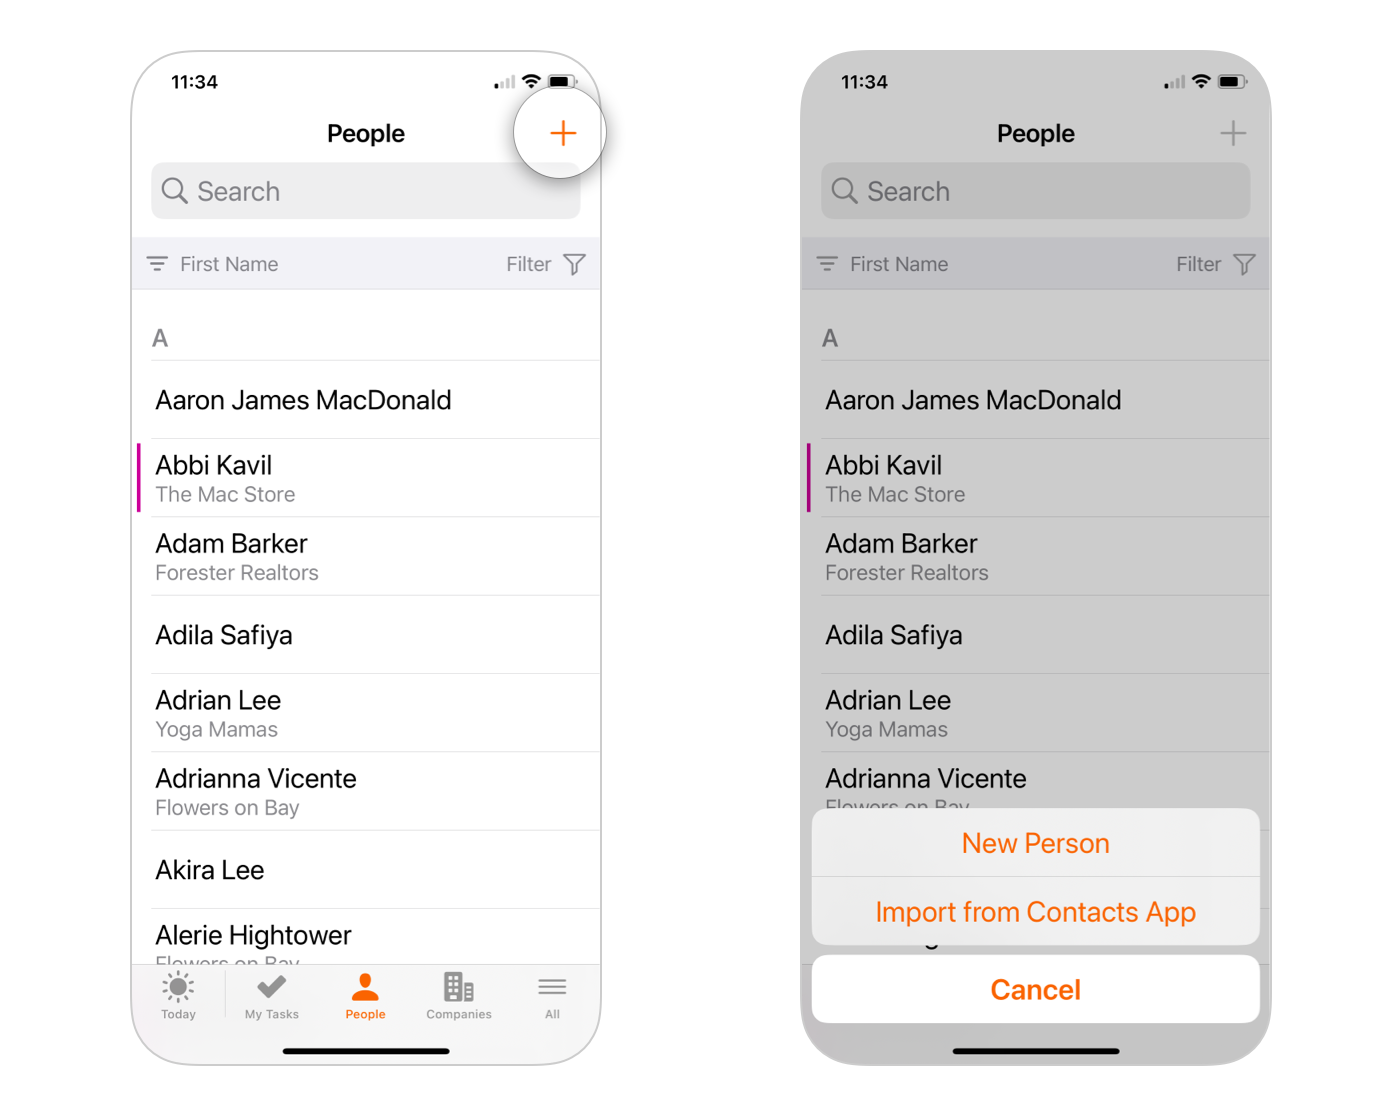
1. Tap **Contacts > People** in the Sidebar.
2. Tap the **+** button at the top of the app.
3. Tap **New Person**.
4. Enter the name and details.
5. Tap **Save**.
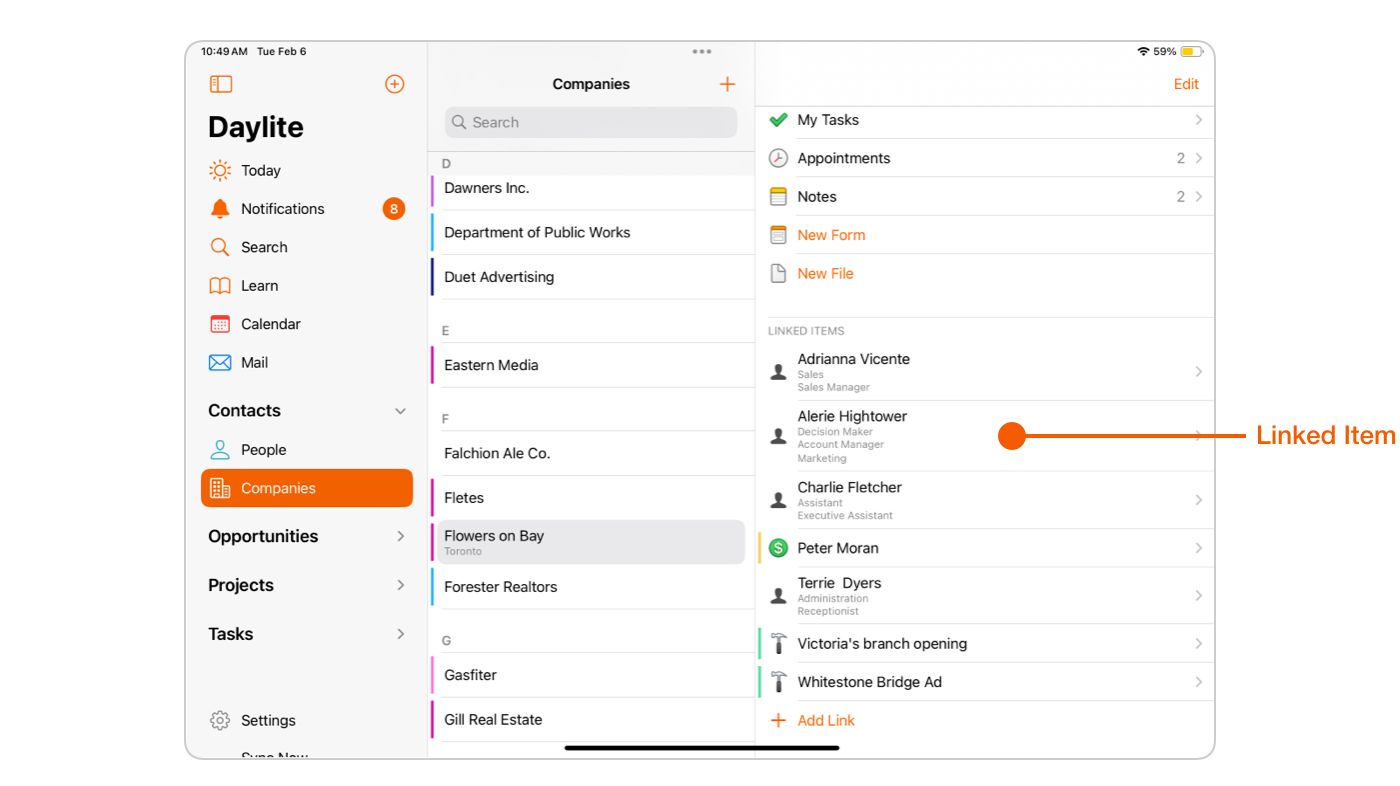
To link a Company while creating a Person, use **+ Add Link** in the **Linked Items** section of the record.
{% endtab %}
{% endtabs %}
{% hint style="info" icon="lightbulb" %}
Enter as much detail as you can on a contact record. The fields you fill in now are what you will search, filter, and segment on later.
{% endhint %}
## Fields on a Person Record
### Name
The basic entry is a first name field and a last name field. Click the **…** control beside the name to expand it and add a prefix or middle name.
{% hint style="info" icon="lightbulb" %}
**Tip:** Splitting the first name and last name into separate fields lets you find and sort by either one.
{% endhint %}
### Profile Picture
A Person record can hold a profile picture. Adding one makes a contact easier to recognise in lists and before a meeting.
### Linked Company
When you link a Person to a Company, the linked Company appears on the Person's card. See [How to Link a Person to a Company](#how-to-link-a-person-to-a-company) below for the methods.
{% hint style="info" icon="lightbulb" %}
**Tip:** You can link a Person to multiple Companies.
{% endhint %}
### Role, Job Title, and Department
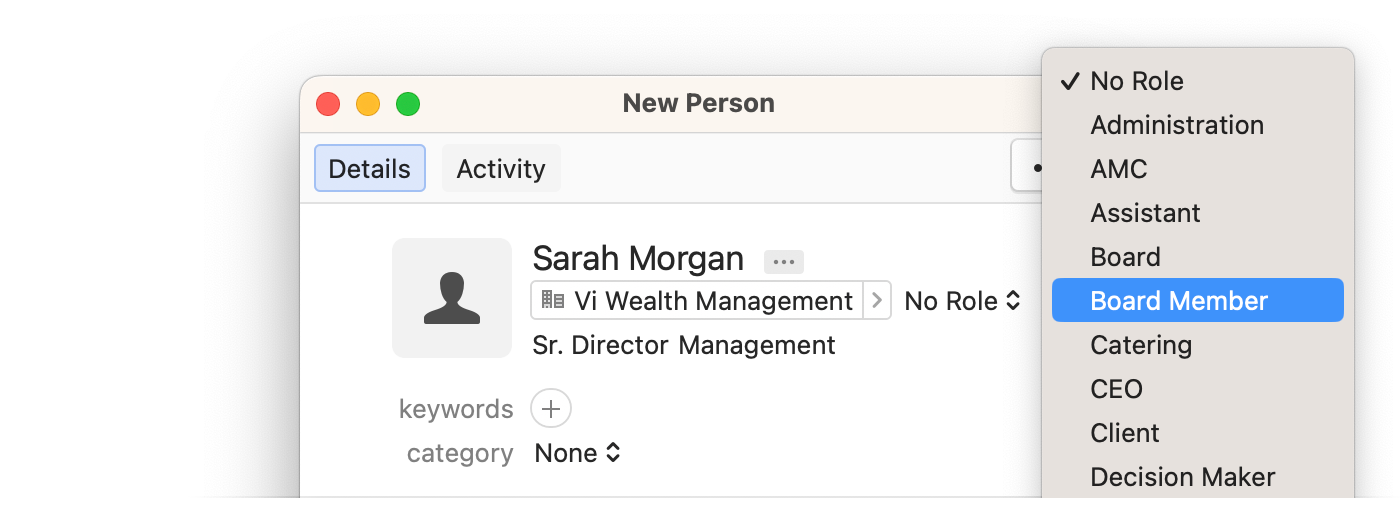
Once a Person is linked to a Company, you can define the nature of the link by adding a Role, a Job Title, and a Department. A Role is a label describing the function the Person plays in that specific link — it belongs to the link rather than to the Person, and it is not the same as a Job Title. Roles are chosen from a customizable drop-down list.
### Category
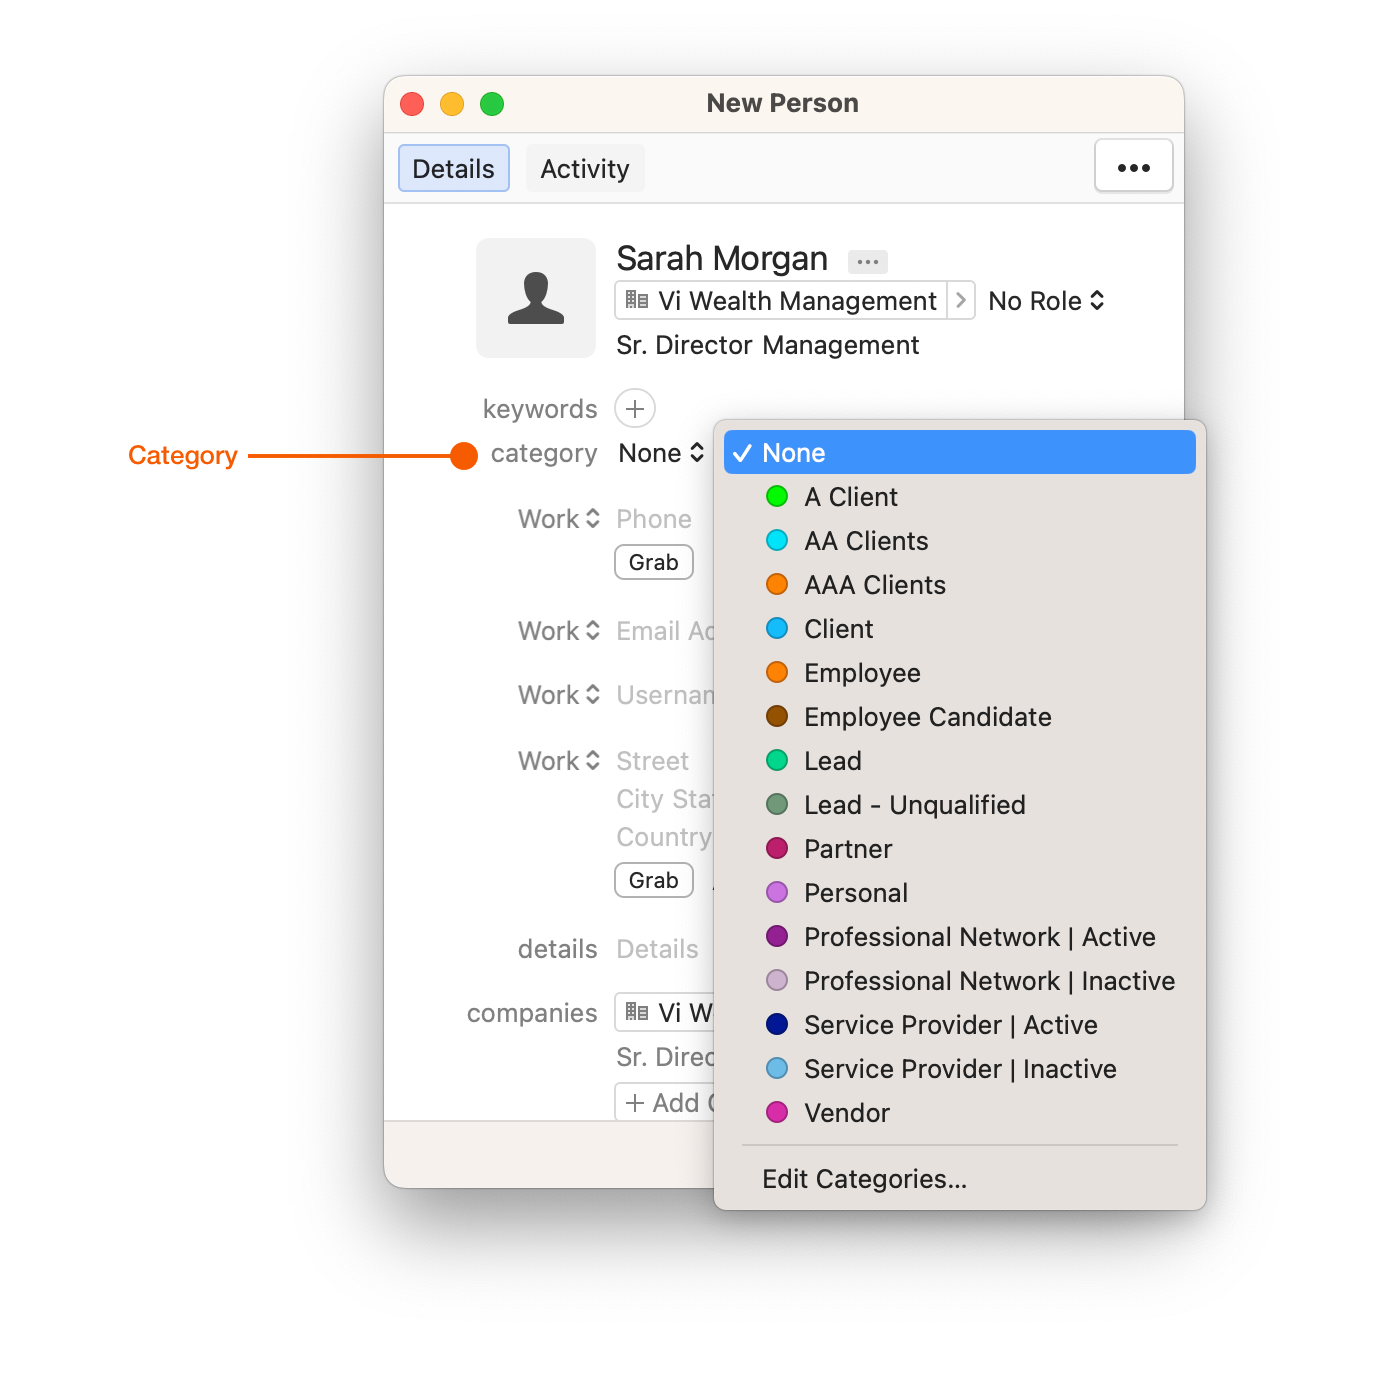
A Category is the primary classification label on a Person. Each Person holds one Category at a time, and each Category can be given a colour. Examples include Prospect, Client, Lead, Personal, and Vendor.
### Keywords
A Keyword is a tag applied to a Person to classify it beyond its Category. You can apply multiple Keywords to one Person. Examples include "Newsletter recipient" or "Lead Source: Website".
### Phone Numbers, Email Addresses, and Addresses
A Person can hold multiple phone numbers, email addresses, and physical addresses. Each one is given a label — Work, Mobile, Home, or a custom label you create.
### Web Page
The web page field holds a URL for the Person.
### Details and Text Fields
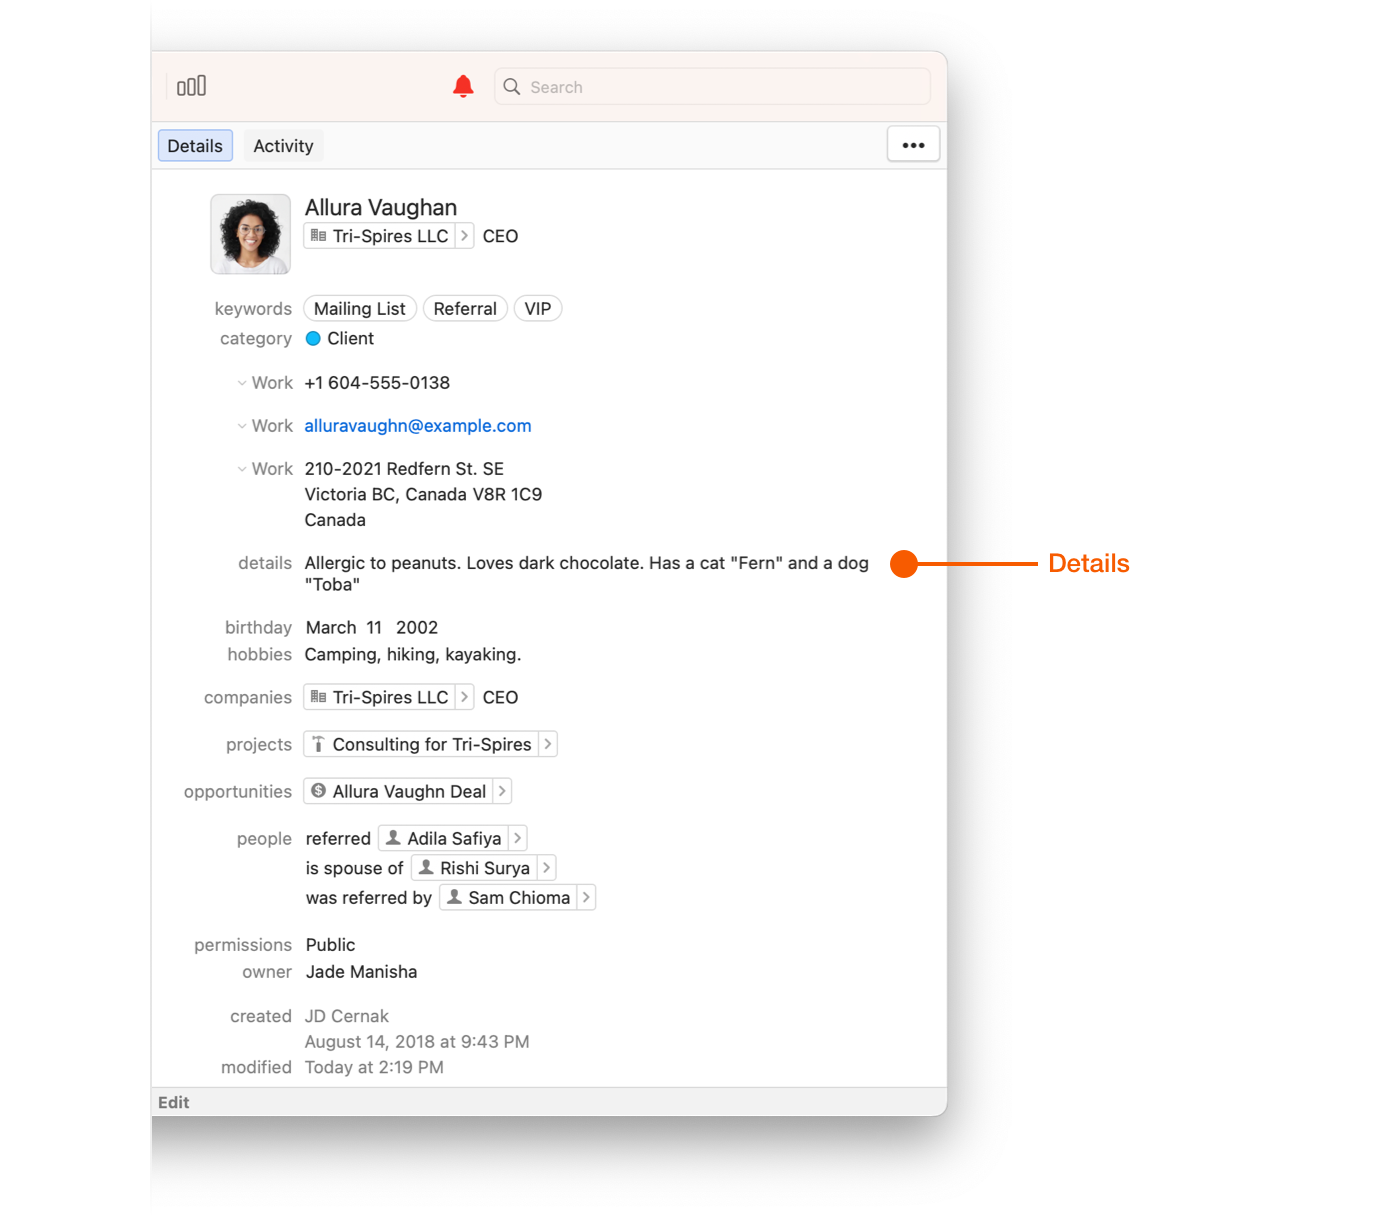
The Details field holds non-time-sensitive information about the contact that you can refer to during a call or an email — a short bio, general working hours, the best time to call, or a note about what to expect when visiting.
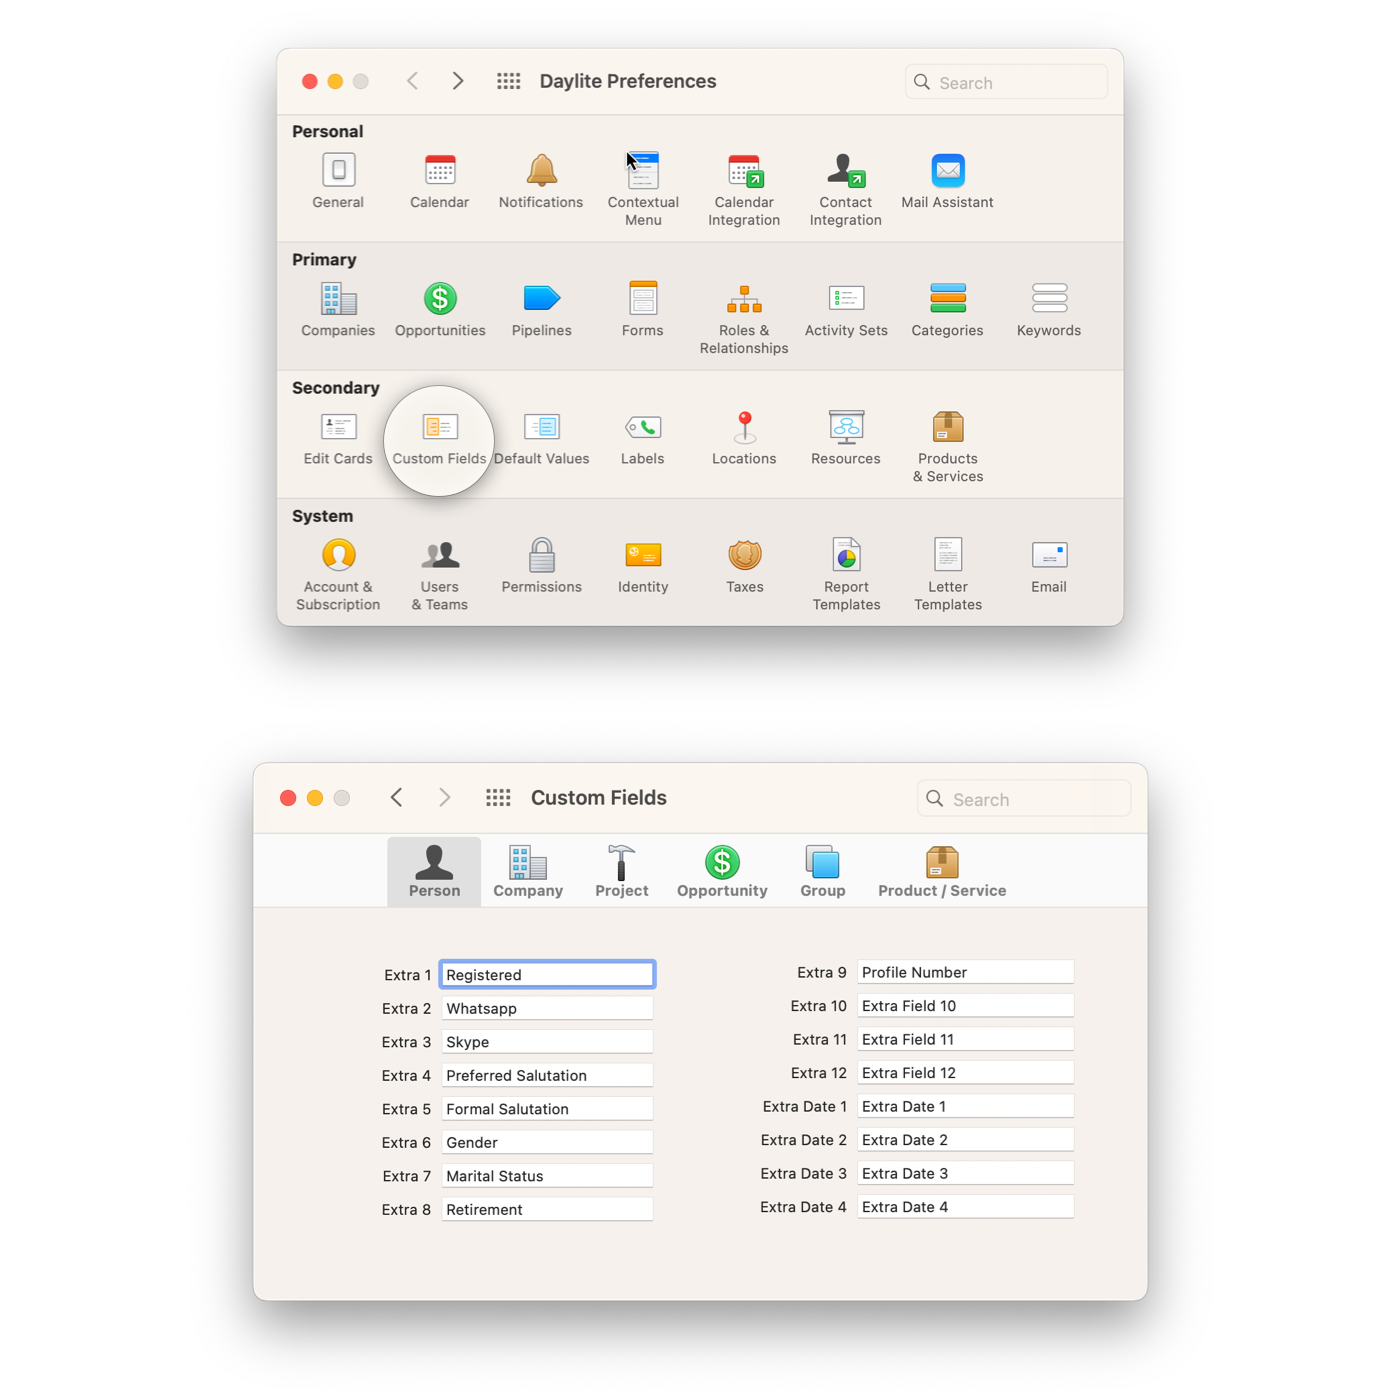
### Custom Fields
A custom field is a user-defined field you add to a record to capture information Daylite does not track by default. A Person record supports up to 12 custom text fields and 4 custom date fields — useful for something like a first meeting date.
{% hint style="info" icon="lightbulb" %}
**Tip:** Set up custom fields in **Daylite > Settings > Custom Fields**.
{% endhint %}
{% tabs %}
{% tab title="Mac" %}
{% endtab %}
{% tab title="iPhone & iPad" %}
To fill in custom fields, tap **Edit > + Add Field**, select the fields you want to add, then tap **Save**.
{% endtab %}
{% endtabs %}
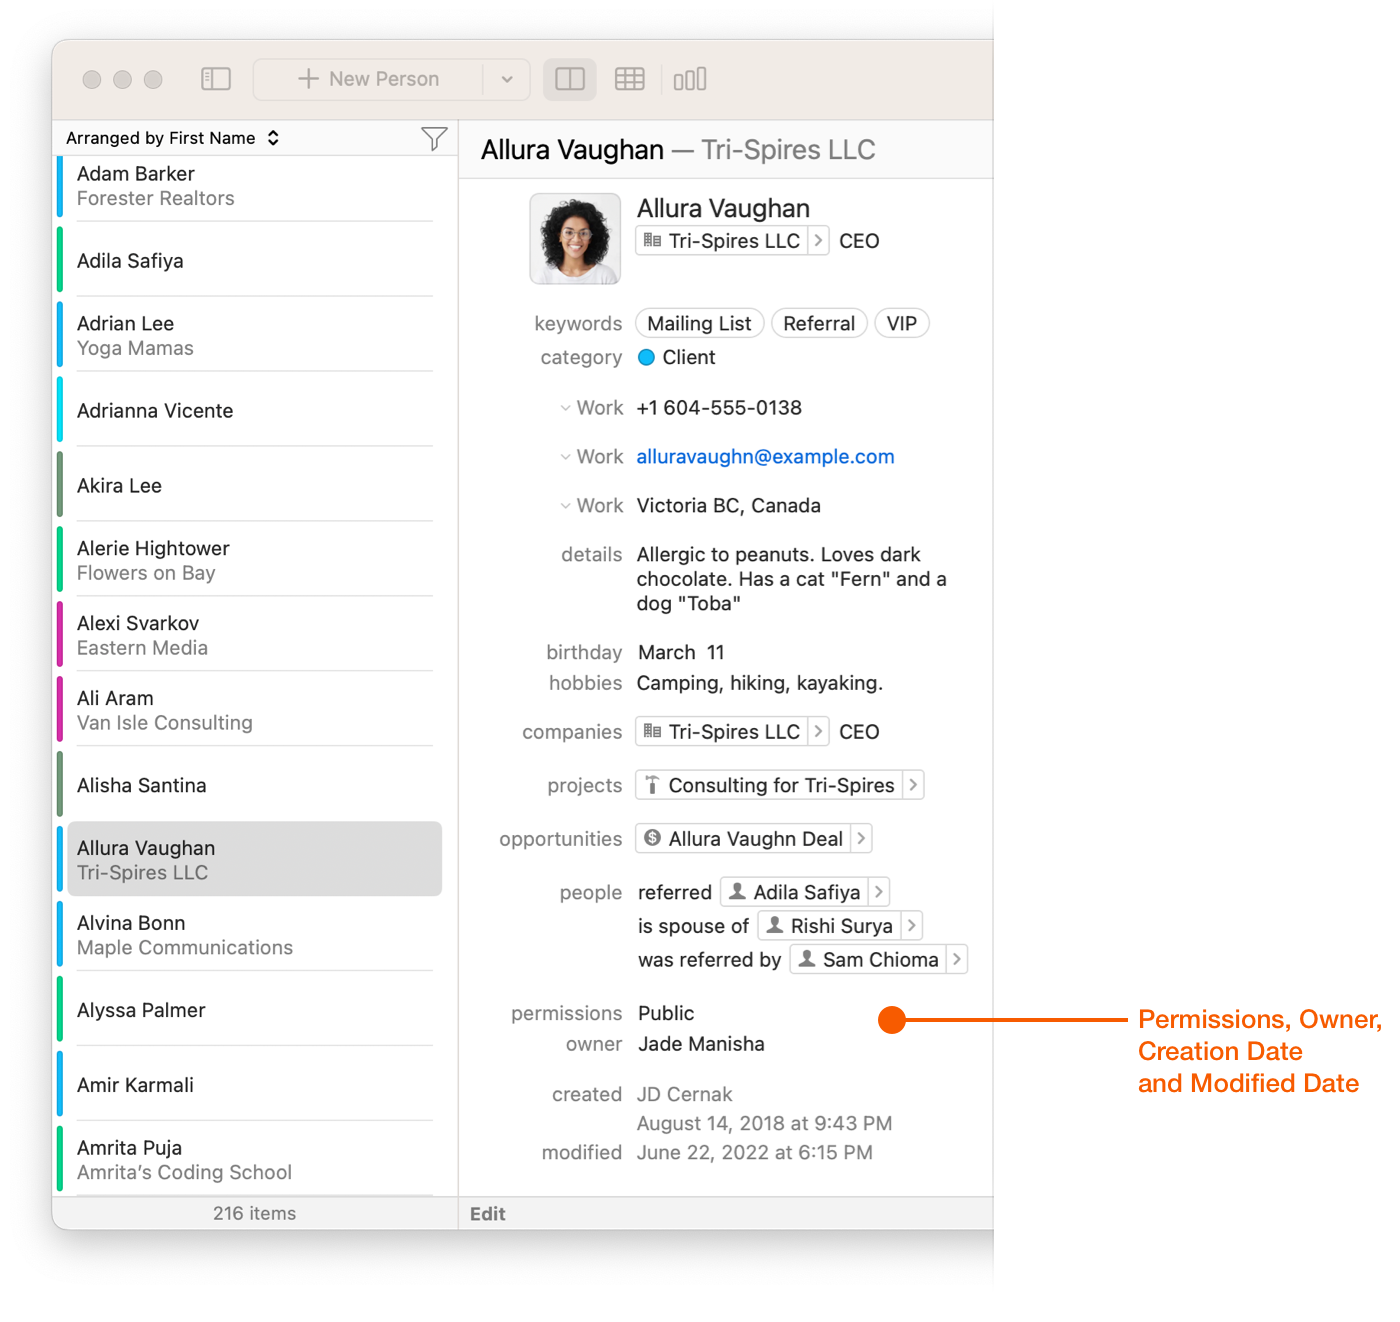
### Permissions and Owner
Permissions control who can see and work with the record. Basic visibility is either **Public**, meaning visible to everyone, or **Private**, meaning visible only to the Owner. Permissions are not turned on by default — an administrator turns them on and configures the access you want.
Every record in Daylite has an Owner. The user who creates a Person is set as the Owner automatically, and the Owner can be changed to another user during creation or at any point afterwards.
{% hint style="info" icon="lightbulb" %}
**Tip:** You can set up teams or custom visibility presets to define who can view or edit particular information in Daylite.
{% endhint %}
### Creation Date and Modified Date
The user who created the record and the date it was created are fixed and cannot be changed, unlike the Owner. The modified date reflects any change made to the record and cannot be edited.
## How to Link a Person to a Company
{% tabs %}
{% tab title="Mac" %}
There are four ways to link a Person to a Company:
* Click **+ Add Company** on the Person card.
* Click the **…** button and choose the Company.
* Drag the Person onto the Company.
* Press **cmd + L**.
{% endtab %}
{% tab title="iPhone & iPad" %}
Tap **+ Add Link** in the **Linked Items** section of the Person record, then choose the Company. You can link People or Companies to a Person record the same way.
{% endtab %}
{% endtabs %}
Once the link exists, you can add a Role, Job Title, and Department to it. When you create a Person from a Company using the **…** menu, Daylite copies details such as the address and phone numbers across to the new Person. For the Company side of this relationship, see [Companies in Daylite](https://docs.daylite.app/help/fundamentals/contacts/companies-in-daylite).
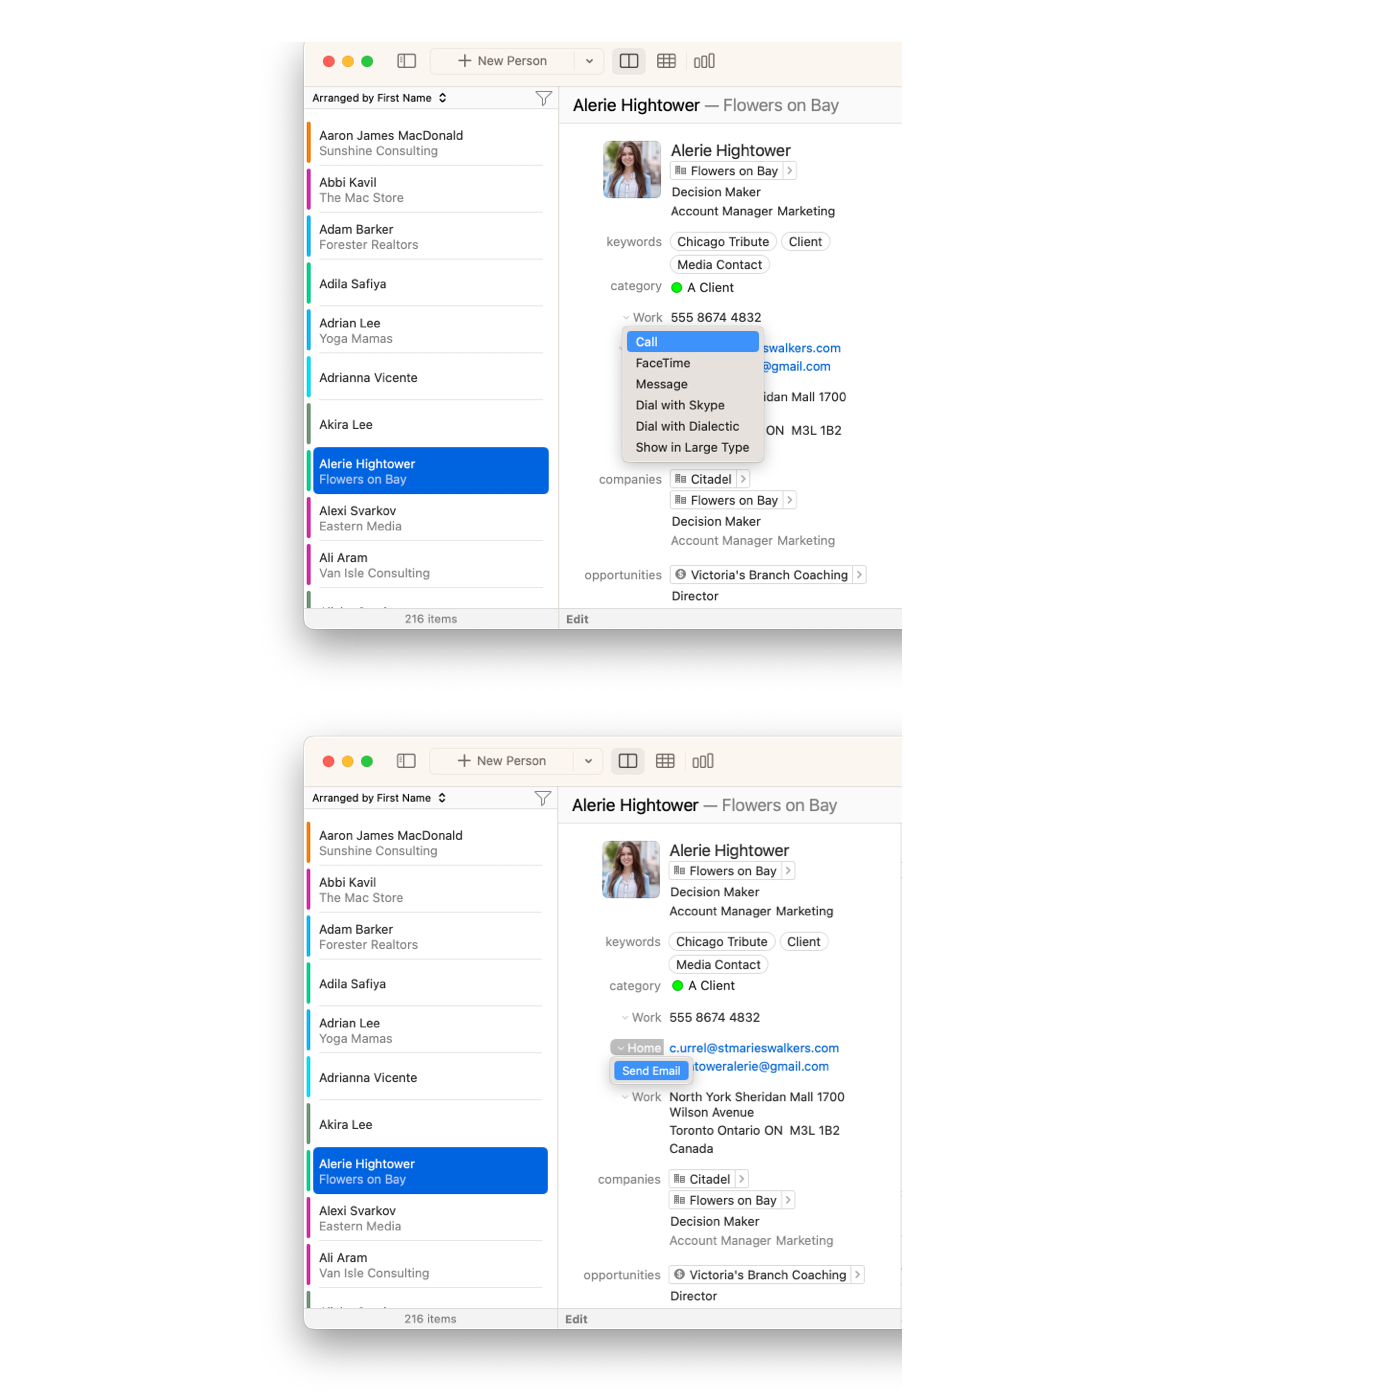
## What You Can Do from a Phone, Email, or Address Label
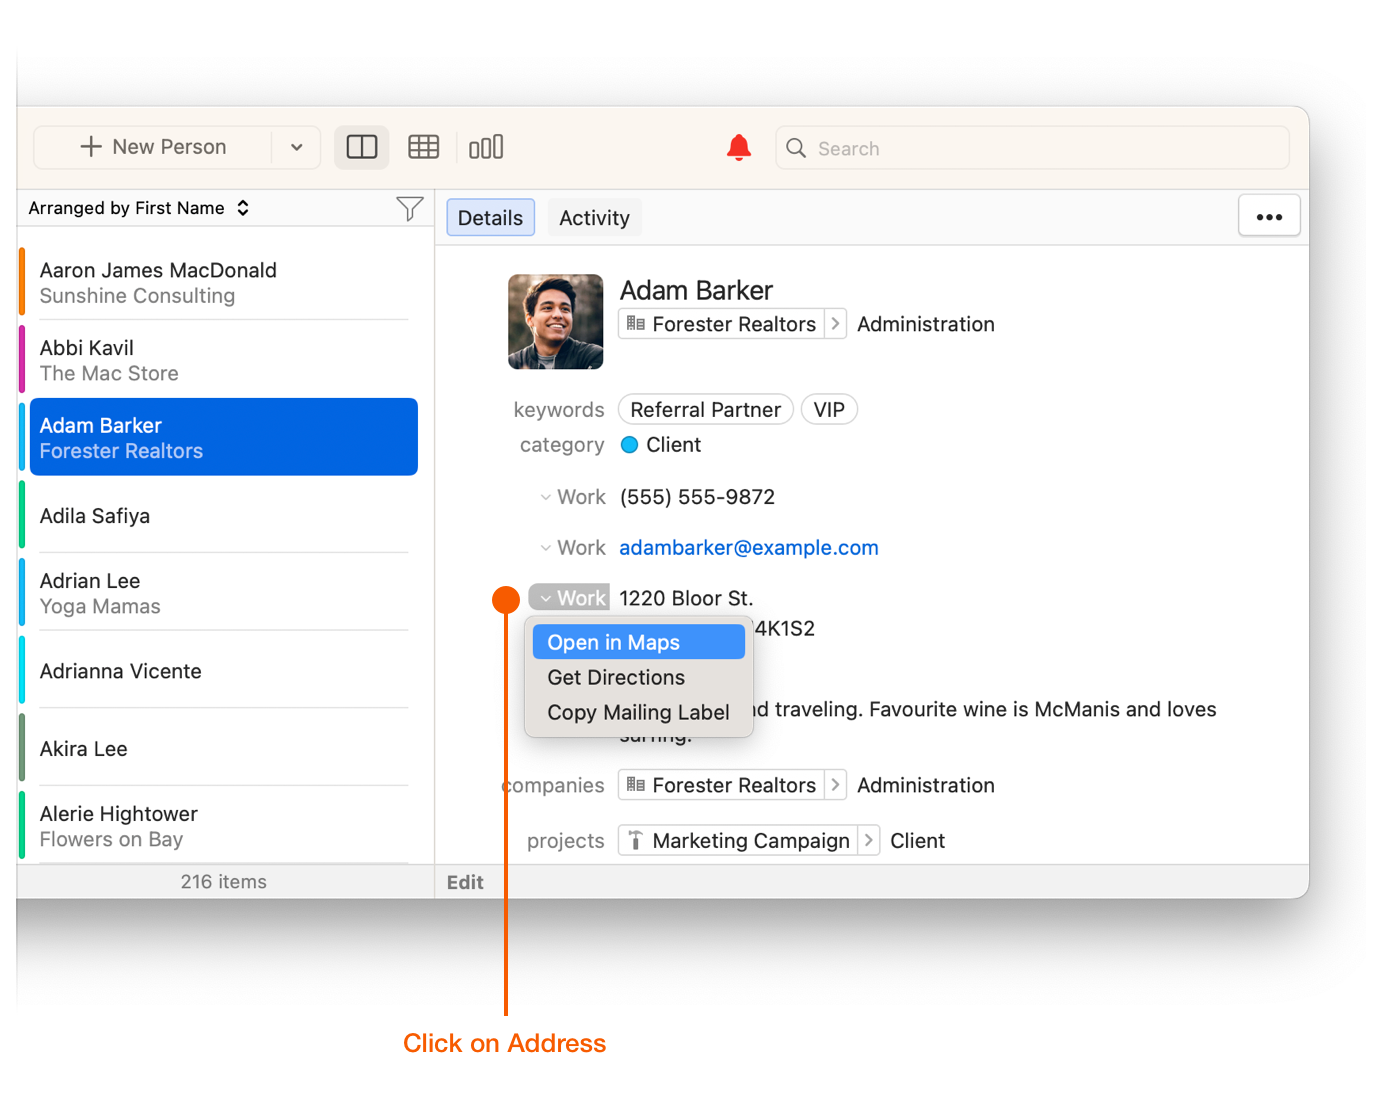
The labels on a Person record are interactive. Clicking one opens the actions available for that type of field.
| Field | Clicking the label lets you |
| ----------------------- | -------------------------------------------------------------------------------------------------------- |
| **Mobile phone number** | Call the Person, or send them an SMS |
| **Email address** | Send an email through Apple Mail or your default email client |
| **Address** | Open the address in Apple Maps, get directions in Apple Maps, or copy the mailing label to the clipboard |
For how email behaves once it is linked to a Person, see [Adding Emails to Daylite](https://docs.daylite.app/help/fundamentals/email/adding-emails-to-daylite).
## How to Add or Remove a Custom Label
Daylite includes standard labels such as Work, Mobile, and Home. You can add your own.
To add a label:
1. Select **Daylite > Settings**.
2. Under **Secondary**, click **Labels**.
3. Select the tab for the type of label you want to add — Phone, Address, or Email.
4. Click **+**.
5. Enter the label name.
The new label is available the next time you create or edit a Person or Company.
To remove a label:
1. Select **Daylite > Settings**.
2. Under **Secondary**, click **Labels**.
3. Select the tab for the type of label you want to remove.
4. Select the label.
5. Click **−**.
{% hint style="warning" %}
Removing a label cannot be undone and may affect every Person and Company using it. Confirm the label is no longer in use before you remove it.
{% endhint %}
## How to Add a Field to a Person Record
If a field you need is not visible on a Person card, you can add it to that card.
1. Open the Person card you want to edit.
2. Scroll to the bottom of the card.
3. Click **Add Field**.
4. Select the field you want. It appears in its corresponding section on the card.
This adds the field to that card only. To make a field appear on all new Contact cards by default, go to **Daylite > Settings > Edit Cards**, select **People**, and enable the field.
## The Activity Timeline on a Person Record
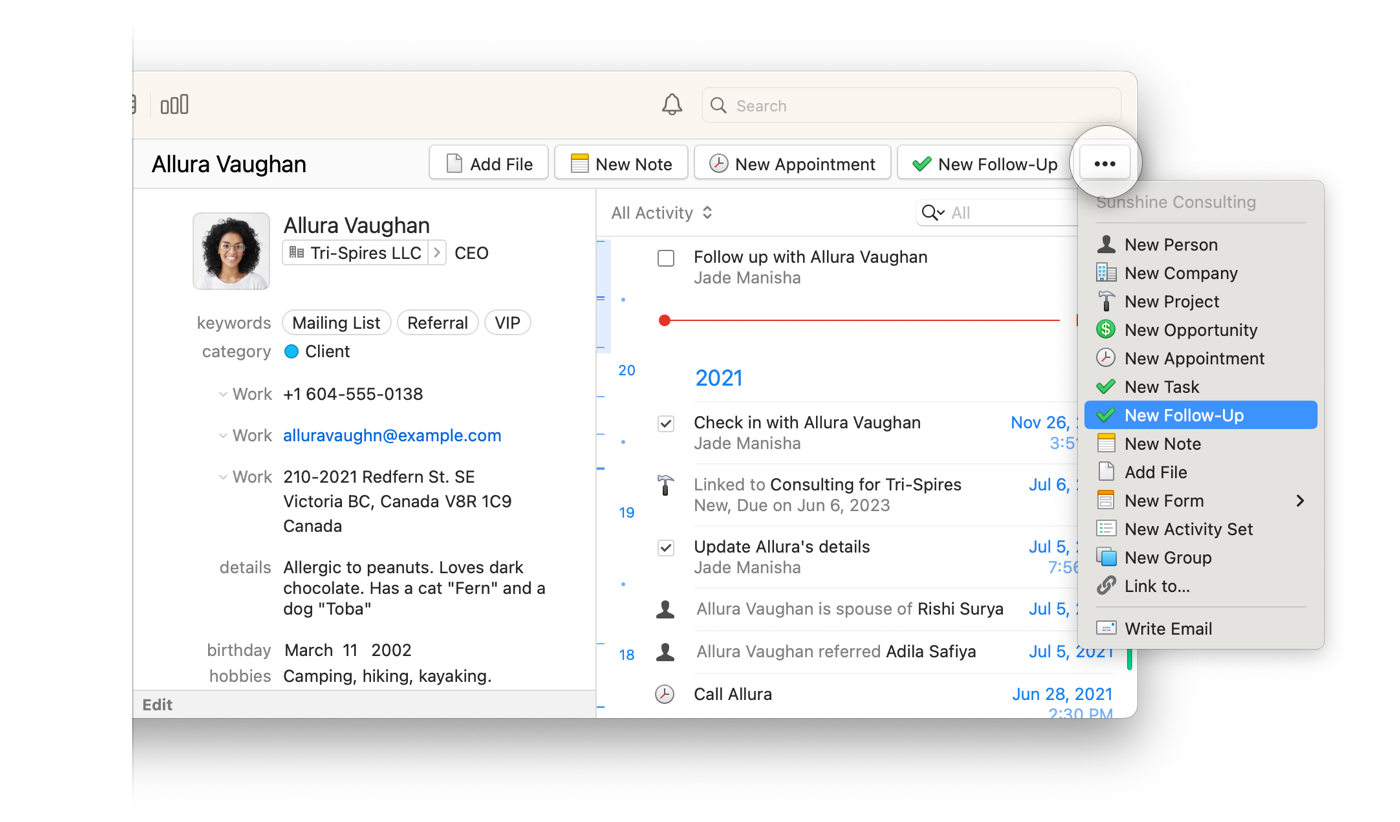
Every Person record carries an Activity timeline, shown in the Activity Pane on the right-hand side of Daylite. The Activity Pane is chronological and holds a complete record of every interaction you have had with that Person since the record was created.
When you link something to a Person — a File, a Note, a Meeting, a Task, a follow-up, or an email — it is added to that timeline. This is what makes the record a history rather than a static address book entry: the next time you open the Person, the context of your last conversation is there.
You add linked information from the **New Object** buttons along the top of Daylite, or from the **…** menu, which lists the full set of records you can create against the Person.
## How to Edit a Person Record
{% tabs %}
{% tab title="Mac" %}
Click **Edit** at the bottom of the Details section, make your changes, and save.
{% endtab %}
{% tab title="iPhone & iPad" %}
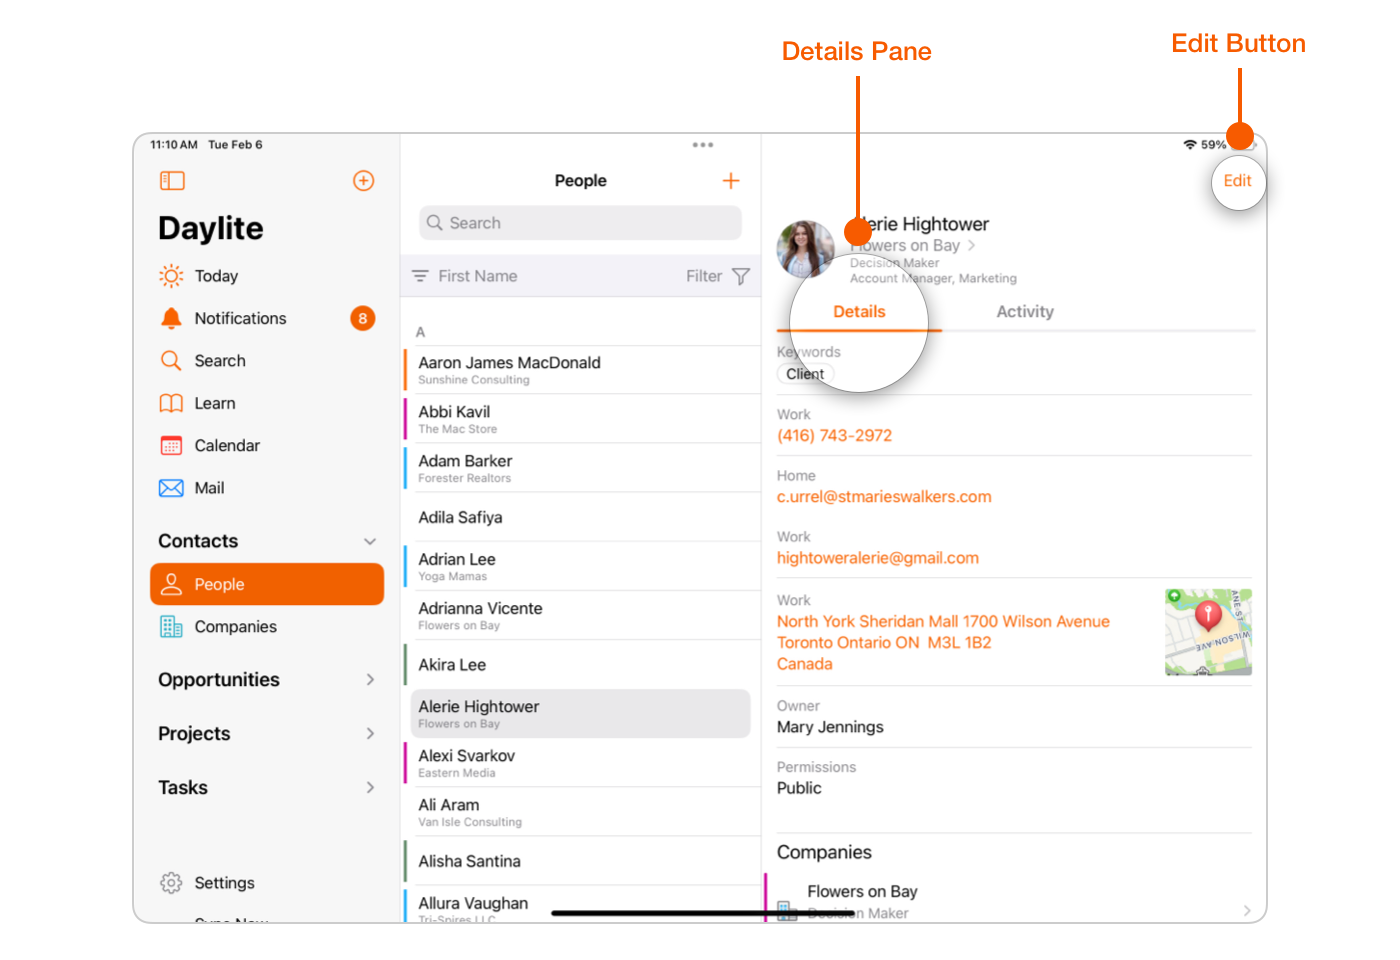
Tap **Edit** at the top of the Details pane, make your changes, then tap **Save**.
{% endtab %}
{% endtabs %}
## Frequently Asked Questions
**Can I link a Person to more than one Company?** Yes. Use **+ Add Company**, the **…** button, drag the Person onto the Company, or press **cmd + L**. Each link can carry its own Role, Job Title, and Department.
**What is the difference between a Role and a Job Title?** A Role describes the function the Person plays in a specific link, such as Decision Maker, and belongs to the link rather than to the Person. A Job Title is the title the Person holds at that Company. A Person linked to two Companies can have a different Role at each.
**How many Categories and Keywords can a Person have?** One Category and any number of Keywords. If you need more than one label on a Person, the extra classification belongs in Keywords.
**How many custom fields can I add to a Person?** Up to 12 custom text fields and 4 custom date fields. Set them up in **Daylite > Settings > Custom Fields**.
**Who can see a Person record I create?** By default, everyone — records are Public unless permissions are configured. Marking a record Private limits it to its Owner. Permissions are not turned on by default and need to be set up by an administrator.
**Can I change who owns a Person record?** Yes. The Owner is set to whoever created the record and can be changed to another user at creation or later. The created-by user and creation date cannot be changed.
---
# Agent Instructions
This documentation is published with GitBook. GitBook is the documentation platform designed so that both humans and AI agents can read, navigate, and reason over technical content effectively. Learn more at gitbook.com.
## Querying This Documentation
If you need additional information that is not directly available in this page, you can query the documentation by asking a question.
Perform an HTTP GET request on the following URL with the `ask` and `goal` query parameters:
```
GET https://docs.daylite.app/help/mac-fundamentals/contact-management/people.md?ask=&goal=
```
`ask` is the immediate question: it should be specific, self-contained, and written in natural language.
`goal` is what the user is ultimately trying to achieve, the reason they need the answer. Sharing it helps GitBook give you a better, more relevant answer. A goal is most helpful when it describes the outcome the user wants rather than restating the question. For example, with `ask=how do I create an API token`, a goal like `automate deployments from our CI pipeline` lets GitBook tailor the answer to that use case.
The response will contain a direct answer to the question and relevant excerpts and sources from the documentation.
Use this mechanism when the answer is not explicitly present in the current page, you need clarification or additional context, or you want to retrieve related documentation sections.