> For the complete documentation index, see [llms.txt](https://docs.daylite.app/help/llms.txt). Markdown versions of documentation pages are available by appending `.md` to page URLs; this page is available as [Markdown](https://docs.daylite.app/help/mac-fundamentals/contact-management/contact-integration.md).
# Sharing Contacts
Sharing your Daylite contact list with other apps lets you work cross functionally more efficiently. With your Daylite contact list shared with other apps, you can take advantage of the [features they offer](#benefits-of-sharing-your-daylite-contacts).
Daylite makes it easy to share your contacts with the Contacts app on the [Mac](#on-the-mac), [iPhone, and iPad.](#on-the-iphone-and-ipad)
***
## Benefits of Sharing your Daylite Contacts
Sharing your Daylite contacts allows you to see them in other apps, so you can add, edit, or leverage your contacts even when you're working outside of Daylite.
Here are a few examples of things you can do by sharing your Daylite contacts:
* Use Caller ID with your Daylite contacts on your iPhone.
* Use your iPhone and iPad camera with business card scanners.
* Make phone calls with Siri.
* Add Daylite contacts to Mail's VIP list.
* Import contacts to Daylite from other contact lists.
{% hint style="success" %}
**Pro Tip:**
Sharing your Daylite contacts with another program's contact application DOES NOT merge the databases together. When you share your Daylite contacts, each database is kept as its own contactgroup.
{% endhint %}
## Create App Specific Username and Password
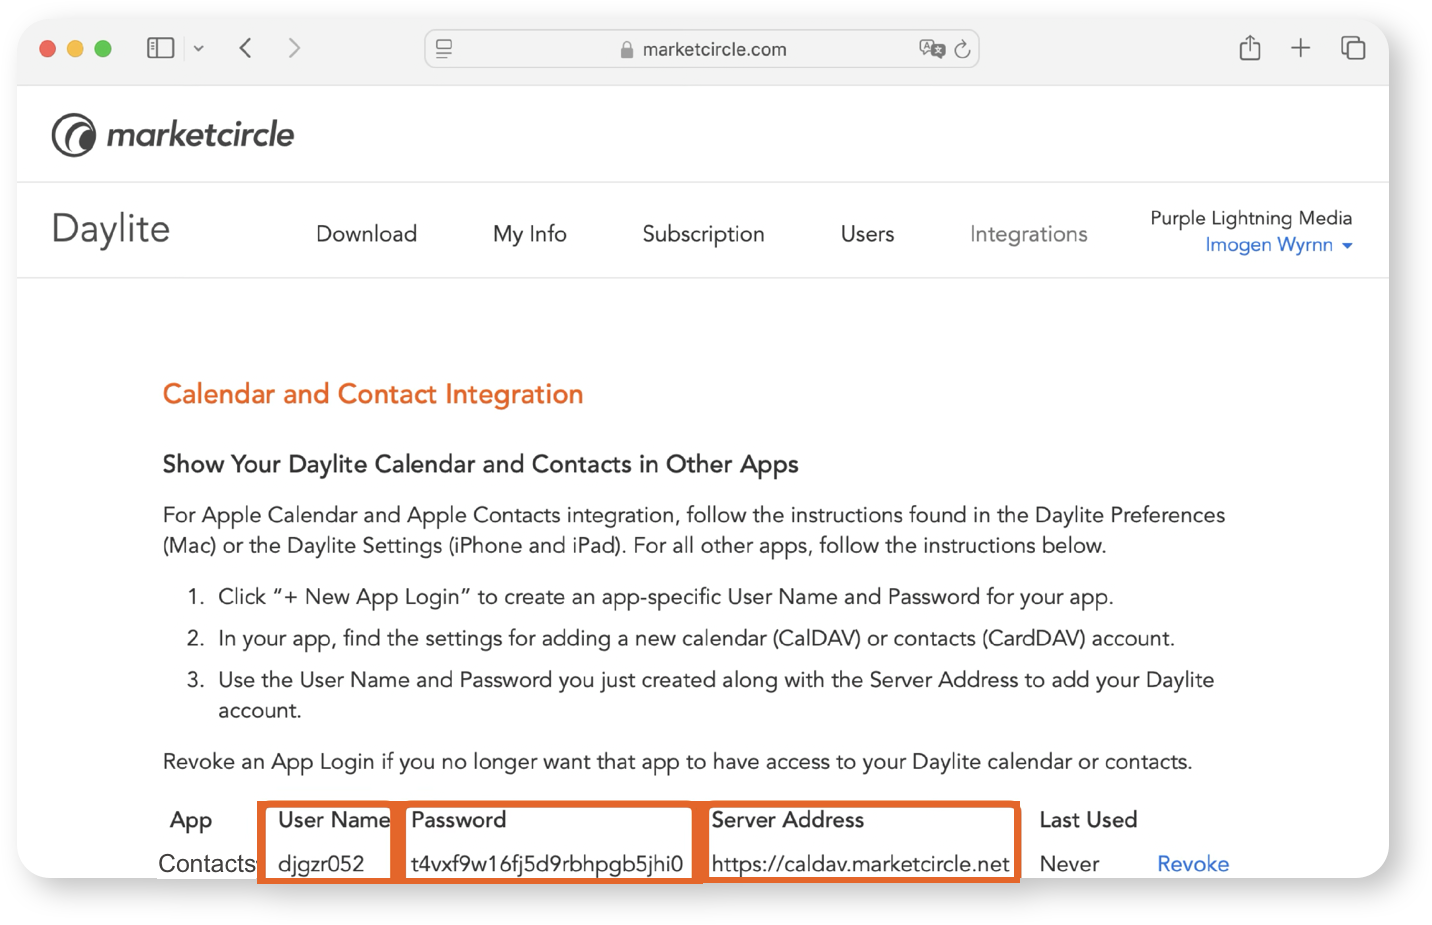
When you share your Daylite contacts, you create a unique app-specific username and password. This allows you to securely connect your Daylite contacts to other applications, like Apple Contacts, without using your main account credentials.
1. Log into [Account Manager](https://www.marketcircle.com/account/login)
2. Select **Integrations**
3. Click **+ New App Login**

4. Enter the name of the app or person you’re sharing with, then click **Generate**
Once completed, Daylite will generate a unique username, password, and provide you with a server address. Use these to add your Daylite contacts to a CardDAV-compatible contacts application.
Each time you share your contacts, a new set of credentials is generated. These credentials are specific to your device and application, meaning they won’t affect your main Daylite login. If you need to remove access or update your setup, you can manage these credentials from your **Account Manager**.
***
## Add Your Contacts to Apple Contacts
{% tabs %}
{% tab title="Mac" %}
1. Open **Contacts** and click **Contacts** > **Add Account**
2. Choose **Other Contacts Account...** and click **Continue**
3. Change the **Account Type** to **Manual**
4. Copy/Paste the app-specific **Username** and **Password** in the correct fields
5. Add the **Server Address**
6. Click **Sign In**
{% endtab %}
{% tab title="iPhone & iPad" %}
By following these steps, you can create a separate **Daylite Group** in your Apple Contacts app. Your Contacts in Daylite are reflected in Apple Contacts, which means your Contacts in both apps will always be up to date.
1. Open **Settings** > **Apps** > **Contacts**
2. Tap **Contact Accounts** > **Add Account**
3. Choose **Other Contacts Account**
4. Tap **Add CardDAV Account**
5. Copy/Paste the **Server**, and app-specific **Username** and **Password** in the correct fields
{% endtab %}
{% endtabs %}
Once you've entered your app-specific username, password, and server details, your Daylite contacts will be added to Apple Contacts. Your contact list will now sync automatically, keeping your address book up to date across your devices and apps.
***
## Make Daylite your Default Contact List
When you share your Daylite contacts, it doesn't merge your contacts with other databases. Instead, each will be kept in a separate contact list. Making Daylite your default contact list on the Mac, iPhone, and iPad means your devices will use the Daylite list automatically when adding or reading contacts.
{% tabs %}
{% tab title="Mac" %}
1. Navigate to **Contacts > Settings > General**.
2. Click **Default Calendar** and choose Daylite.
{% endtab %}
{% tab title="iPhone & iPad" %}
1. Navigate to **Settings > Contacts**
2. Tap **Default Account** and select your Daylite Account.
{% endtab %}
{% endtabs %}
***
## Add Your Contacts to Other Contact Apps
Daylite uses **CardDAV**, a standard protocol supported by many contact management applications. This means you can add your Daylite contacts to apps like **BusyContacts** or other CardDAV-compatible apps.
Most CardDAV-compatible apps will require your **server address**, **app-specific username**, and **password**, which you can generate in your **Account Manager** under **Calendar and Contact Integration**. If a port number is required, use **443**.
Refer to your contacts app’s documentation for specific setup instructions.
***
## Wrap Up
Now Daylite is shared with the Contacts app on the Mac, iPhone, and iPad. With all of your contacts in one place, Daylite helps you build more relationships, close more deals, get more done, and scale your business.
---
# Agent Instructions
This documentation is published with GitBook. GitBook is the documentation platform designed so that both humans and AI agents can read, navigate, and reason over technical content effectively. Learn more at gitbook.com.
## Querying This Documentation
If you need additional information that is not directly available in this page, you can query the documentation dynamically by asking a question.
Perform an HTTP GET request on the current page URL with the `ask` query parameter, and the optional `goal` query parameter:
```
GET https://docs.daylite.app/help/mac-fundamentals/contact-management/contact-integration.md?ask=&goal=
```
`ask` is the immediate question: it should be specific, self-contained, and written in natural language.
`goal` is optional and describes the broader end goal you are ultimately trying to accomplish on behalf of the user. GitBook uses it to tailor the answer towards what is most useful for that goal.
The response will contain a direct answer to the question and relevant excerpts and sources from the documentation.
Use this mechanism when the answer is not explicitly present in the current page, you need clarification or additional context, or you want to retrieve related documentation sections.