
Loading...
Loading...
Loading...
Loading...
Loading...
Loading...
Loading...
Loading...
Loading...
Loading...
Loading...
Loading...
Loading...
Loading...
Loading...
Loading...
Loading...
Loading...
Loading...
Loading...
Loading...
Loading...
Loading...
Loading...
Loading...
Loading...
Loading...
Loading...
Loading...
Loading...
Loading...
Loading...
Loading...
Loading...
Loading...
Loading...
Loading...
Loading...
Loading...
Loading...
Loading...
Loading...
Loading...
Loading...
Loading...
Loading...
Loading...
Loading...
Loading...
Loading...
Loading...
Loading...
Loading...
Loading...
Loading...
Loading...
Add your AOL account to Daylite.
Go to Daylite > Settings > Mail > Mail Accounts and select Add Mail Account.
Next, select AOL from the list of account types.
Enter the email address of your AOL account.
2-Step Verification Required
You must enable 2-Step Verification on your AOL Account to create an app password.
If you have already enabled 2-Step Verification, proceed to Step 5.
To turn on AOL 2-Step Verification:
Log into your AOL mail account and choose Security > 2-Step Verification.
Once 2-Step Verification has been enabled, click Generate app password.
Enter "Daylite" as the app name, then choose Generate password.
Copy the App Password that has been generated and paste it into the Password field in Daylite. Click Next to finish adding your AOL account to Daylite.
Add your Office 365 account to Daylite.
Go to Daylite > Settings > Mail > Mail Accounts and select Add Mail Account.
Next, select Office 365 from the list of account types.
Enter the email address of your Office 365 account.


Microsoft will ask if you are trying to sign into Daylite. Select Continue.
Choose a Description and Name for your account to identify it, then click Save.

Add your Outlook account to Daylite.
Go to Daylite > Settings > Mail > Mail Accounts and select Add Mail Account.
Next, select Outlook from the list of account types.
Enter the email address of your Outlook account.

Add your email account to Daylite to send, receive, and manage your email right in Daylite.
Microsoft will ask if you are trying to sign into Daylite. Select Continue.
Choose a Description and Name for your account to identify it, then click Save.


Your Contacts are at the very centre of your business. Importing your Contacts from other contact management applications should always be a straight forward process. Whether you are importing from Apple's Contacts, iCloud, Google, or any other format, Daylite makes that process easy.
Apple's Contacts application is built right into macOS. It is easy to import People and Companies from Contacts into Daylite, whether you're importing some Contacts, all Contacts, or just a specific group into Daylite.
In Daylite, select File > Import > Import Contacts.
Next, choose Import from Contacts app.
During the import process, you can assign specified Categories to your Contacts as you import them. For example, you could choose to assign a Category of Client to the first batch of imports, and Prospect to the next batch. Once these Contacts have been successfully imported, their Category will be updated automatically.
Select the Contacts you wish to import and then click the blue Import Contacts button.
Congratulations, you have successfully imported your Apple Contacts. Please note that only New Contacts are added. Daylite will update any dupliate Contact records.
You can also import Google Contacts into Daylite.
Log into , select the contacts you want to export and click Export on left hand column.
Choose vCard (for iOS Contacts) and click Export.
Open Daylite and choose File > Import > Import Contacts.
Select Import vCard from the list.
Navigate to your Downloads folder, select the .vcf file, and click Open.
If your contact manager or CRM doesn't support vCard exporting, or you are managing contacts in a spreadsheet, you can still import contacts into Daylite using the Import from Spreadsheet option. Microsoft Outlook for example uses a Comma Separated Values format, also known as a .csv format.
Open the contact application you are currently using and look for the option to Export.
Choose the format you wish to export to the Downloads folder. In this example, Microsoft Outlook does not give you an option to choose.
Open Daylite and choose File > Import > Import from Spreadsheet (CSV, TSV).
Click Browse and navigate to your Downloads folder. Select the file your application uses (.csv in Microsoft Outlook's case) and click Import.
Pro Tip:
If you cannot see the option to export as a vCard, you can contact the developer of the app for assistance, or check to see if you can export contacts from either a .csv format or other delimited text.
With your Contacts in Daylite, you can start exploring the interface and see how Daylite can take you further. Keep up the momentum and add your to Daylite, then start sharing your and with other apps.
If you would like help with importing from another major contact manager, CRM, or contacts spreadsheet we'd love to pair you with one of our
When you don't know how many deals are in your pipeline, it's difficult to know whether you need more deals to meet your goals or if you're taking on too many.
Whether you're a salesperson or a manager, Daylite helps you organize all your open deals so you can see how many you or your team have.
When you know how many open deals are in your pipeline, you can manage your workload more easily. Daylite's Opportunities Board lets you view all the deals in each of your Pipelines, so you can stay organized and focus on what's important.
Select the Opportunities Board from the Sidebar, then click the Pipelines filter to select the Pipeline you want to view.
All of the Opportunities assigned to this Pipeline are now shown.
The Opportunities Board also lets you filter your Opportunities by Owner, Forecasted Close Date, Date Created, Categories and Type.
If you're a sales manager, you need to be able to track your team's deals quickly and easily. You also want to see how many deals each salesperson is assigned. Thanks to Daylite's Opportunities Board, you can track each deal's sales cycle across your entire team, with a few simple clicks.
Select the Owners filter to view an individual salesperson's Opportunities, or choose All Owners to see your team's deals all at once.
Click on the Forecasted Date filter to view Opportunities that are forecasted to close by a certain date, such as next week or next quarter.
Click on the Create Date filter to view Opportunities that were created within a certain date range.
Click on the Categories filter to view Opportunities by the categories that you set up in Preferences, such as Gold, Silver, or Diamond Services.
Knowing how an Opportunity was generated is an important step to understanding where your advertising budget should be targeting.
Click on the Type filter to select Opportunities that were generated the same way, such as a trade show, social media, or inbound call.
By accurately tracking your deals, you can start to forecast sales demand and measure your workload. Daylite's Opportunities Board helps you see at a glance how many deals are in your pipeline. As a manager, you can expand this by looking across your entire team, as well as individual sales people.
Add your IMAP email account to Daylite.
Go to Daylite > Settings > Mail > Mail Accounts and select Add Mail Account.
Next, select IMAP from the list of account types.
Enter the email address and password of your email account.
Enter your Incoming Mail Server and Outgoing Mail Server information, as specified by your your email provider.
Microsoft Exchange Account
If you are adding a Microsoft Exchange account, you will need to contact your email administrator or email service provider to ensure IMAP is enabled, and to provide you with the server settings.
If you are the administrator of your Microsoft Exchange account and need assistance configuring IMAP, refer to Microsoft's .
When you start using Daylite for the first time, the calendar is a blank slate, waiting to be filled. You probably have schedules full of meetings, appointments and time blocked off for work, all of which are currently in other calendars, and all of which need to be imported into Daylite.
Before you learn about Daylite's powerfully integrated calendar functions, you will need to turn on Calendar Integration in Daylite. This way, you can view all of your calendars from other applications in Daylite, and also let other calendar applications view your Daylite calendar entries.
The ability to show all of your calendar entries from other apps is one of the great integration features of Daylite. Follow these steps to get started.
Sending out personalized letters to mark holidays or special events is an easy way to stay top of mind with your customers. But it’s tedious to organize all your customer's names and mailing addresses and you don't want to do this part by hand.
Daylite makes it easy to choose specific people and print out your contact list with Filters and Print Labels.
As you begin to use Daylite to its fullest extent you will notice your team beginning to work more efficiently. However, it may not make sense for everyone to have full access to your database. Employees for example do not need to see confidential HR records.
Daylite lets you control who can see or edit information.
Every business has sensitive information. That's why you can apply permissions to individual items in Daylite.
There are two types of permissions:
On these pages, you will find resources to help you understand and implement Daylite. Use the boxes below to jump to a section or just the sidebar to jump to specific articles.


From the Menu bar, choose Edit > Select All.
Choose File > Print.
Choose the print label you want to print.
Click Print.
With your print labels ready, you’ve done the hardest part of staying top of mind when sending holiday letters.
Open Daylite and select Daylite > Settings.
Select Calendar Integration.
Follow the instructions to give Daylite access to your other calendars.
Click the Add Calendar Account button to add optional calendars from other applications, such as Apple or Google.
Follow these steps to view Daylite's Calendar in Apple's Calendar app.
Select the Daylite Calendar in Other Apps tab.
Select Show your Daylite calendar in other apps and how you wish to view your appointments.
Click Install Daylite Calendar Profile.
If you would like to view Daylite's calendar entries in other calendar applications, you can click Go to My Account under In Other Apps.
As you can see in the screenshot below, Daylite has successfully been added to Apple Calendar.
Congratulations, you have just set up Daylite's Calendar Integration.
Now, when you create a new event in Apple Calendar, you will see Daylite as an option.
Apple Calendar is a familiar app for anyone using a Mac, and where many people will have their calendar stored. You can import your schedule from Apple Calendar to Daylite Calendar in a few easy steps.
Open Apple Calendar and select the calendar or calendars you want to export.
Click File > Export > Export.
The .ics file will export to the Download folder by default. Click Export.
Open Daylite and click File > Import > Import vCalendar.
Select the .ics files you want from the Download folder and click Open.
Google Calendar is a popular calendar app and gives you the option to export all your calendars as .ics files, which can be used to import into Daylite.
Open Google Calendar and click Settings.
Click Import & export and select Export from the drop down menu.
Select the calendars you wish to export and click Export. A ZIP file will be downloaded to your computer. If you open the ZIP file, you'll see individual .ics files for each of your calendars.
Open Daylite and choose File > Import > Import vCalendar.
Select the .ics file and click Open.
Select a Daylite category to match the Calendar from Google.
For multiple calendars repeat steps 6-8 until all your calendars are imported.
Most calendar applications, like Outlook Calendar or Fantastical, let you export your events.
Open the calendar application where your events are currently stored.
Look for an option to Export.
If you're given the option to choose from different file formats, choose .ics.
Open Daylite.
Choose File > Import > Import vCalendar.
Select one of the .ics files and click Import.
Match the Daylite category to the Calendar you imported.
For multiple calendars, repeat steps 5-7 until all your calendars are imported.
With your calendar in the same place as everything else, you don't need to jump around from app to app. Now you can focus on your work and let Daylite remember the details for you. Keep up the momentum and add your calendar to Daylite, then start sharing your Contacts and Calendar with other apps.
Edit: Only those with Edit Permissions on an item can edit an item they don't own. Denying edit permissions is useful when you have a Project that only a project manager should edit, or if you are documenting important decisions that you wouldn't want changed.
Choose Daylite > Preferences.
Choose Permissions then click On.
When prompted to restart Daylite click OK.
Assigning permissions is easy and can be done in a few clicks. You can change permissions at any point, and they will update on the next sync.
Select an item in Daylite and click Edit.
Click Permissions.
Select the appropriate permission and click Done.
When editing permissions, you will see the view and edit permissions for each person on your team as well as two presets: Public and Private. These permissions let you quickly allow or deny, view, read, and edit permissions for everyone.
Public: Anyone can view and edit this item.
Private: Only the owner can view and edit this item.
Pro Tip:
Instead of assigning permission to one person at a time, set up permissions for entire teams by Organizing Your People into Teams.
Give your team one place to store all their information, while making sure that the information is still sharable with the right people and teams.
If you find yourself somewhat limited using Microsoft Outlook to file, manage, and organize your email messages, you can improve your Outlook experience with Daylite for Outlook.
Daylite for Outlook allows you to add emails to your Contacts, Client Projects, and Sales Opportunities directly from your Outlook inbox. This means that instead of trying to manage your emails by creating numerous folders, or possibly overlooking them in your inbox, you can save all your client history in Daylite, where it's conveniently linked to the appropriate Contact, Project, or Opportunity for future reference.
To begin, you will need to install Microsoft Outlook from the App Store.
Open the app, and enter the email address and password you wish to add to Outlook.
If you are adding a non-Microsoft account click Continue when you're prompted to sync your messages to the Microsoft Cloud.
If you choose to Sync directly you will not be able to install Daylite for Outlook, or any other add-ins. For more info, see .
Outlook will now display your email accounts on the left hand side of the app.
Daylite for Outlook is what we refer to as an add-in. This means Daylite acts alongside Outlook, blending in seamlessly with the app to give you the very best experience possible.
Select an email account, then tap the ... icon and choose Get Add-ins.
If the Get Add-ins row is greyed out and you can't click it, make sure you set up your email account in Outlook correctly. See the section above "Installing Microsoft Outlook on Your Mac".
You will need to add the Daylite add-in from the Office Add-ins page. Begin by searching for "Daylite" and clicking it from the search results.
Install the Daylite add-in by clicking Add.
Now that you have added the Daylite add-in to Outlook, select an email message.
Select the ... menu and choose Daylite.
The pane will now be displayed on the right hand side of Outlook.
Be sure to click the Pin icon so that the Daylite pane will remain open at all times. If the Daylite pane isn't pinned, it will close each time you select a different email.
Select Connect to Daylite to link your Daylite account to the Outlook app.
Daylite for Outlook asks for your permission to access your Daylite account.
Once this is done, you can now add your Outlook emails to Daylite!
How can Daylite for Outlook make your business more productive?
Let's say you attended a trade show this past weekend, where you handed out brochures with your contact information on them. This morning when you checked your inbox there was a message from one of the attendees, asking about your services.
Click the grey + Add to Daylite button to add this email message to Daylite.
Once added, this button will change to orange, and now says In Daylite.
Daylite will scan the participants of the message and the attendee would appear in the Daylite pane as a Suggested Contact.
Click the Suggested Contact's name to add them as a Contact to Daylite.
Now you can enter in all of the information you have on hand for this New Contact. Don't worry, you can always update this Person record as time goes on.
Click Save Person when you are done.
When adding a new Contact to Daylite, you may wish to add them immediately as a New Opportunity, or maybe you have a meeting scheduled with them and want to create a new appointment from this email.
Click which Object you want to add to the email and fill in the appropriate information.
Pro Tip:
You can use the Search button to link other Contacts to the email if they aren't suggested, but are related to the email. You can also do this with Projects, Tasks, Appointments and Opportunities.
If we continue the example above, now that you have used Daylite for Outlook to create a new contact and add the email to Daylite, it is now time to see what exactly that looks like in Daylite.
Daylite links the "Trade show follow up" email to the new Contact's record. You can view the email chronologically in the Activity View.
Double-clicking the email opens it in a slide-over view where you can see the full email content.
Daylite for Outlook doesn't just keep track of email you receive, it can also add email messages you compose and send. You can link and create all the same things, too, including Contacts, Projects, Opportunities, Attachments, Tasks, and Appointments.
Before you begin to compose your new message, remember to select Daylite from the … menu and pin it to the Outlook sidebar.
Click the New Mail button in Outlook.
Click Add to Daylite to link the email to the Contact's record in Daylite.As you add recipients and attachments to your email they will appear in the Daylite sidebar as greyed out Suggestions, as well as any associated Projects or Opportunities.
You can click the Search button if you need to link additional items to the email.
If any of these items are not added to Daylite after clicking the Add to Daylite button, you can manually add them by clicking on the individual Item.
Attachments will also appear in grey, which means they have not been added to Daylite yet. Click on the attachments to add them to Daylite. They will change from grey to blue.
Creating that "personal touch" with each of your customers helps keep you Top of Mind, but typing a personalized email every single time can be daunting and unrealistic. Eventually, your Contact list becomes too large, and you need a way to send a large number of emails, often referred to as bulk emails.
Daylite helps you grow your reach AND stay top of mind, saving you time while staying personal with Letter Templates.
Letter Templates let you send emails that are personal, but also scalable as your contact lists grow. They do this by allowing you to write a standardized email while pulling information directly from Daylite so it's both personalized and specific to the person you're sending it to.
Here's how you make a Letter Template:
Along the menu bar choose Daylite > Preferences.
Select Letter Templates.
Click the + button to add a new template. Give the Letter Template a name, and double click to edit.
Fill in the Letter Template accordingly.
Here is a sample Letter Template you can use. You can copy/paste the text below and customize as needed. Replace the bolded text with your own content.
Hi <$contact.firstname$>,
The clients I work with often face a personal or business challenge that you can solve. Have you experienced anything similar?
If so, I have several ideas that might help -- like A Quick Tip to help this problem. If you’d like to hear more, I'd love to have a chat with you.
Pro Tip:
Add more personalization by double-clicking on additional merge keys on the right-hand side of the Letter Template window.
When you want to send an email to either one individual or a group of people, select them from your Contact list, then:
Along the menu bar choose Edit > Merge > Write Letter in Daylite
Select the letter template you wish to use.
In Title field, type the subject you want to use for your email.
Review the email and, when ready, send the email to your selected contacts.
Congratulations! You have just created and sent your first Letter Template.
For even more powerful email integration, check out the for MailChimp integration or the
You've now created your first letter template. To take it to the next level, learn how to create a follow-up schedule in
So much can happen all at once, and it's easy to forget when something is due. Missing deadlines can increase your stress, tarnishes your reputation and stops you from reaching your goals.
With Daylite, you can create dashboards that will show you what Tasks are due within any time period you want. When you create Task dashboards, you can stay on top of your Tasks and make sure you always meet your deadlines.
When it comes to organizing your Tasks, Filters are key. Filters show you only the Tasks you want to see, by showing or excluding Tasks with certain properties. When you save your filter, it becomes a Smart List, which is a list that updates all on its own. You can use this list as a dashboard for your Tasks.
Click All Tasks.
Click the Filter icon.
Set your first filter to Created by Current User.
Click + to add a new filter.
Set your next filter to Status is Open.
Click
Your Filter should look something like this:
Once you're happy with the filter, click Save As Smart List and name it accordingly.
You can create whatever dashboards you need to have the oversight over your Tasks, and the Tasks of your team.
Focus on the future and feel less stressed over looming due dates by staying on top of them. Create a Due This Month Dashboard and execute on your plans. Now you're ready to create reminders for those due dates so you can get notified when things need to get done in
Where is most of your business coming from? What source gives you the best leads or has the highest conversion rate? If you’re not tracking your lead source, you won’t know what to ramp up, what to focus less on, and where there’s opportunity ripe for the picking.
With Daylite you can track where your deals are coming from, use tools to analyze which sources are working and which ones aren't so you can make better decisions, and spend more time focusing on higher generating sources.
In Daylite, you track your deals by creating Opportunities. If you haven't created an Opportunity, check out How to Capture New Business first.
Your deal source is where the lead heard about you. Here are a few examples:
Referral
Trade Show
Social Media
Before you are able to track your sources, you need to create those options in Daylite.
From the menu bar click Daylite > Preferences
Choose Opportunities
Click + and type the name of the source
When you have a new potential deal, create a new Opportunity in Daylite and click Type, and then select the source.
Now that you're tracking your deals by source, you can use Daylite Reports to show you which sources are helping you acquire the most amount of new business.
For more ways to use Insights to measure your deals, read
Select Reports
Select Opportunity Analysis
Choose your date range
Click Run
Which sources are generating the most and least leads
You can't close deals in a market that doesn't exist. That's why knowing where the most leads are coming from is a powerful tool in determining whether or not a source is worth continuing with.
Which sources are generating the most and least revenue
How do you know if your marketing dollars are working? You need to be able to track the revenue you earn on Won Deals and clearly see which ones are generating you the most and least amount of revenue, and whether you're getting an ROI on your marketing.
By tracking the source of leads for your business and reporting on trends, you can identify which sources are generating the most new business. These insights will help you make better decisions for your business.
In a business, decisions are made every day, but many people don't document why they were made. This blind spot creates serious risk when the issue comes up again and no one remembers why they went down a certain path.
When you use Daylite to help remember your decisions, you will always stand on firm ground when you're considering a change of direction.
The first step to documenting your decisions is to create a Note Category. This will help you differentiate decisions from other types of Notes, and allow you to create filters and Note lists.
Choose Daylite > Preferences then select Categories.
Select Notes.
Click the + symbol to add a new Category and name it Decisions.
Pro Tip:
Make your decisions stand out by choosing a Category colour in the colour picker.
Next, you can gather all your decisions in one place with a Note Smart List.
In the Daylite Sidebar select Notes.
Click the Filter button.
Set your filter to Match all.
Documenting your decisions in a Decisions Smart List is a great way to stay focused, but what if you want to share your new Smart List with your team?
Sharing Smart Lists is quick and easy.
Hover your mouse over the Decisions Smart List icon on your sidebar.
Click Shared With and choose who you would like to share your Decisions Smart List with.
Now everyone on your team will be able to trace back any past decisions, as well as contribute to the current decision making process.
The sum of a business often comes down to the decisions made over its history. Documenting your decisions allows you to look back at those pivotal moments, helping you to understand and make better decisions in the future.
7 minute read
It is important to ensure that when inviting people outside of your company to meetings all logistics and details get into both of your calendars, so everyone remembers to be there and has the information they need. Daylite allows you to add external people as invitees to the appointments you create, sends them an invitation by email, notifies you of their responses, and records their replies in Daylite - keeping everything in one place so nothing falls through the cracks!
The Meeting Invite functionality within Daylite -
One advantage of staying Top of Mind is you don’t always have to chase leads, because business often comes to you.
Daylite has the tools you need to stay top of mind with your customers, by keeping all that new potential business organized, with email templates and list building capabilities built right in.
Letter Templates are the number one way to save time when staying top of mind with your prospects. Letter Templates give you a way to consistently message groups of people, while still giving them your own personal touch.
Here is an example of a Letter Template that uses a Contact’s first name and their phone number kept in Daylite.
The ability to track your Close Rate is an integral part of the sales process, as it helps you identify areas of opportunity for increasing sales.
For example, if you know your Close Rate is currently sitting at 30%, and your goal is to land three new clients this quarter, this tells you that you need ten more deals in the Pipeline to make that goal.
It is important to change the State on the Opportunity when a deal closes, regardless of whether you won or lost the deal.
Customer referrals are an excellent sign that you are doing something right. Strong relationships are one of the cornerstones of a successful business, and when you make a good impression on people you’re likely to get more referrals.
Daylite helps you build strong relationships by letting you see how many referrals your clients are sending you. Acknowledging your best referrers for the business they’ve given you encourages even more referrals, building your "book of business" through the referral process.
The easiest way to capture a referral is to create a new Contact for the referral, and then link the referrer to that Contact.
Your Contact list is made up of many different groups, each Contact has a different relationship with you, and each group is always changing. Keeping up with those changes can feel like a full time job. So how do you segment your Contact list in order to keep up with you?
In Daylite, you can segment your Contact list with filters. Save these filters, and they will automatically update whenever a Contact changes.
There are an infinite number of ways to segment your Contacts. The following example demonstrates how you could target people who you haven't been in contact with.
Learning to say no to a client that is asking for "just one more thing" can often be difficult. You feel like you are forced to say yes, even though your plate is already too full to handle. Maybe you say yes because you are afraid to alienate a client, but you have to balance that "yes" with the knowledge that something else may have to take a lower priority.
Daylite's Worklist gives you visual reminders of your top priorities, helping you to stay better organized.
The Worklist groups your top priorities for today in one location, making them easily viewable. It's important to be realistic about what you can do in a day, and that's why you want to keep this list focused and small. Try to limit your Worklist to a maximum of three to five Tasks. If other items come up that take priority, review your Worklist and decide which ones need to be removed. By keeping your Worklist small, you can stay focused on your day's most important Tasks.
Add your Yahoo account to Daylite.
Go to Daylite > Settings > Mail > Mail Accounts and select Add Mail Account.
Next, select Yahoo from the list of account types.
Enter the email address of your Yahoo account.


Set your final filter to Due Date is this month.


<$me.firstname$>
Click Merge.


Save the filter by clicking Save as Smart List.
The list will appear on the left hand side, rename it Decisions.


Remember - When adding other Daylite users as invitees (internal invitees), they are invited directly with a push notification and the appointment will show in their calendar. They will not receive an invitation by email.
Invite external meeting participants with confidence and ease. Here’s how!
When creating or editing an appointment in Daylite, you can seamlessly add an external person(s) from outside of your company (someone that is not a Daylite user) as an invitee to the appointment. You can distinguish internal invitees (a) from external invitees (b) from the icon accompanying their name in the appointment card.
You will see more details and options regarding the invitation of an external invitee by clicking the status text to the right of the invitee token. The following items are shown:
Current invitation status
Sending Invitation, Invitation Sent, Email Not Delivered, etc
Invitee’s name and email address: used for invitation/update emails
Required: mark an invitee's attendance as required/optional
Change Response: manually set response for this invitee
Resend Invitation (or “Send Invitation” if not sent yet)
An invitee can be marked as required or optional for a meeting (this is informational only and doesn’t change any functionality). The default is “required," however, this can be changed when adding an invitee or editing an appointment later, by clicking the status text to the right of the invitee token and selecting "Optional". The status text beside an invitee will then show “(Opt)”
When you are done editing or creating the appointment, you are prompted to send the invitation email. You can customize this email before sending by editing the subject and message, choosing the language, whether to include the details field, and whether to show the list of invitees to everyone.
(a) If you do not wish to show the invitees, the email will include only the person organizing and the individual person who is receiving the email invitation;
(b) If you select ‘show invitees’, all invitees will be listed at the top.
(c) You may also choose not to send out invitations using the “Don’t Send” button, which you might do if you have already discussed when to meet by some other form of communication such as phone or messaging.
(d) Clicking the “Cancel” button will return you to editing or creating the appointment in case you want to make further adjustments before sending out invitations.
The invitation email will look like this to the invitee. They can use their calendaring service or application (Outlook, Google, Apple Calendar, etc.) to reply.
The status can be seen for each invitee in the appointment detail card, and will change from (a) “Sending Invitation” to (b) “Invitation Sent” once the email is sent.
If you choose “Don’t Send”, then the status will show as “No Invitation Sent”.
On occasion, you may need to resend a meeting invitation to a participant(s).
To resend an invitation to a single invitee, click on the status text to the right of the invitee token, and choose “Resend Invitation…”
If the invitee(s) have not been sent an invitation before, their option changes to “Send” invitation (rather than “Resend”)
To resend invitations to all invitees, click on the “invitees” label in the detail card, and choose “Resend Invitations…”
When you cancel or make a change to an appointment for which invitations have already been sent, another email may need to be sent to notify those invitees of the changes.
Not all appointment changes require notifying invitees. Minor changes requiring no update could include updating the category or keyword on the appointment, changing the subject or details.
The more major changes that are important to update invitees about are changes that affect the scheduling, such as the date, time, or location.
Sending updates on major changes to an appointment may require invitees to respond again. In this case, when updating, select the option to “Clear Responses” for any invitees that have already responded.
Here is what the update email looks like to the invitee. They can use their calendaring service or application (Outlook, Google, Apple Calendar) to reply.
Changing the status of an appointment to cancelled/postponed, putting an appointment in the trash, or removing an external invitee, will require an email to notify the invitee(s) that the meeting is cancelled, so you will be prompted to send a meeting cancellation email.
Here is what the cancellation email looks like to the invitee.
If the appointment’s end date/time is in the past, an update or cancellation email will not be sent.
When the status of an appointment is changed from cancelled/postponed to any other status, you will be prompted to send a new invitation to the external invitees.
In the case an appointment is restored from the Trash, there will be no prompts regarding this meeting until the appointment is edited again.
When an external invitee responds to a meeting invitation, their calendar service or application sends a reply to Daylite - resulting in an update to the appointment, indicating the invitee's response of accept/decline/maybe. A push notification will be sent to inform you of the response (a), along with a notification in Daylite (b).
Expanding the invitee status menu allows you to see a summary of the current invitation status. Here are examples of some summaries that are shown:
Invitation emails will be previewed before sending
Sending invitation emails to 3 invitees…
Invitation emails sent to (#) invitees on <date and time>
No invitation emails have been sent
Sometimes you may receive a response from an external invitee using some other form of communication (ie., phone or messaging) of whether they will be attending or not. In this case, you can manually change the response for that invitee to record it in Daylite. If the invitee later responds using their calendaring application/service, it will be updated in Daylite with their latest response.
There may be a problem delivering the invitation email, either because the invitee email address does not exist or there is a temporary problem with the invitee’s email account or email server. In this case:
a) The status for the invitee will show “Email Not Delivered”, with more details available by clicking the status
b) A push and Daylite notification will be sent to the owner of the meeting to inform them of the error
c) A suggestion as to how to resolve the problem will be provided, including: resending the invitation, re-adding the invitee with a different email address, or contacting support if necessary
There is full offline support for this feature. Anything meeting related done offline is saved locally and synced when you are back online. Once you have synced, any emails related to meetings will be sent.
To create a Letter Template follow these steps:
Choose Daylite > Settings > Letter Templates.
Click on the + sign and name your Letter Template.
Double-click your new Letter Template, then create a message that you can use to stay top of mind.
Be sure to utilize the Available Merge Keys to autofill your Template.
Pro Tip:
Daylite can use the Letter Templates title as the subject of the email. So, if you have a subject in mind, use that as the Title of the Letter Template.
Classifying your Prospects makes it easy to find your Contacts and track them as they move through your funnel. They give you a quick colour coded visual representation of a Contact, as well as making creating lists easy.
Once you have imported your Contacts you can follow the steps below.
Select the Contacts you want to modify.
Choose Daylite > Edit > Bulk Edit.
Click the checkbox next to Category and select Client Prospect from the Category menu.
Click Apply.
Now, all the Contacts you selected will have the category Prospect applied to them, allowing you to keep track of what type of Contact they are to you, and do things like building a list of just your Prospects you need to contact.
A Prospecting List is a list of people who you plan on contacting, usually for the first time. In Daylite, the Prospecting List is designed to search your Contacts for all your Prospects, and it automatically updates as you add or change a Contact's Category.
Select People from the Daylite sidebar, then click the + button in the bottom left corner of the sidebar and select New Person Smart List.
Your Smart List will start out looking like this:
Click the + sign to add additional lines as needed.
Click Activity and change to Category > is > Client Prospect.
Click the … button to add a new filter line.
Select Do not match any of the following.
Select Activity > in last > 60 > days.
Choose Opportunities > at least one > match all of the following.
Choose State > is > Open.
You can email the people in your Prospecting List one at a time, however it’s more efficient to send out a bulk message using a specified Template. Daylite will create personalized emails for each Person in Apple Mail that you can review and send out. This way you can write a consistent message, and also reduce the time it takes to send emails.
Select the Contacts you want to email, then navigate to Edit > Merge > Write Letter in Daylite.
Select the Template you want to use.
Create a Title for your email.
Select Email with compose window from menu.
Select Merge.
Pro Tip:
Save time linking and sending emails by turning on Daylite Mail Assistant auto linking and send emails with the keyboard shortcut Command-D
Daylite helps you organize your Prospects, create bulk email templates, and nurture those important relationships to help stay top of mind.
Do you have a question about what workflow is best for you? Book your free business consultation today.
Is your Prospecting List becoming too large to keep organized? Consider integrating Daylite with an email marketing tool like MailChimp or Direct Mail.
Locate the Opportunity and click Edit.
Select the state field and choose either Won or Lost.
Click Done when finished.
When you choose a State for your Opportunity you can also explain why you Won or Lost. These are called Opportunity State Reasons, and are set up in Daylite Preferences.
Navigate to Daylite > Preferences > Opportunities.
Select Opportunity State Reasons.
Click the + button.
Enter an Opportunity State Reason and State.
After setting up Opportunity State Reasons in Daylite Preferences, open an Opportunity and click Edit.
Select the field under the state menu, and choose the Opportunity State Reason.
There are a couple of ways that you can begin to break down and analyze you Close Rates within Daylite.
The Win vs Loss Report is a quick and easy way to see how many deals you have Won, how many deals you have Lost, and the Total Amount of Revenue associated with each.
Choose Reports from the Daylite Sidebar.
Choose Opportunity Reports, then select Opportunities Won Vs. Lost.
You can also use the Insights View for a more in depth analysis of your Close Rate.
Choose All Opportunities from the Daylite Sidebar.
Select Insights View from the Daylite Taskbar.
Hover your mouse over Won or Lost in the State Category to see more detailed information about your selection.
By tracking your Close Rate, you can make better decisions about forecasted sales, how many leads you need in the Pipeline, and track improvement in your sales performance.
For assistance creating a New Opportunity, check out How To Capture New Business.
For more information about using Insight View to it's fullest potential, check out Using a Data Driven Sales Approach.
Create a new Contact for your referral by choosing the New Person button.
Fill in the details for your new referral, then click Add Person and choose the existing Contact who referred you to the new Contact.
Select was referred by from the Relationship menu. You can set up your own custom Relationships in the Daylite Settings.
You can now see who referred your new Contact by scrolling down to People in the Details pane. Click the arrow button beside the referrer's name to view the Contact.
You'll notice that the Detail Card of the referrer Contact now also shows who they referred.
After you have captured your referral in Daylite, you can filter your referrals to see all the Contacts that have been referred by a specific Person. This way you can thank the person for their referrals, and be specific about who they referred to you.
As an example:
Click the Filter button.
Select People > at least one > match all > of the following.
Select Name > contains and type in the Contact name.
Click the + to add a row and then select Relationship > is > was referred by.
Tracking referrals can catapult your business to whole new levels, making you stand out in your client's eyes.
If tracking your referrals is important to your business, you may also want to consider engaging a Daylite Partner to help you customize reports and integration based on your specific needs.
You can book a call with one of our advisors to be paired with the right partner for your needs.
Ready to take things to the next level? For an introduction in creating filters and segments of people, read How to Segment Your Contact List.
Open Daylite and click the Add Filter icon.
When you click on the Add Filter Icon, you will see the Filter popover. Each row can be configured to filter by a different field.
What do you want to filter?
How do you want to filter the search?
You can add additional sub-filters.
To filter Contacts without recent activity, update the filter.
Set your Filter to Match All.
Filter for Categories that are Leads..
Click ... to add a sub-filter.
Set the sub-filter to Do not match all.
Click the first pop-up button and select Activity.
Choose in last and type 90 days.
Your Filter should look like this:
Click Save As Smart List.
Name the Smart List Leads Going Cold.
Every Filter you create and save as a Smart List is automatically placed in the Daylite sidebar.
When you segment your Contact list, you stay more organized and gain new insights about the people and businesses in you contact list.
Want to see how you can take the Smart List you made further?
Find out how you can stay Top of Mind with Reminders to follow up.
When you select either an existing Task or create a New Task, you can add it to the Worklist by clicking the pin icon within the Task itself.
A Task that is in the Worklist will have an orange pin icon. When a Task is no longer a priority, click the pin again to remove it from your Worklist.
After you add a Task to the Worklist, you can view it immediately from the Home View, as well as on the Daylite Sidebar under Tasks.
The Worklist can be found directly under the Due Today and the Overdue sections of the Home View. Because the Worklist is an important part of staying organized, it will appear even when there are no Tasks in it.
You can also view and add items to your Worklist from the Daylite Sidebar.
Due and Overdue Tasks are grouped together, and you can add a new Task to your Worklist by clicking the + New Task button.
When prioritizing your Tasks and focusing on the most important things becomes second nature, your ability to execute on your plans will increase exponentially. Thanks to Daylite's built in Worklist, you're able to easily see what you've committed to and which Tasks are most important.
For more strategies on improving how you focus on the right tasks, check out How to Accomplish More by Doing Less.
2-Step Verification Required
You must enable 2-Step Verification on your Yahoo Account to create an app password.
If you have already enabled 2-Step Verification, proceed to Step 5.
To turn on Yahoo 2-Step Verification:
Log into your Yahoo mail account and choose Security > 2-Step Verification. If you need more detailed instructions, follow this article from Yahoo.
Once 2-Step Verification has been enabled, click Generate and manage app passwords.
Enter "Daylite" as the app name, then choose Generate password.
Copy the App Password that has been generated and paste it into the Password field in Daylite. Click Next to finish adding your Yahoo account to Daylite.

Daylite integrates with Zoom, Google Meet, and Teams to streamline the process of scheduling and joining video calls. When creating a meeting in Daylite, you can generate a meeting link directly from the appointment. This link is automatically added to the meeting and shared with attendees—both internal and external—through calendar invites and emails. Once the meeting is scheduled, joining is as simple as clicking the link from your Daylite calendar or the appointment details.
Before you can add meeting links to appointments, you need to connect your video conferencing account to Daylite.
Go to Daylite > Settings > Account in the Daylite menu.
Click the Manage Conferencing... button.
Daylite will load your account's Conferencing settings in your default browser.
Click the Add button next to Zoom. If you're not already signed in, you'll be asked to log in to your Zoom account.
You’ll return to your Conferencing settings, where Zoom will appear as connected. Daylite is now connected to your Zoom account, allowing you to add Zoom video call links to your meetings.
Once configured, you can add a meeting link directly from any appointment in Daylite.
Create a new or edit an existing Daylite appointment.
Click the Meeting Link dropdown.
Choose the video conferencing you want to add to your meeting
A placeholder will appear in the appointment details, once the appointment is saved the meeting link will be created.
There are two ways to join the meetings from Daylite.
The first option is to click the Join button on your appointment in the Daylite calendar.
The second option is to click the Join button from the appointment details card.
If a meeting no longer needs a meeting link, you can remove it directly from the appointment in Daylite.
Open the appointment in Daylite.
Click the Meeting Link dropdown.
Select Remove.
Save the appointment.
After syncing, the meeting link will be deleted from your video conferencing account.
You can disconnect a video conferencing service from Daylite at any time. This will remove Daylite’s ability to create meeting links for that video convernecing service.
Go to Daylite > Settings > Account in the Daylite menu.
Click the Manage Conferencing... button.
Daylite will load your account's Conferencing settings in your default browser.
Open the configuration dropdown menu next to your video converencing service and click Delete.
Either approach will immediately remove video conferencing from your Daylite account and Daylite will no longer be able to create meeting links. Existing meeting links will remain active and continue to work as long as your video conferencing account remains active and the corresponding meetings are not deleted.
It is possible for Daylite to be unable to generate a meeting link and will notify you via-Push Notification if there a problem. If you receive a Push Notification informing you of an issue generating a meeting link follow these steps to resolve the issue:
Click the Push Notification alert.
Daylite will present the alert in the Notifications popover. Click the More... button of the alert to be presented with the details of the appointment affected by the error.
In the meeting link info box details about the error will be presented. First attempt to resolve the issue by clicking Retry in the meeting link dropdown menu.
If the error persists, you will receive an additional Push Notification indicating an error. In this case click
If you continue to experience issues with meeting links please contact our .
Closing deals means making a lot of commitments, often months in advance. If you forget to follow up just once, your customer may lose confidence in you, and you run the risk of all your hard work unravelling. Tasks with reminders are the best way to make sure your commitments are followed through. No matter how long ago it was added to Daylite, you'll get a reminder to follow up.
Daylite reminds you of your commitments no matter when they were made, so you can be confident your deals get done.
Automatic reminders make sure you don't forget to add a reminder to your Tasks. This lets you focus less on remembering to remember, and more on driving your business.
Choose Daylite > Preferences and choose Notifications.
Click Tasks.
Click None and select on due date so you get a new notification.
With the date and time picker, choose when you want a reminder.
Select the checkboxes labelled New Tasks and appointments I create,Receive items through delegation or invitation, and Disable reminders for tasks marked as Done.
Pro Tip:
Add as many as reminders as it takes to give you peace of mind that thing's won't get forgotten.
The easiest way to create a new Task is the New Item button. This button will change depending on what you're viewing in Daylite, so to create a new Task, click My Tasks from the Sidebar, then select + New Task.
Your task will now have a reminder added by default. You can change the reminders here if they don't fit your needs.
Click the
Now that you have a reminder assigned to your Task with a due date, you have peace of mind knowing that you will get notified to follow up by Daylite no matter when it is due.
Pro Tip:
Save clicks by setting up a Default Due Date for Tasks.
Choose Daylite > Preferences > Defaults Values and click Tasks. Select the checkbox next to Automatically Set Due Date and choose how many days after today you want all Tasks due.
When a reminder comes due, the notification bell in Daylite turns red and the Daylite icon on your Dock shows how many pending notifications you have.
Click on the notification bell, and you will see your reminder with the name of your Task and these options:
Status checkbox: Click if the Task is completed.
More: Go to the Task in Daylite for more details.
Snooze: Snooze the reminder with pre-set time increments.
Dismiss
Even if you are not in Daylite, push notifications will remind you on your Mac, iPhone and iPad.
You can customize push notifications in System Preferences for macOS. Select the Notifications icon.
Turn on Allow Notifications.
You can also turn on Daylite notifications in the Settings for your iPhone and iPad.
Tasks and Opportunities can appear on your Calendar and Home screen. This way you have a visual reminder when a Task is due or deal should close. Opportunities don't have Reminders like Tasks, and instead use forecasted close dates. For more on using Opportunities to track new business, check out
To add Tasks and Opportunities to your Calendar:
Click My Calendar.
Click the Calendar View Options.
Select Show Tasks and Show Opportunities.
The Home Screen acts as your daily and weekly dashboard. Overdue Tasks and Opportunities, as well as ones that are due within the next week, will appear on your Home Screen.
Make a habit of reviewing the Home Screen every day. First, check for anything overdue, then prepare for the week by reviewing what is due in the next 7 days.
Don't lose deals because someone forgot to follow up. Use Reminders to keep you organized, on track, and focused on your priorities. Spend your time working with potential customers so you can close more deals. Now you're ready to track all the details of your business by
Daylite works well for a single person, but when used with your team, you really start to see the difference. With everyone on your team using Daylite, processes become streamlined, and everyone works together better.
When you add someone to Daylite, you invite them to your account by email. Only a Daylite account owner can invite team members to Daylite. After an invitation is accepted, you are charged based on the amount remaining in your billing cycle.
Invite your team to Daylite and take your business further.
Choose Daylite > Settings and select Users and Teams.
Click the + in the lower left-hand corner.
Click Manage Account....
After you click Manage Account... your browser will open to Account Manager. Please note that you must have empty seats available to invite people to join. If you have more than one person to add, repeat the steps in Account Manager until you have invited everyone.
Click Invite New User.
Type the email address of a person you want to invite to Daylite.
Click Send Invitation.
Ask your team to check their inbox for the invite and have them do the following:
From the invite email, click Accept Invitation.
Enter your email and password, then click Sign In.
Follow the Welcome instructions.
Navigate to the Downloads folder and drag the Daylite application to the Applications folder to install.
Follow the steps within the installer. Once the application has been installed, log into your account with the email address and password you used to create your account.Installing Daylite on an iPhone or iPad
Your team can also log into Daylite on their iPhones and iPads. While they should have received these steps by email, you can send them the steps here:
Open the iOS App Store.
Search for Daylite and tap Get.
Open Daylite and log into your account with the email address received and password you used to create the account.
Daylite will help your business increase communication and your team will work together better. By adding your entire team you can build and nurture more relationships, close more deals, and execute on your plans.
Take your business further and get ready to scale by .
Sharing your Daylite calendar with other programs lets you work cross functionally, and more efficiently. With your Daylite calendar available in other apps, you can take advantage of the features they offer as well.
Daylite makes it easy to share your calendar with the Calendar app on the Mac, iPhone, and iPad.
Sharing your Daylite calendar allows you to see your appointments in other apps, so you can add, edit, or leverage your calendar even when you're working outside of Daylite.
Pro Tip:
Sharing your Daylite calendar with another program's calendar application DOES NOT merge the databases together. When you share your Daylite calendar, each database is kept as its own calendar group.
When you share your Daylite calendar, you create a unique app-specific username and password. This allows you to securely connect your Daylite calendar to other applications, like Apple Calendar, without using your main account credentials.
Log in to
Select Integrations
Click + New App Login.
Enter the name of the app or person you’re sharing with, then click Generate
Once completed Daylite will generate a unique username, password, and provide you with a server address. Use these to add your Daylite calendar to a CalDAV-compatible calendar application.
Each time you share your calendar, a new set of credentials is generated. These credentials are specific to your device and application, meaning they won’t affect your main Daylite login. If you need to remove access or update your setup, you can manage these credentials from your Account Manager.
Open Calendar and click Calendar > Add Account
Choose Other CalDAV Account... and click Continue
Change the Account Type to Manual
Once you've entered your app-specific username, password, and server details, your Daylite calendar will be added to Apple Calendar. Your appointments will now sync automatically, keeping your schedule up to date across your devices and apps.
Navigate to Calendar > Settings > General.
Click Default Calendar and choose Daylite.
If you no longer want your Daylite calendar to appear in the Calendar app on a device, you can disable calendar sharing. This removes the calendar from the device's Calendar app, but doesn't delete them from Daylite.
Go to the Calendar app on your Mac
Choose Calendar > Accounts, then select your Daylite account you want to delete
Click - at the bottom of the account list
Log into
Open Settings > Apps > Calendar
Tap Calendar Accounts > Add Account
Choose Other
Tap Add CalDAV Account
Navigate to Settings > Calendar on your iPhone or iPad.
Tap Default Calendar and select your Daylite account.
Daylite uses CalDAV, a standard protocol supported by many calendar applications. This means you can add your Daylite calendar to apps like Fantastical, and BusyCal.
Most CalDAV-compatible apps will require your server address, app-specific username, and password, which you can generate in your Account Manager under Calendar and Contact Integration. If a port number is required, use 443.
Refer to your calendar app’s documentation for specific setup instructions.
With Daylite shared with the Calendar app on the Mac, iPhone, and iPad, you are well on your way to building more relationships, closing more deals, getting more done, and scaling your business in ways you never could before.
Want to share your Daylite contacts with other apps too? Then check out , and get ready to take your business to the next level.
Following up on emails, phone calls, and conversations between you and your client is critical to your success, but how effectively do we keep track? Trying to remember all the points made during a phone call verbatim, or writing down the highlights on a scrap of paper doesn't really do the trick.
Daylite makes capturing, tracking and sharing communication an easy, straight forward process. Whether it's an email, a phone call, or a face-to-face conversation, you can use Daylite to capture the details.
One of Daylite's most unique and powerful abilities is to capture emails straight from your inbox with the Daylite Mail Assistant window.
Thanks to this window makes capturing, and linking emails to a Person as easy as the click of a button.
Navigate to Daylite > Settings > Mail Assistant.
You can choose add emails to Daylite manually or automatically. You can also choose to link or unlink Items when an email is added to Daylite. This will include any Items when you send or recieve an email. You can choose to automatically link Contacts, Users, Opportunities, Projects, and attachments from all incoming and outgoing emails. This is incredibly important, because once you have checked or unchecked these boxes, Daylite will link this information to Contact records, which you can then view chronologically under Daylite's Activity View.
Whether it's an inbound or outbound phone call, it is easy to capture calls and make sure they get linked to the right person. This way you don't have to remember all the details of the phone call, such as what it was about, how long it was, and whether you called them, or they called you.
You can scroll through your contacts to find the person you need, or, as your contact list increases in size, you can click the Quick Search bar, type in the person's name you are looking for and hit return.
Click New Task from the menu to create a new Task linked to that person.
Fill in the call details:
Call Title: An easy to remember title to reference later
Call Notes: Use the details field to capture call notes
Linked Items: Link anything related to the call
With the start time filled in, click the checkbox for the task when the call finishes, so you get the call duration.
If call tracking is a major part of your workflow, try adding Type, Start Date and End Date, as standard fields on Tasks:
Choose Daylite > Settings and click Edit Cards.
Click Tasks and select the checkboxes for these fields.
Meetings, one-on-ones, and impromptu walk-ups are where some of the most important conversations happen. Make sure no one forgets what was discussed by capturing these in a Daylite note.
Click the quick search bar and type in the person's name and hit return.
Click New Note to link a new note to the person.
Fill in your call notes:
Note Title: An easy to remember and relevant title
Linked Items: Link anything related to the call
Conversation Notes: Capture the important details about your conversation
When tracking your communications, you can't afford to spend time searching to find the information you need. With a person's conversation history listed chronologically in Daylite, you can find whatever you're looking for fast.
With so much communication happening on a day-to-day basis, it is nearly impossible to remember every single detail of every single call or email. Capturing those details with Daylite is a simple and effective way to focus on what is important- your customers.
Whether you’re hung up on the difference between a Category and a Keyword, or trying to figure out what a record means, check out our list of common terms below.
An Activity Set is a template of Tasks and Appointments you create once, which can be applied to different records. Activity Sets can be a checklist for all your Projects, a follow up schedule to stay top of mind, or any process you repeat.
An appointment is a block of time you have set for a specified activity, and will appear within your Daylite Calendar. You can invite Daylite users as well as other people to your appointments and track whether they are going or not.
Categories are the top-level classification for objectives in Daylite. An object can only have one category at a time, and define the primary classification. Each category has a colour indicator which makes finding items with a category easy.
Company records store information about the people you and your organization communicates with. They can be a business, family, association, or any legal entity made up of of People. All information about a company is stored here, including the people who are associated with the company is stored in a Company record.
The Email section displays all emails added using Daylite’s Mail Integration. To add emails to Daylite while on the Mac, turn on Daylite Mail Assistant with Apple. To add emails to Daylite while on the iPhone and iPad, add your Daylite account in My Mail in Daylite for the iPhone and iPad.
A filter is a lists of records in your database that meet certain criteria you specify. Filters can find look for records that match or do not match your criteria, including the properties of objects linked to a record. For example, a filter can include all People in a specific city, who have an Opportunity over $10,000.
A form in Daylite works just like a paper form. They are useful for collecting and managing information about people, companies, projects, opportunities, and groups.
A Group is a collection of like objects, determined by you and your team. Groups can collect a mix of any of the Daylite objects.
A Keyword tags an object with important details that you’d like to quickly reference when reviewing a record, or to create lists of items using a Filter/Smart List. For example, a Keyword can note a person’s favourite sports team, a high importance Opportunity, or any term/phrase to group like records. A record can have an unlimited number of Keywords added.
Linking is when two or more records are connected to each other. Linking records gives you more context about an item’s activity and makes it easier to find information by keeping everything in one place. The more you link the richer a record’s history becomes.
A note is a record of information that can be created on its own. Notes are perfect for those little bits and pieces of information that don’t fit anywhere, but can’t be lost—for example, meeting minutes for your weekly meeting, reference information for your project, etc.
Daylite has 10 Objects which not only store information about the things you do in your business, they define the types of relationships you have, activities you take, and communication you have with a person. Those objects are:
Appoinments
People
Companies
Opportunities
Opportunities represent the potential for new business. They help you track business leads, turn prospects into clients, and forecast potential revenue. They store basic information like the details of an Opportunity, tell you its state, probability to close, total value, and also its classification.
People records store information about the people you and your organization communicates with. They can be someone you know personally, a prospect, customer or any other relationship you may have. All information about to the person like phone number, electronic address, birthday, as well as activities are is stored in a person record.
Pipelines describe the major stages your Projects and Opportunities go through. Stages are used to organize and analyze the success of your Projects and Opportunities. Each Pipeline Stage can have its own template of Tasks and Appointments.
Projects are outcomes that will need more than one action step to complete and that you can mark off as finished in the next 12 months. Projects help you plan, organize, and keep track of information for your multi-step goals.
Values on a record.
An instance of an object.
A Smart Lists are save filters. Smart Lists can be edited, shared with other teams, and duplicated.
Tasks records keep track the things you need to do. Whether they a follow up to a client, a phone call you need to make, or a daily reminder, Tasks make sure you get it done. Add due dates and reminders, create repeating tasks, and delegate to other Daylite users.
Add your Gmail account to Daylite.
Go to Daylite > Settings > Mail > Mail Accounts and select Add Mail Account.
Next, select Gmail from the list of account types.
Enter the email address of your Gmail account. Daylite requires you to create an app-specific password. This is a different password than the one you use to sign into Gmail.
Click Next to begin the guided setup.
First, you must turn on 2-Step Verification in your Google Account. This is required before you can create an App Password. If you have already enabled 2-Step Verification, move to step 7.
Log in to your and choose Manage Your Google Account
Select Security > How you sign in to Google > 2-Step Verification. If you need more detailed instructions, follow .
In Daylite, check the box "I've enabled 2-Step Verification" and click Next to proceed to creating an App Password.
Next, you must set up an App Password for Daylite under your Google account. Click to create an App Password.
On the Google App Passwords page:
Enter "Daylite" as the app name and click Create.
Google Workspace Accounts
If you're using a Google Workspace account and cannot add your account:
Check with your IT administrator to ensure IMAP access is enabled for your organization
Verify that less secure app access policies allow third-party applications
Confirm that 2-Step Verification is permitted by your organization's security policies
Google will display a 16-digit App Password. Copy this password.
Return to Daylite, select the I've set up an App Password checkbox, and click Next.
Paste the 16-digit App Password you just generated into the Password field.
Click Next. Your Gmail account is now added to Daylite.
In an ideal world, you always want to give each of your deals the same amount of attention. Each one of your clients should feel special, no matter how large or small the deal. However, it is important to prioritize your deals so you can focus your attention on the largest ones first.
Tracking deals by their size is a powerful way to increase income and grow your business because it helps stay on top of those big deals. With Daylite, staying focused on the deals that have the biggest impact on your business is easy.
Any time a lead or client expresses interest in a product or service, you want to create an Opportunity and then add an Estimate. If you are not familiar with creating Opportunities, start by reading the Learn article How to Capture New Business..
Daylite lets you enter a Value into an Opportunity card with a single click, which can be incredibly beneficial for those "on the fly" meetings or phone calls, where you may just want to quickly enter a value as a placeholder.
Select the New Opportunity menu, or double click an existing Opportunity card.
If you are creating a new Opportunity, select value to enter how much the deal is worth.
If you already have an existing Opportunity that you would like to enter a value for, double click on the Opportunity card, then select
If you wish to add greater detail to your value, you can create an Estimate to capture the full value of your deal:
Select an Opportunity and click on the Estimate tab.
Click the + button to add a New Line Item and then set the Quantity and Price.
The Estimate
If you repeatedly sell the same Products or Services to your clients, you can save them in the Daylite Preferences to be used any time you create an Estimate.
Navigate to Daylite Preferences > Products & Services.
Click the + button and choose either Product or Service.
Now you can enter the information for Details, Pricing, Extras
When you can track your deals by size, it becomes easier to prioritize which deals you should be working on next. Whether you enter a Value or an Estimate, you can tell at a glance which deals need your attention.
Click here to learn how to , and take your business to the next level.
Sales cycles can get very complicated. People come and go, documents are created, decisions are made, then updated, and then changed again.
Daylite organizes all those moving pieces so you can work faster, make fewer mistakes, and close more deals.
Daylite lets you keep a history of emails, meeting minutes, files, and documents on all your deals. This is done by linking items to an Opportunity so you can reference notes from a call, search for an email, or find an important file like a document or image.
When viewing an Opportunity, you can link Files, and add New Notes, New Appointments, New Tasks, and more directly to that Opportunity. This is useful when you're on a call with a client, in a sales meeting, or planning how you want to approach the deal. When viewing an Opportunity, click the corresponding button in the top right corner.
If you want to create and link a new item to an already existing Opportunity, but you do not see it as a button, click the … button and select the item here.
You can also link an existing Opportunity to the new or existing item you are viewing.
When creating a new item, or viewing an already existing item, click +Add Opportunity and type the name of the Opportunity. Select the Opportunity from the search results.
Every Opportunity has a long list of files. These include sales decks, contracts, pictures, spreadsheets, and more. You'll never scramble for a file again because they will be linked to the Opportunity.
Select the Opportunity and click Add File in the top right corner. If you don't see this option, select the … button to access the drop down menu.
Click Choose and navigate to the file you want to link.
If needed, update the title, the date added or additional details about the file.
Since someone using Daylite can only access a file added to Daylite, you might prefer to use a file sharing service like iCloud or Dropbox when collaborating with clients or 3rd parties. In these cases, you can still link files to an Opportunity as file references:
Select the Opportunity and click Add File in the top right corner. If you don't see this option, select the … button to access the drop down menu.
Choose a reference to a file on the internet from the Add menu.
Enter the web address of the file you wish to link to.
Organize all the moving pieces to your Opportunity so you can track the status of a deal, find out who is working on what, and locate all of the decisions and details. Now that you are organized, it might be time to start so you can achieve your goals sooner.
Juggling multiple Projects at once and switching focus is just a regular part of any business, but if you sometimes feel like you are scrambling to keep track of all those details, the delay can be costly.
Daylite helps connect all those moving pieces, so even with long-term Projects, you can remember what you have done, who is currently working on parts of a project, and any decisions that have been made.
Daylite helps you keep a history of emails, Notes, Tasks, and appointments for a Project. This is done by Linking these items to a Project.
As an example, here is a Project called
Sharing your Daylite contact list with other apps lets you work cross functionally more efficiently. With your Daylite contact list shared with other apps, you can take advantage of the .
Daylite makes it easy to share your contacts with the Contacts app on the ,
Sharing your Daylite contacts allows you to see them in other apps, so you can add, edit, or leverage your contacts even when you're working outside of Daylite.
Here are a few examples of things you can do by sharing your Daylite contacts:
Add your iCloud account to Daylite.
Go to Daylite > Settings > Mail > Mail Accounts and select Add Mail Account.
Mail in Daylite is a leap forward in how Daylite works with email, bringing your inbox directly into Daylite for a more seamless and powerful experience than was possible with Daylite Mail Assistant in Apple Mail or Outlook. Efficiently handle your email, with side-by-side access to the full details of related Daylite items, without needing to switch between apps.
Mail in Daylite for Mac is a new feature that we’re continually improving. With Mail in Daylite, you can make email more actionable and seamlessly connected to your business. Below you’ll find instructions on how to get started, a roadmap of upcoming features, and an FAQ with answers to common questions. We’d love to hear your feedback as we keep making Mail in Daylite even better.
Before getting started with Mail in Daylite, please confirm the following:
Daylite is a highly customizable application with a wide range of capabilities to make it easy for you to simplify your work life so your small business runs smoother. With centralized management of all its capabilities, Daylite helps to keep you productive, organized and focused.
This tour of Daylite will give you a basic overview of the application, and how to navigate through the different screens to find the information you need quickly and efficiently.
When you open Daylite for the very first time, you are presented with a blank slate. So where do you begin?
Why, at the beginning of course.
Keeping track of your deals can be hard. This is especially true when you are working with multiple accounts and long sales cycles. So much can happen at any moment and you really can't remember it all. So how do you organize all your deals, and how do you keep track of what stage they are in?
Daylite's Opportunities Board makes it easy to track all your deals at once. It allows you to view all of your opportunities in a pipeline by stages, so you can see at a glance where all of your deals are at.
Pipelines are created in Daylite Preferences, and Stages are added to each Pipeline. Once completed, you will be able to view them in the
Following up with your Contacts is one of the most important aspects of building stronger relationships with them. Without an effective method of following up you risk losing customers, as they feel they aren't being responded to in a timely manner.
Don't let those important follow-ups slip through the cracks. Using Tasks and Activity Sets in Daylite to create follow-ups and follow-up schedules helps keep you in touch with your clients.
When you view a Person or Company, you can create a follow-up with the New Follow-Up button, which will create a Task linked to the Person or Company, and name it for you so you know it's a follow-up.
Projects
Tasks
Forms
Notes
Emails
Groups
You are using macOS 14 Sonoma or newer (not available on macOS 13 Ventura or earlier)
You have updated to the latest version of Daylite for Mac available from both our website and the Mac App Store
Once ready, follow these steps to set up Mail in Daylite:
Select My Mail in the sidebar
Click Add Mail Account
View instructions for adding mail accounts of different types
These are the features that we are planning to work on next. If there are other features you would like to see, please share your feedback.
These are features we know are important to you and are being considered to work on next.
Sync drafts mailbox to mail server
Add Outlook/Office 365 accounts without requiring IMAP to be enabled
Some organizations or administrators do not allow IMAP access to be enabled, which is currently required to use Mail in Daylite
Yes, you can continue using Daylite Mail Assistant and try Mail in Daylite at the same time.
No, Mail in Daylite requires macOS 14 Sonoma or newer.
Yes, you can add multiple email accounts to Mail in Daylite. After adding your first account, add another account in Daylite > Settings > Mail > Mail Accounts > Add Mail Account.
No, Mail in Daylite does not support notifications at this time.
No, the Daylite app icon cannot be badged with the unread email count at this time.
No, Mail in Daylite does not have any email tracking features at this time.
Drafts are currently only stored on this device and not synced to your mail account. Syncing drafts is a feature being considered for a future update.
Yes, you can right-click (or control-click) in the message area and select Spelling and Grammar > Check Spelling While Typing.
Yes, you can right-click (or control-click) in the message area and select Writing Tools.
No, you cannot create a new mailbox at this time. For now, you can create a new mailbox in another mail app and it will show up in Mail in Daylite.
No, you can only move emails between mailboxes in the same account at this time.
No, Daylite does not support repeating meeting invitations at this time.
Add Field: Add additional fields like Type, Start and End times
Start: The time when the call started


To connect Daylite to Zoom, click the Allow button.
Daylite will load your account's Conferencing settings in your default browser.
Click the Add button next to Google Meet.
Choose the account you want to add or click User another Account and sign in
To connect Daylite to Google meet, click the Continue button.
Allow Daylite to See, Edit, Share and Delete calendars
Click the Continue button
You’ll return to your Conferencing settings, where Google Meet will appear as connected. Daylite is now connected to your Google Meet account, allowing you to add Google Meet video call links to your meetings.
Click the Manage Conferencing... button.
Daylite will load your account's Conferencing settings in your default browser.
Click the Add button next to Teams.
Pick an account you want to add or click User another Account and sign in
You’ll return to your Conferencing settings, where Teams will show as connected. Daylite is now connected to your Teams account, allowing you to add Teams call links to your meetings.
Since the meeting link is generated by Daylite a sync is required for the link to appear in the meeting details.
Once created the meeting link will appear within the meeting
You will be asked to confirm your decision to delete, to proceed click the Delete button.
Select the Daylite app.
Click Remove.
Visit your Google Account’s third-party connections page.
Locate Daylite in the list.
Select Daylite.
Click the See Details button.
Click the Stop using with Goggle button.
From the left of Teams, select Apps.
On the page that opens, scroll to the bottom and select Manage your apps.
Find Daylite.
Select the arrow to expand and see where in Teams you've recently used the app. Select Remove for each context from which you'd like to remove Daylite and click the Confirm button
Daylite will load your account's Conferencing settings in your default browser. Follow the instructions to resolve the issue.


Download and install Daylite.


Copy/Paste the app specific Username and Password, and add the Server Address
Click Sign In
Select Integrations
Within the Calendar and Contact Integrations list, locate the App specific username you wish to remove
Click Revoke
Click Revoke again to confirm
Copy/Paste the server, and app specific Username and Password in the correct fields


The next time you add an Estimate to your Opportunity you can add your Product or Service from the + button.


Click Add File.
Click Add File.


The Project Name.
The Project Details.
The Activities linked to the Project.
The Linked Activity Filter.
Using the Activity pane you could search for a call, you could reference a specific email, and you can filter for linked items, for example, to quickly look at specific appointments, or linked attachments within a Project.
When viewing a Project, you can choose to Add File, link a New Note, New Appointment, New Task and more.
Use the … button to see all the items you can create and link, or to link an existing item to the Project.
You can also link a Project to an item you have already created.
Click +Add Project and type the name of the Project. Select the Project from the search results.
Every Project is unique, and always seems to end up having a long list of files attached to it: specs, contracts, pictures, spreadsheets, and more. You don't have to scramble and look for a missing file when you attach them to a Project.
Select the desired project from either My Projects or All Projects in the Daylite Sidebar.
Click Add File and select the file you want to attach to your Project.
Every business has some kind of document solution, whether it's online like iCloud or Dropbox, or locally stored, such as folders on your computer, or a network storage device, like a shared hard drive. In these cases, you can still link files to a Project as a file reference.
To begin, select the desired project from either My Projects or All Projects from the Daylite Sidebar and click Add File as you did in the previous example.
Click Add, and select a reference to a file from the internet from the menu.
Add the url that links to the file on the internet. In this example the file is located on iCloud.
Enter a title for easy reference.
Remember to click Add File.
Your Project's entire activity history loads immediately, keeping you organized so you can find what you need in a just a few seconds.
As you scan through this rich history of information relating to your Project, a timeline navigator shows you what date range you are currently viewing. You can quickly navigate to any point in time by simply hovering your mouse over the timeline to pinpoint the exact date, then jump to it with a click.
There is also a very clear red line to determine what is NOW. This way you can tell your upcoming appointments from those that happened in the past.
The Activity Search Bar searches the entire contents of the activity view. For example, even if you only remember a single word or phrase, you could type it in, and Daylite will find what you are looking for.
You will also find more filtering options, including one called All Communications, which has filters for Appointments, Tasks, Emails etc.
Daylite also shows the colour for each item's Category on the right hand side of the Activity View. This helps you visually keep track of what's important.
There is a pronounced icon for each item to indicate what type of activity you are looking at.
Organize all the moving pieces of a Project to track it's status, know who is working on what, and capture all the important decisions and details. Now that your projects are organized, it is time to learn How to Streamline your Projects and achieve your goals sooner.
Use Caller ID with your Daylite contacts on your iPhone.
Use your iPhone and iPad camera with business card scanners.
Make phone calls with Siri.
Add Daylite contacts to Mail's VIP list.
Import contacts to Daylite from other contact lists.
Pro Tip:
Sharing your Daylite contacts with another program's contact application DOES NOT merge the databases together. When you share your Daylite contacts, each database is kept as its own contactgroup.
When you share your Daylite contacts, you create a unique app-specific username and password. This allows you to securely connect your Daylite contacts to other applications, like Apple Contacts, without using your main account credentials.
Log into Account Manager
Select Integrations
Click + New App Login
Enter the name of the app or person you’re sharing with, then click Generate
Once completed, Daylite will generate a unique username, password, and provide you with a server address. Use these to add your Daylite contacts to a CardDAV-compatible contacts application.
Each time you share your contacts, a new set of credentials is generated. These credentials are specific to your device and application, meaning they won’t affect your main Daylite login. If you need to remove access or update your setup, you can manage these credentials from your Account Manager.
Open Contacts and click Contacts > Add Account
Choose Other Contacts Account... and click Continue
Change the Account Type to Manual
Copy/Paste the app-specific Username and Password in the correct fields
Click Sign In
Once you've entered your app-specific username, password, and server details, your Daylite contacts will be added to Apple Contacts. Your contact list will now sync automatically, keeping your address book up to date across your devices and apps.
When you share your Daylite contacts, it doesn't merge your contacts with other databases. Instead, each will be kept in a separate contact list. Making Daylite your default contact list on the Mac, iPhone, and iPad means your devices will use the Daylite list automatically when adding or reading contacts.
Navigate to Contacts > Settings > General.
Click Default Calendar and choose Daylite.
If you no longer want your Daylite contacts to appear in the Contacts app on a device, you can disable contact sharing. This removes the contacts from the device's Contacts app, but doesn't delete them from Daylite.
Go to the Contacts app on your Mac.
Choose Contacts > Accounts, then select your Daylite account you want to delete.
Click - at the bottom of the account list.
Log into Account Manager
Select Integrations
Within the Calendar and Contact Integrations list, locate the App specific username you wish to remove
Click Revoke
Click Revoke again to confirm
Sharing your Daylite contacts to your iPhone and iPad lets you do things like make calls with Siri, or add contacts with a business card scanner on your iPhone and more.
By following these steps, you can create a separate Daylite Group in your Apple Contacts app. Your contacts in Daylite are reflected in Apple Contacts, which means your contacts in both apps will always be up to date.
Open Settings > App > Contacts
Tap Contact Accounts > Add Account
Choose Other Contacts Account
Tap Add CardDAV Account
Copy/Paste the Server, and app-specific Username and Password in the correct fields
Navigate to Settings > Contacts
Tap Default Account and select your Daylite Account.
Daylite uses CardDAV, a standard protocol supported by many contact management applications. This means you can add your Daylite contacts to apps like BusyContacts or other CardDAV-compatible apps.
Most CardDAV-compatible apps will require your server address, app-specific username, and password, which you can generate in your Account Manager under Calendar and Contact Integration. If a port number is required, use 443.
Refer to your contacts app’s documentation for specific setup instructions.
Now Daylite is shared with the Contacts app on the Mac, iPhone, and iPad. With all of your contacts in one place, Daylite helps you build more relationships, close more deals, get more done, and scale your business.
Want to share your calendar? Check out How to Share Your Daylite Calendar.
Enter the email address of your iCloud account.
Daylite requires you to create an app-specific password. This is a different password than the one you use to sign into iCloud.
Sign into your Apple Account associated with your iCloud email address.
Choose Sign-In and Security from the Apple Account menu, then select Account Security to enable Two Factor Authentication. If you need more detailed instructions, follow this article from Apple.
Once Two Factor Authentication has been enabled, select App-Specific Passwords.
Go to Daylite > Settings > Mail > Mail Accounts and select Add Mail Account.
Next, select iCloud from the list of account types.
Enter the email address of your iCloud account. Daylite requires you to create an app-specific password. This is a different password than the one you use to sign into iCloud.
Click Next to begin the guided setup.
First, you must turn on 2-Step Verification in your iCloud Account. This is required before you can create an App Password. If you have already enabled 2-Step Verification, move to step 7.
Sign into your associated with your iCloud email address.
Choose Sign-In and Security from the Apple Account menu, then select Account Security to enable Two Factor Authentication. If you need more detailed instructions, follow .
In Daylite, check the box "I've enabled 2-Step Verification" and click Next to proceed to creating an App Password.
Once Two Factor Authentication has been enabled, select App-Specific Passwords.
Click Generate an app-specific password.
Enter "Daylite" for the name of your App-Specific Password, then choose Create.
In Daylite, confirm you've set up an App-Specific Password
Copy the App-Specific Password that has been generated and paste it into the Password field in Daylite. Click Next to finish adding your iCloud account to Daylite.
Your iCloud account is now connected to Daylite.
If you use an iCloud+ custom domain email address such as [email protected], you need to add it as an IMAP account with specific settings.
To add an iCloud custom domain email:
Go to Daylite > Settings > Mail > Mail Accounts and select Add Mail Account.
Select Other IMAP from the list of account types.
Enter your custom domain email address, such as: [email protected]
Enter your app-specific password in the Password field. If you haven't created one, see Create an App-Specific Password above.
Click Next.
On the server settings screen, change both User Name fields to your Apple ID email address. The Email field at the top will display your custom domain email—do not change this. Both User Name fields will initially display your custom domain email. Change these to your Apple ID email address (the email ending in @icloud.com).
For example: If the User Name fields show [email protected], change them to [email protected].
Click Next to finish adding your account.
Once added, your emails will send from your custom domain address.
At the top of your Home Screen you will find:
Sidebar Button: Show or hide your sidebar with a single click.
New Object Button: Create new objects from one convenient location.
Notification Button: Shows alerts and reminders.
Quick Search: Find what you are looking for FAST.
Details View: Shows details about the selected item.
By clicking on the New Object Button, you can create new contacts, projects, tasks etc. You can edit this information at any time, adding to each entry as you need to.
Notifications and alerts are shown when you click on the notification button.
Quick Search lets you quickly find what you are looking for, searching all of Daylite for any mention of what you type.
Under the Calendars section in the Sidebar, you will find two different calendars. The first is your own, called My Calendar.
The second is called All Calendars. This is the team calendar, which lets you view, create, and edit calendars between your team.
When you select either of the calendars in the Sidebar, you will immediately notice that the controls along the top change slightly.
The New Object button now says New Appointment, which reflects the Calendars view you are in.
You now have a choice of between Calendar View and Multi-Column List View.
The Details View changes to reflect the appointment selected.
You can create a New Appointment by clicking on New Appointment in the Toolbar. Add a Title, Category and Keywords. You can also add Details, a Start and End Time, and link the appointment to an Activity such as a Task or Agenda. Be sure to click Save.
Click the Action button on the left hand side of the Calendar to access display options. From here you can Show Tasks, Show Projects, Show Opportunities, and more.
Selecting the Filter button presents you with options to filter based on fields like category, keyword, name, or more. You can save a filter as a Smart List so that you can easily view it again later.
These Smart Lists are saved in the Sidebar.
Moving down to Contacts on the left hand sidebar, you will see People and Companies by default. The other lists in this example are all Smart Lists that you can create at any time.
The New Object button now says New Person, which reflects the Contacts view you are in.
You can select Add File, New Note, New Appointment, New Follow-Up, or click the ••• button to view even more options.
There are three different ways to look at the Contacts view.
List View
Multi-Column List View
Insight View
Filtering options are located in the same place, and include Arranged by First Name, Arranged by Last Name, Arranged By Created, Ascending and Descending order.
The Filter button is also located in the same place, allowing you to create Smart Lists that help group your contacts according to specific criteria.
Under the Opportunities section you will find the Opportunities Board, My Opportunities, and All Opportunities.
Under the Projects section you will find Projects Board, My Projects and All Projects.
All Opportunities and All Projects allow you to collaborate with your team on shared Projects or Opportunities.
As with all other object views, Opportunities and Projects shares the same general layout with the main list. By selecting either of these you will see the:
Side Bar
List View
Details View
Activity View
The Activity View shows a timeline with linked history on the right.
The Tasks section looks very different than the other sections found in the Sidebar.
Tasks are grouped into Worklist, My Tasks, Delegated, Done, and All Tasks.
The My Tasks section is divided into different sections. For example, you will find the Inbox, Tasks, and Projects that you are involved in.
Inbox: Quickly get tasks off of your mind by adding them to your Inbox until you have time to categorize them later.
Tasks: See the tasks you need to remember to complete.
Projects: See the next actions you need to take on each of the Projects you are involved in.
Here are some examples of how to use Tasks.
You can create a Task.
Fill in the Task Details.
You can link the Task to an existing Project.
Clicking on the pin icon moves the Task into the Worklist section.
The Worklist section is designed to help you focus on what needs to be done right away. It helps to think of it as your "priority" list.
Any due or overdue tasks will also be brought to your attention under the Due section.
A new Task can be created by clicking the + New Task button.
Fill in the Task Details.
Tasks can also be added to the Worklist from anywhere by dragging the Task onto the Worklist in the Sidebar.
Use Notes to capture details during a call or meeting, or add details to a Task or Objective.
Link the Note to a Contact, appointment, or any other item in Daylite, and it will be added to that item's Activity view.
Daylite includes the Daylite Mail Assistant window, an extension for the Mail app on Mac. The Daylite Mail Assistant window allows you to capture new and existing Contact's information straight from your inbox, while also linking them to the email directly within the Mail app. Switching between apps can sometimes be disruptive to your workflow, so this feature gives you a major productivity gain.
Daylite can help you organize your day, your business, and your life. Thanks to its intuitive structure, you can add that important person to Contacts, check when your next appointment is coming up in Calendars, and create Tasks and Notes so you never forget an important point during a call or meeting. All of these features, and more, tie together to guarantee your business runs smoothly.
For more information on how to set up the Daylite Mail Assistant, please refer to Install and log into Daylite on the Mac.
For more information on how to capture a Contact from an email, please refer to Capturing A Contact From Email.
Choose Preferences > Pipelines.
Click on the + button to create a New Pipeline.
Click the New Stage button to name your Stage and fill in relevant information. Click + Add Stage to add additional Stages to your Pipeline. These Stages will now appear in the Opportunities Board.
For more information about creating Pipelines and Stages, check out the article Streamlining Your Sales Process.
The Opportunities Board is perfect for organizing everything in one convenient location. Each Opportunity is organized first by Pipelines, and then by Stages.
Choose Opportunities Board from the Daylite Sidebar, then click the Pipeline filter to select which Pipeline you want to view. As an example, if you select the Sales Pipeline then only the Stages and Opportunities for that Pipeline will be shown.
Once you have selected your Pipeline you will notice that all previously created open Opportunities are now grouped under their respective Stages. Each Stage in the Opportunities Board shows the number of Opportunities currently in that Stage, as well as the Total Value of those Opportunities.
When creating a New Opportunity make sure you select the correct Pipeline to assign the Opportunity to.
A new Opportunity is automatically placed in the Not Started Stage. This Stage is only visible when a new Opportunity is created, but has not yet been assigned to an established Stage in your Pipeline. It will disappear once you move this Opportunity to the next Stage in the Pipeline.
Dropping the Opportunity onto a Stage's title prompts an Advance Stage window that lets you verify or change the Start Date, create Tasks and Appointments, and leave Notes.
When starting to drag an Opportunity, four different States appear at the bottom of the Opportunities Board. You can select from Lost, Abandoned,Suspended or Won. If you drag and drop an Opportunity to any of these States, it will change its state and disappear from the Opportunities Board.
Daylite's Opportunities Board helps you keep track of what stage a deal is in, whether they are awaiting a proposal, needing to be followed up on, or are ready to close.
Locate the Contact and click New Follow-Up.
Click Set a due date and reminder to choose when you want to be notified to follow up.
Optionally, you can change the time you want to be reminded or how you want to be reminded.
Building stronger relationships with your clients often means staying in touch on a regular basis, but you can't be expected to remember to check in with all your clients all the time. Using an Activity Set you can create a check-in template, or a series of follow-ups, that you can add to your contacts in a couple of clicks, and Daylite will do the remembering for you.
To create a follow-up schedule:
Go to Daylite > Preferences > Activity Sets.
Click the + button to add a new Activity Set.
Change the Name to something like "New Client Follow Up".
Select which objects this Activity Set will apply to, in this case People and Companies.
Click on New task and set due dates for each task you create, such as "30 days after start".
Here is an excellent example of a completed Activity Set with follow-ups scheduled in increments that makes sense for the business and type of contact they are intended for.
By adding your Activity Set to a Contact, your schedule of follow-up Tasks will be created and linked to the Contact you've selected.
Select a Contact, then click the ... button and choose New Activity Set.
Choose your follow-up schedule from the activity set popup menu.
Optionally, you can link other items to each of the Activity Set Tasks by clicking + Add Link.
Your schedule of follow-ups will now be created and linked to the Contact. The number of days "after start" that you had set for each Task is the number of days from today they will be due.
You have learned how to create a follow-up in Daylite, as well as create your own follow-up schedule. When you let Daylite remind you to follow up, you can focus on the work at hand.
Want to learn more? Learn How to Stop Things Falling through the Cracks
For a Project to run efficiently, and be completed on time, everyone needs to know what is expected of them, who is involved in the Project, and the timeline. You can track progress, organize your Tasks, and improve your efficiency by using Daylite to streamline your Projects. Improve your workflow by having everything in one place, a simplified process, and a team that understands what's expected of them.
An Activity Set is a great way to enter information in once, and reuse it for each Project that requires a checklist to be followed.
Navigate to Daylite > Preferences > Activity Sets.
Click the + button to create a new activity set.
Enter the Name and Description. Double check to make sure the Active checkmark is selected.
Check any Categories the Activity Set applies to.
You can order the tasks, and set the due date for each relative to the start or end date. You can also set a reminder if you want Daylite to remind you to complete each task.
You can now access your newly created Activity Set by clicking More Options Button > New Activity Set.
Select the Activity Set you want to apply, and click Create.
When it comes to Projects, there are often lots of little tasks that need to get done, and sometimes these Tasks can be the same for different projects. Checklists help reduce errors, prevent duplicate work, and wasted time.
An excellent example of this would be a real estate agent who closes a deal on a house and has to fulfill a bunch of steps for the buyer or the seller.
Here is how to build a Project checklist with Activity Sets so all your Tasks and meetings are followed through perfectly.
Select Daylite > Preferences > Activity Set.
Click the + button to create a new Activity Set.
Enter the Name and Description. Double check to make sure the Active checkmark is selected.
Here is a great example of an Activity Set with a completed checklist.
Your Activity Set can now be accessed by selecting New Activity Set from the More Options button.
Choose which Activity Set you want to populate, then select Create.
Pipelines help you visually track which stage each Project is in, or act as a guide to make sure you or your team are following each step in order.
Focus on the right things at the right time by defining each stage of your Project. By building Pipelines for your Projects, you can ensure your process is completed in the right order.
Navigate to Daylite > Preferences > Pipelines.
Select New Pipeline and fill in the Name, Description, and select Applies to Projects.
Fill in New Stage details.
In the following example you can see:
A list of Pipelines.
Tasks lists created for each Stage in a Pipeline.
Details of the selected Task.
Projects with better visibility finish on time. Track the progress of Projects and meet your deadlines with streamlined processes.
There are several different ways to check the progress of your Projects. For example:
You can review a list of your active Projects and check which tasks still need to be completed. The Details and Activity view offers an overview of upcoming tasks.
The Tasks and Pipelines tab will indicate the number of Tasks remaining, and any that are overdue will be in red.
You can also build Project lists using Filters, which separate the data and show you only what you need to see. For example, you could:
Filter by Tasks assigned to a specific team member.
Filter using Keywords or Categories.
You could also use the Filter button for additional options.
Streamline your business with documented processes, keeping everything in one place. Track your progress, improve your efficiency, and set the right expectations with your team in Daylite.
Do you need some assistance coming up the perfect Project workflow? can help fine-tune your business processes by implementing Daylite in your workflows.
Hiring the right candidate for an open position can be a time consuming, and often daunting endevour. You and your candidate both have a lot riding on this process.
With Daylite, you can track all your candidates, keep your correspondence in one place, and even streamline your onboarding process.
Tracking and screening candidates can be hard. You may be receiving emails from candidates sourced from multiple job posting websites, each with their own resume. It's a lot to track. If you’re hiring for multiple positions, sorting everyone out can seem impossible.
Fortunately, with Daylite, you can easily manage and track your candidates.
Most candidates applying to the position will come from your email inbox. Thanks to Daylite Mail Assistant, you can capture those new candidates, link their resume, and create a Task or Time Block to review their information right from your inbox.
To add a new candidate to Daylite:
Select Add to Daylite from the Daylite Mail Assistant banner in Mail.
Assign any Tasks that need to occur during the hiring process.
Link any attached files such as a resume.
Choose Candidate from the Category menu. You may need to create this Category by navigating to Daylite > Settings > Categories > Emails.
Pro Tip:
You can also use Keywords to tag Contacts with additional information.
Add Keywords for each job posting, the source of the job posting, if you're interested in inverviewing them, etc.
Now it’s time to review your candidates. With Daylite, you can create a list of each of the candidates, and quickly locate all their information.
First, you need to create a list of all your candidates. To do this, select People for the Sidebar, and choose the Filter icon. Next, select Category is Candidate to filter your possible job hires.
Your Candidates are now displayed in alphabetical order, along with their Details and any Activity associated with the Contact card.
You can review the Candidate's contact information, linked resume, any Notes that have been recorded, and check off Tasks as they have been completed, all with the end goal of moving the Candidate along in the hiring process.
After you’ve done the initial screening, remember to add the Keyword "Rejected" or "Passed Screening" on their Contact card.
Now that you have candidates you’ve passed on, and others you want to want to interview, you can follow up with each of them. To do that, modify your filter and add the Keywords “Rejected” to create a list of those you’ve moved on from, and adding the Keyword “Passed Screening” for those you want to interview.
Once you have your list, select a Person, and then click on their email address to send a reply.
Now it's time to hold interviews.
Start by booking a meeting with each candidate, and be sure to invite anyone on your team who should be there.
Click New Appointment.
Set the Category to Interview.
Invite the candidate, as well as other members of your team who may be part of the decision process.
Daylite will ask if you wish to send the invitation to external invitees when you press Save.
Follow the steps in Replying to Candidates and Running Interviews, until you’ve gone through your hiring process and made your decision.
After due consideration, you have decided who you want to hire. Once they accept your offer it’s time to get them onboarded. Daylite helps with the onboarding process by keeping all their data in one place.
Link all hiring documentation that you have sent to them by email with Daylite Mail Assistant.
Create an all day appointment to document their start date, and link anyone who needs to know about it.
Link the new hire's Contact record to your Company in Daylite.
Choose your Company record.
Select the Edit button.
Scroll down to people and select +Add Person.
Choose your new hire's Contact record.
Pro Tip:
If you have a more complicated onboarding process, or you have an onboarding process that is the same every time,
Now that you've gone through the process of hiring and onboarding a new employee, check out .
How much time do you spend each day trying to keep things from falling through the cracks? Last minute meetings, alarms you thought you set that don't go off, or due dates that creep up on you.
Daylite takes that stress away by helping you remember everything you need to accomplish, thanks to better visibility and easy-to-set reminders that keep you on task.
The easiest way to create a Task reminder is to use the New Item button.
Select Tasks in the Daylite Sidebar, and click New Task.
Click Set a due date and reminder.
Using the date picker, choose when the Task is due.
When you set the due date, your default Task reminder is automatically applied. In most cases, that's it, you're done! If you need to, you can change the reminder, such as the time of day you want to be reminded, or add a second one.
Pro Tip:
Save more clicks with default due dates.
Choose Daylite > Preferences > Defaults Values and click Tasks.
Select the checkbox labelled Automatically Set Due Date and choose when you want your Tasks due.
When a task comes due, the notification bell in Daylite turns red and the Daylite icon on your Dock will be showing how many pending notifications you have.
Click on the notification bell, and you will see your reminder with the name of your Task and these options:
Checkbox: Click if the Task is completed
More: Go to the Task in Daylite for more details
Snooze: Snooze the reminder with pre-set time increments
The Daylite Home screen is your personal dashboard for the upcoming day and week. Any Task or Project that is due today, overdue, or has a due date within the next week will show up on your Home screen.
Click the Home section in the Daylite Sidebar.
Check your Overdue list to make sure nothing is forgotten.
Check to see what is Due Today.
You can also see what is upcoming in the
You can also show upcoming due dates on the Calendar.
This will help prioritize Tasks, and is a fabulous visual reminder of anything that may need your attention.
To show Tasks & Projects on your Calendar that have due dates:
Click My Calendar.
Click the Calendar Options Gear and select which items you want to show in the Calendar.
Pro Tip:
Need to move a due date?
Change the due date on the calendar by dragging and dropping a Task or Project to a new date.
By setting reminders for important to-dos, reviewing the Home screen daily, and using the Calendar to track upcoming Tasks and Projects, you will be able to keep things from falling through the cracks and set yourself apart from the competition.
Now you're ready to learn and make your business run smoother by
Two-factor authentication (2FA) is an extra layer of security used when signing into websites or apps.
With two-factor authentication enabled, you have to sign in with your username and password and provide another form of authentication that only you know or have access to. This ensures that only you can access your account, even if someone else knows your password.
You can turn on two-factor authentication for your account using these steps:
Sign into .
Select the My Info tab, and then select Enable Two-Factor Authentication under the Security section.
Daylite will now ask you to use an authentication app to obtain a verification code before continuing.
The simplest option is to use Apple's built-in Passwords. This way you can simply right-click on the QR code and choose Set Up Verification Code.
Select the login you wish to associate the verification code with and click Add Verification Code.
The Verification Code has now been successfully linked to your account.
If you are using a different authentication app, such as 1Password or Google Authenticator you can scan the QR code, or copy and paste the text code into the app.
Your authentication app will now be able to provide a verification code, which you need to enter to continue.
Once two-factor authentication has been enabled, Daylite will require a verification code each time you log in. The process is the same on a Mac, iPhone or iPad.
Logging in still begins with your email and password just like before.
It is now followed by a Verification Code request. Enter the verification code from your Authentication app and click Verify.
If you do not have access to your Verification Code you can click Sign in with recovery code and enter one of the recovery codes you have previously written down, saved or printed.
It is important to note that once two-factor authentication is enabled, sign in will require an updated version of Daylite. Older versions of Daylite will not be able to sign into an account with two-factor authentication enabled.
However, any Mac, iPad, or iPhone that is already logged in will not need to re-authenticate.
Pro Tip:
helps save your passwords automatically, receive password suggestions, and gives you verification code integration with Daylite.
A recovery code can only be used once before it is invalidated, so you may decide to generate new ones to have on hand. You may also want to create new recovery codes if you have lost your old ones.
Sign into your account and select My Info, then click Generate New Recovery Codes.
Click Continue when asked to confirm. New recovery codes are generated and you are instructed to copy, print, or store them.
You can disable two-factor authentication by signing into your account and selecting My Info, then click Disable.
You will be asked to confirm your decision to disable two factor authentication and warned that your account is more secure with two-factor authentication enabled.
A company may decide to require all users to use two-factor authentication to log in.
The company's account administrator can turn on the requirement for two-factor authentication, which means each user will need to follow the steps outlined in this article to turn on two-factor authentication for their own account.
In order to turn on the company requirement for two-factor authentication:
The account administrator must log in to and select the Users tab.
Click Require Two-Factor Authentication.
The administrator can also see which users have enabled two-factor authentication, which is indicated with a 2FA badge on each user's row on the Users tab. The same badge will also show on the row for each device that has logged in using two-factor authentication. Note that existing devices are not forced to reauthenticate when turning on two-factor authentication, so the user would need to log out and log in again on a device for it to show the badge.
Two-factor authentication lets you enjoy peace of mind, knowing your Daylite data is protected. You are the only one who can access your account, even if someone else knows your password.
If you have ever had to reset a forgotten password you are definitely not alone. According to a recent study, many people create and manage up to an astonishing 100 passwords. With that many passwords to juggle it's no wonder one or two might be forgotten. This is the reason that passkeys exist.
Passkeys is the new industry standard for secure sign in to your apps and websites without using a password. Daylite has adopted passkeys to give you a simple and secure way to sign in. Passkeys are stored in Apple's iCloud Keychain so they are securely available on all your Apple devices.
There are two system requirements to use passkeys:
You must update your Apple device to iOS 16 or macOS 13 Ventura.
You must enable .
To add a passkey to your Daylite account open Safari on a device logged in to your Apple ID with iCloud Keychain turned on.
You can add a passkey using these steps:
Sign into .
Select the My Info tab.
Passkeys requires you to . This ensures your account is secure, and offers an alternative login method, using your password and verification code.
Once Two Factor Authentication has been enabled you will see Passkeys as an additional option under Security. Click Add a Passkey.
You will be prompted to save a passkey to Apple's Cloud Keychain, by first verifying your identity with Face ID, Touch ID, or your device password.
Passkeys has now been enabled on all your Apple devices.
To begin using passkeys to sign into your device, you must be logged into your Apple ID with iCloud Keychain turned on.
Open Daylite and click the email field in the Log In view, then select the suggested account in the auto-fill menu that appears.
Open Daylite and click the email field in the Log In view, then select the suggested account above the keyboard.
Open Safari to the Account Manager sign in and click the email field, then select the suggested account in the auto-fill menu that appears.
Follow the onscreen instructions to verify your identity with Face ID, Touch ID, or device password. You are now logged in to your account using your Passkey.
Sign in to and select the My Info tab.
Click Disable under the Passkeys section.
Confirm by clicking Disable in the alert that is shown.
If you are tired of trying to remember all your passwords, or have been forced to reset one recently, then passkeys is exactly what you need to keep your workday running smoothly.
Help keep your business data safe and set your mind at ease by turning on passkeys and in Daylite.
A great sales process is simple to follow, repeatable, easy to teach to new employees, and can be refined over time.
Daylite helps you streamline your sales process, so everyone will know what needs to get done. You will know at a glance who is doing what, so that everyone can work towards closing bigger deals faster. Daylite gives you simple yet powerful sales tracking and streamlining tools, and it all starts as an Opportunity.
An Opportunity Pipeline allows you to define each step in your sales process and keep track of how far along each Opportunity is in the sales process.
Pipelines are the foundation of your sales process, and provide the high-level steps you need to move each lead through. Pipelines are a visual representation of the sales process, are highly customizable, and are shareable with your whole team.
If you offer a variety of products or services, you may need a separate Pipeline for each one so you can customize accordingly.
Choose Daylite > Settings then select Pipelines.
Click + to add a new Pipeline.
Name the Pipeline and add a description of when it should be used.
Pro Tip:
If you are creating a new Pipeline that is similar to one you already have, click Duplicate Pipeline and update the new copy.
Defining the stages of your Pipeline is a great first step, but next you want to use your Pipeline to start tracking which stage each of your Opportunities are in. This way anyone can check on a new deal and see how it is progressing. Tracking stages is also helpful for creating custom Filters and Smart Lists, allowing you to report on your Opportunities. The first step is to add a new Pipeline.
Locate the Opportunity in either My Opportunities or All Opportunities.
Click the Tasks & Pipelines tab.
Click Choose a pipeline and choose the Pipeline you want to use.
Once you have a Pipeline selected:
Click the Stage you want your Pipeline set to.
Click Change Stage.
The current stage will be highlighted in blue.
Now that you have the big steps or stages of a deal, it is time to get into the nitty-gritty. Every stage of a Pipeline can have a custom set of activities for it, or a checklist of Tasks and Appointments, that are automatically filled in for you. You can assign these activities to your team, set due dates, reminders, and more.
To add an Activity Set to a Pipeline, open it by going to Daylite > Settings > Pipelines.
Select the Pipeline you want to add an Activity Set to.
In the appropriate Pipeline Stage, click + New Task or + New Appointment.
Pro Tip:
When you use @@ in the name of a Task or Appointment within an Activity Set, it will be replaced with the name of the item which it is added to. Eg. If you name a Task "Send quote to @@" and add the Pipeline to an Opportunity named "Marisha Key", the Task will be named "Send quote to Marisha Key".
Now when you change Stages in a Pipeline, you can have your Stage populated with all the Tasks and Appointments you already created.
After you’ve closed the deal, Daylite helps streamline the transition from closing the deal to completing the job by letting you create a new Project straight from an Opportunity.
Once you have closed the deal, select the Opportunity in Daylite, then click the More Options button in the top right corner and choose New Project from Opportunity.
Daylite will create a new Project linked to the Opportunity. Click the > arrow to view the Project.
The new Project will show linked Contacts, Notes, Emails, and Companies in the
With a simple-to-follow and repeatable sales process, you will close more deals. Whether a seasoned veteran or a recent hire, your sales team will have the information, expectations, and tools at their finger tips to be successful.
To learn more about how to create new Opportunities check out
Want help creating the perfect sales process? who can fine-tune your business processes by implementing Daylite in your workflows.
It can be tough letting go of the reins, trusting that the project you worked so hard on is safe in somebody else's hands. Learning to delegate is an important skillset, especially if you are a manager.
With Daylite, you can delegate Tasks while still maintaining oversight on the entire project.
The easiest way to create a Task is to use the New Item button. This button will change depending whether you're looking at Tasks or another item in Daylite.
When you're not viewing Tasks, click the down arrow next to the New Item button and choose to create a Task.
Pro Tip:
When delegating a Task, assign a due date on your Tasks so everyone knows what they need to do, and when the Task is due.
When creating the Task, follow the steps below to delegate it to someone else:
Name and add a description of the Task.
Click Delegate.
Click the pop-up button labelled delegate to and then select a person.
Select the checkbox labelled Notify me of changes
Now, when an assigned Task is updated you will receive a notification in Daylite on your Mac, iPhone, and iPad with a push notification.
Delegating action items from an email is critical to focusing on the biggest picture and getting control of your inbox. Daylite Mail integration allows you to link an email to a Task, and delegate it straight from your inbox so you can move on to the next issue.
Select the email you wish to delegate and select the Add to Daylite banner.
Click New Task.
In the Task pop up click Delegate, then choose the person you want to delegate this Task to.
Select Notify me of changes, and click Delegate.
The Delegated Task List contains all tasks currently assigned as Delegated To Me and Delegated By Me respectively. These Tasks can be filtered using the filter bar, by user and category, and marked as Done when the Task is completed.
Select the Delegated Task List from the left taskbar.
Highlight the Task you wish to view. You can see the Task details on the right hand side.
You can filter Tasks by user and category using the filter bar.
Click on the keyword in filter bar to view your Delegated Task.
Delegating is undoubtably one of the hardest things you may ever do, especially if you feel invested in the project. Daylite helps you delegate those special projects to your team, and gives you the oversight to maintain control of your business.
Scaling your business means organizing and adding to your team. With specialized roles a business is more focused, but with that complexity comes new challenges.
Daylite helps you simplify those challenges, and leverage everyone by organizing your employees into Teams.
Adding your existing teams into Daylite is a simple process:
On the menu bar choose Daylite > Preferences and choose Users and Teams.
Click on Teams.
To create a new Team:
Click the Add Team + button to create a new team.
Type the name of your team in the Team Name field.
Click the Add People + button to populate the team.
Pro Tip:
Teams don't have to only be departments. Build teams based on Projects, responsibilities or the levels of access.
A team's calendar can be a powerful tool, giving you more insights into what Teams are working on. Office Managers, Executive Assistants, and Dispatchers can create additional calendars to manage other people's schedule. You can save this calendar as a Smart List to reference whenever you wish.
On the Daylite sidebar click Team.
Select the Team you want to view with the Team Selector.
Click on View Calendar.
Having oversight while trying not to be a micro manager can be a tough balance. Knowing who is succeeding is important, but you don't want to slow everyone down with too many questions or updates.
Team View is a manager's dashboard that lets you get an overview of how things are going. Prepare for status updates, identify red flags, and plan further initiatives. Here is how that information is organized on Team View:
Today: Appointments and meetings scheduled for today as well as Projects and Tasks due
Overdue: Projects and Tasks that are overdue
Worklist: Tasks added to the worklist
Team View is also simple to access.
Select Team from the Daylite Sidebar.
Select the Team you want to view with the Team Selector.
The team members are grouped column style for easy viewing.
With Team View, you can determine whether a team is falling behind their due dates, what their focus is, and how many appointments they've made. At a glance, prepare for a meeting with your managers, take urgent corrective action and decide whether now is the right time to start new initiatives.
By setting up Teams in Daylite you can simplify complex issues and look at Tasks, Projects and Appointments in the context of each Team. With a single glance, you can gain insight about the status of a project, or the direction of a Team.


Decide which Category this activity set applies to.
Enter a Task or Appointment.
Fill in the Activity Set Details.
You may add additional stages by clicking the Add Stage button.
Choose Tasks and Pipelines.


Finally, you can check the Worklist for pinned tasks you've specifically chosen to work on next.


Click on the Daylite Verification Code field and it will automatically populate. If you have turned off the password auto-fill feature in Safari you will need to enter the Verification Code manually.
Daylite will now show you Recovery Codes, which you should copy or print, and store someplace safe in the event you lose or do not have access to your authentication app. Click Continue when ready.


Select either Projects or Opportunities, and make sure the Active box is selected.
You can add as many Stages as you wish to your Pipeline. Click + Add Stage, name the stage and click Done.
Fill in the details of the Task or Appointment. You can add as many Tasks or Appointments as you wish.
You can also view the newly created Project in My Projects with the same name as the Opportunity.


Click Delegate.
You can also create additional filters by adding Keywords to your delegated Tasks. This automatically creates a corresponding filter, viewable in the filter bar.


Click on the Filter Button.
Click Save as Smart List.


If your business requires you to juggle a lot of active Projects at the same time, keeping up with all of your Tasks and next steps can be cumbersome. Your Home Screen may become overwhelming, and clicking through all your Projects every day to find Tasks needing your attention can be tedious. Thankfully, Daylite gives you a better way to focus on just the Projects needing your attention.
Using Daylite's built-in Smart Lists to create Project dashboards can help you stay organized in ways you never dreamed possible. You can create Project dashboards that let you check in on Tasks that are due, overdue, or upcoming, so you can decide where your attention needs to be focused.
Missing deadlines can cost your business money. Creating a dashboard of all your Project Tasks that are due and overdue gives you insight into what you need to work on next.
Select All Projects from the Daylite Sidebar, then click the + button in the bottom left of the Sidebar and choose New Project Smart List.
Click the + button in the Smart List popover to add a new filter.
Change the Category filter to Tasks.
Prioritizing your upcoming Tasks becomes easier when you can see them all in one location. Creating a dashboard of Projects with Tasks due in the next seven days helps you stay better organized.
Control-click or right-click on the Smart List you just created, in this case Projects with Due Tasks, and choose Duplicate.
Change the Due Date filter to Due Date is in next 7 days.
Forming good habits takes time and repetition, and having the right system in place sets you up for success. Viewing your Projects with Due Tasks dashboard at the beginning of each day allows you to identify the Tasks for each Project you need to focus on.
Select the Project you want to view from your Projects with Due Tasks list, then click the Tasks and Pipeline tab. The Tasks and Pipeline View lets you see all of your Tasks grouped by Task List or Stage, and shows any due tasks in red.
Complete your due Tasks and then move down through each other Project in the list until your dashboard is empty.
Project dashboards can also be accessed by placing them in your Favorites Bar. Much like Apple's Safari web browser feature, you can drag your Project dashboard into your Favorites Bar for quick and easy access.
To check that your Favorites Bar is showing, go to Daylite > View > Show Favorites.
Drag and drop your Project dashboard into your Favorites Bar. You can re-order the Favorites Bar as needed.
Depending on your business needs, or perhaps just personal preference, you may wish to view a Project dashboard using the Multi-Column List. This view gives you more control over the information you can see at a glance, as well as how you want to sort your list.
To view the Multi-Column List, you can either:
(A) Go to Daylite > View > Multi-Column List.
(B) Click the Multi-Column List icon in the Daylite toolbar.
The Multi-Column List can be re-ordered by clicking on a column heading. For example, if you wanted to sort the list alphabetically by Name, you would click on the Name column. To reverse the sort, click on the column header a second time.
You can also Control-click or right-click anywhere on the header row to select from a menu of columns to show or hide.
Finally, you can drag and drop the columns into whatever order you wish.
Planning how best to tackle upcoming work can be daunting, but it doesn't have to be. By utilizing Daylite's built-in Pipelines and Activity Sets to create repeatable processes, you remove the stress of having to remember every single step.
If you've already created a Project Pipeline in the Daylite preferences, the next step is setting due dates on your Pipeline Tasks so you're reminded about all of your important Tasks at every Stage of every Project. If you haven't set up a Pipeline yet, check out the article . The steps below can also be followed to set due dates in your Activity Sets.
Go to Daylite > Preferences > Pipelines and select the Pipeline you want to edit.
Select a Task or create a new Task, then set due to after start or before end and set the number of days.
Setting aside time on a Monday or Friday to review Tasks for the upcoming week using your Projects with Upcoming Tasks dashboard is an excellent way to stay organized. Looking through the Projects in the list lets you know if there is anything coming up that needs your attention, and allows you to adjust due dates as needed.
One of the quickest and easiest ways to adjust your Task due dates is by using the Mini Calendar.
If your Mini Calendar isn't showing, click the Mini Calendar icon in the Daylite Sidebar.
Select your Project and click the Tasks and Pipelines tab.
Select the Tasks you want to adjust, then drag them onto the Mini-Calendar on the day you wish the Tasks to be due.
Tracking and executing the next steps of your Projects has never been so easy. No matter how many Projects you have on the go, Daylite helps you focus on the Projects and Tasks that need your attention. And by building a habit of regularly checking your upcoming Tasks you can ensure you're prepared for the week ahead and reduce the number of unexpected things that come up.
The world is a busy place.
We're always on the go, pressed for time, and even though we know our memories are far from perfect, we don't always stop and write things down. Remembering your client's birthday, or their favourite team sport for example, can be the difference between getting the sale and losing a valuable customer.
That’s why, no matter where you go, you can capture new Contacts quickly in Daylite.
Daylite gives you a lot of options to create a new Contact. You can create a new Contact within Daylite, on your iPhone and iPad, and from your Mail on the Mac.
The easiest way to capture a new Contact is to use the New Item button.
Select the New Person button, or click the drop down arrow to the right.
You can now fill in the appropriate Contact fields. Click Save when finished.
Daylite includes the Daylite Mail Assistant, an extension for Apple Mail. This extension allows you to capture things like new Contacts straight from your inbox, while also linking them to the email.
To begin, select the email and click Add to Daylite.
The Daylite Mail Assistant window now shows In Daylite > highlighted in orange to let you know the email has been added to Daylite, and the extracted Contacts from the email highlighted in blue. If an email is not extracted, Daylite may place it under Suggested. You can also click the magnifying glass next to Contacts and type in the name of the person you want to add to the record.
You can also link additional information such as Projects and Opportunities, Tasks, Appointments and Other inportant information data.
Click the arrow next to the Contact's name. This will open a popover that allows you to edit the Contact info as well as view the Contact in Daylite.
You're not always in front of your Mac, and that's where Daylite for the iPhone and iPad comes in.
Contacts you capture while on the go will sync with your other Daylite devices, so you always have the most up to date information.
Tap the Contacts tab.
Tap the plus (+) button on the top right side of the screen to add a new contact.
Choose to create a New Person, New Company, or Import iOS Contact.
Tap the Contacts tab.
Tap the plus (+) button on the top right side of the screen to add a new contact.
Choose to create a New Person, New Company, or Import iOS Contact.
Daylite gives you a lot of contact fields, but don't panic.
You don't have to use them all.
Gather the information you need today, and as your relationships grow you can edit existing fields, or add entirely new ones. You can add and change labels for fields when creating contact cards by clicking on the label. Additional Fields generate automatically, and you can assign each field as either Primary or Secondary.
For strategies about capturing new relationships, watch the .
When you classify your Contacts, you can do powerful things such as sort, filter, and segment your Contacts with Categories and Keywords.
Categories are the top-level contact classification. A Contact can only have one Category, so when classifying a Contact, consider who they are in relation to you and the business. Add a Category to a Contact by clicking the Category pop-up menu. If no Category fits, click Edit Categories... and create a new Category.
Here are a few examples of how you can categorize your Contacts.
Where they are in your sales funnel
Prospect
Lead
Customer
Keywords are more flexible than Categories. A Contact can have as many keywords as you want, so feel free to use them for as many reasons as you need. Add a Contact Keyword by clicking the plus button (+) next to the Keywords field and type the Keyword you want to add.
Here are a few examples of how you can use Keywords to classify your contacts:
Type of lead
Cold
Hot
Source
You'll rarely meet someone who isn't involved with another company or knows someone else in your network. When you link People and Companies together, you can choose within a Company, and between people.
Now you can always make sure you're speaking to the right person at a Company, track referrals, and see how your network grows.
When you link a Person to a Company, you can choose what their role is. This helps by documenting who does what in a company. That way, when you call or email a company, you're sure you're reaching the right people. You can also do things like build an entire campaign targeting specific roles, such as coaching for C-level executives.
When you link a Person to another Person, you can choose their relationship. This is helpful when working with multiple people in a family, tracking referrals or business partners.
Keep the details straight and capture new Contacts in Daylite.
More than just a contact manager, Daylite gives you powerful classification tools to track categories, assign keywords, as well as define roles and relationships. Remember it all, and action it in ways you never could before.
Is your sales process working for you? How would you know if it wasn't?
Having the ability to view every detail of your overall sales process can be hugely beneficial. With Insights and In-App Reports, Daylite gives you the information you need to understand your strengths, and where you may want to focus to improve your sales process.
Insight View offers a real time visualization for each of your Opportunities. Use it to see how many Opportunities you've Won, how many you've Lost, and how much money each of those Opportunities represent.
Insight View will also show you your top Opportunities, where they may be getting bogged down, who your Top Performers are, and even a historical view of when new Opportunities came in and when they closed.
Select All Opportunities from the Daylite Sidebar.
Choose Insight View from the Daylite Toolbar.
You will notice that fields turn red when you hover your pointer over them, including all corresponding fields related to your inquiry. Daylite does this so you can find the information you need quickly, as the highlighted red fields relate to each other. Double clicking on any red highlighted field will filter your search, in essence, drilling down one level further.
Opportunities- View Opportunities represented by Won, Lost, and Open Sales. This is a very high level view of what deals you currently have on the go.
Pipelines- All your Pipelines are represented here. This also includes each Stage assigned to a Pipeline.
Category and Keywords- Category and Keywords assigned to Opportunities are shown here. This is useful to see quickly which Categories or Keywords are generating sales opportunities.
Insight View is a fantastic way to find Sales information you need quickly and easily, however when it comes to printing out reports, nothing beats Daylite's Multi-Column List for customization.
As an example...
Select the Account Salesperson from the Owner list.
Select a Date range.
Select Multi-Column List from the Daylite Taskbar. Drag each column into the order you want. Right click the column to add or remove.
Your deals are a treasure trove of data that you can use to refine your process and close more deals. Use Insight View and Daylite Reports to improve your effectiveness, streamline your processes, and close more deals.
Interested in learning more about using Reports to track your Close Rate? Check out the article .
For some businesses, capturing new leads means writing names on a whiteboard, while others use spreadsheets or even scraps of paper. If you truly want to grow your business, you need to have a better system to remember all those details for you.
Daylite gives you an entire tool box to do exactly that. Tracking your leads, organizing all the moving pieces, and streamlining your sales process begins by capturing new business as Opportunities in Daylite.
Whether you use your Mac, email, iPhone or iPad to capture new business, Daylite is right there to help keep you organized. Enter an Opportunity's information on one device, and instantly access it from another. It really is that easy.
Your time is valuable, and you know from experience that every second counts.
That's why Daylite's keyboard shortcuts are such a brilliant time saver.
By applying even just a handful of these shortcuts, you will quickly find you have added time back to your day.
Business relationship
Supplier
Vendor
Coach
Employee
Personal contacts
Family
Friends
Trade Show 2018
Referral
Buyer preference
2 Bedroom House
Monthly Coaching Sessions
Wedding Package 2


Change the second filter to Due Date is before tomorrow.
Click the bottom + button to add another filter.
Change the third filter to Status is not Done.
Click the bottom + button to add another filter.
Change the fourth filter to Status is not Cancelled.
Double-click on the Smart List name and change it to Projects with Due Tasks.


Dates- These are broken down by Create, Start, Forecasted, End and Modify Dates. You can use the Date slider to help drill down to specific dates or times.
State- Find out how many Opportunities were Won, Lost, Open, or Suspended. These are represented by the number of Opportunities, as opposed to the sales amount.
Type- This field represents where the Opportunity originated from. This is a great way to discover quickly where your marketing dollars are doing them most good.
Owner- This field represents who owns the account. It lets you see at a glance who your best Sales person may be, but also who may need guidance or assistance.
Highlight the Opportunities you want to include in the printed report.
Navigate to Daylite > File > Print and select which style of Report you want printed.
Daylite's Reports** can be also be used for PDF Reports, Sales Meetings, and Summaries.


To create a new Opportunity, click All Opportunities or My Opportunities in the Daylite Sidebar, then select + New Opportunity.
Alternatively, if you're not viewing an Opportunity, you can click the downward facing arrow next to the New Item button and choose New Opportunity. For example, you might have People selected in the Sidebar and want to create a new Opportunity without leaving your spot.
Whether responding to a marketing email, online form, or after handing out your business card, email is one of the most common ways new business starts.
Daylite includes the Daylite Mail Assistant, an extension for Apple Mail. It allows you to capture things like new Opportunities straight from your inbox, while also linking them to the email.
You're not always in front of your Mac and that's where Daylite for the iPhone and iPad comes in. The Opportunities you create while on the go will sync with your other Daylite devices, so you always have the most up to date information.
Tap the Objectives tab.
Tap the + button.
Select New Opportunity.
Fill in all the information you have for the Opportunity, then tap Save.
Daylite gives you a lot of Opportunity fields to fill out. Don't worry though, you don't have to use them all. Gather the information you need today and as you learn more, or update your sales process, you may decide to fill in additional fields at a later date.
Every Opportunity should have the Name, Start Date, and Details filled in. You may also want to add a Forecast Date as a guide for when you expect a deal to close, as well as create an Estimate to track an Opportunity's total value.
Be sure to link any People or Companies that are relevant to the Opportunity.
If you need to capture more information, click add field at the bottom of the Opportunity card and add the field you need. For even more fields, check out Custom Fields and
Pro Tip:
Adding the same field over and over again?
Add it as default!
Choose Daylite > Preferences and select Defaults. Now add the fields in the Opportunities tab.
Custom fields give you more flexibility. With 12 extra fields and 4 extra dates for Opportunities, you can choose what information you capture.
Choose Daylite > Preferences > Custom Fields
Select Opportunity and add the names of any custom fields or custom dates you require.
Opportunities will now have access to these fields from the add field menu.
When you link a Form to an Opportunity, you can capture more details and have more flexibility with the type of information you use.
To create a Form, go to Daylite Preferences and select Forms
Click the + sign to create a new Form template.
Give your template a name and description.
Make it Active.
Now you can select the Form you just created from the … button.
Estimates are a way to track the total possible business a new Opportunity offers. This can be used for internal tracking but you can also send a simple quote to a lead as a PDF.
Click the Estimate tab on an Opportunity.
Click the + button to add a custom line item or choose an item from your saved Products and Services.
You can adjust the number of items, price discount, etc.
Now when you click the Details & Activity tab you will see that the total field matches the estimate total.
Pro Tip:
Frequently adding the same products or services to your Estimates?
Add them as reusable line items in Daylite > Preferences > Products and Services.
Once you have the basics down, it's time to classify the Opportunity. Classifying your Opportunities is where Daylite sets itself apart. With Categories and Keywords, you can sort, filter, and segment your Opportunities.
A Category is the top-level classification in Daylite. An Opportunity only has one Category, so think about how you want to organize your Opportunities.
To choose a Category, open the Category pop-up menu. If no Category fits, click Edit Categories... to open the Daylite Category Preferences and create a new Category.
Here are a few examples of how you can categorize your Opportunities.
Products or services your leads are interested in buying
Personal Coaching
Group Training
Speaking Event
Types of leads
Hot
Cold
Sources for your leads
Email Marketing
Trade Show 2019
Keywords are a more flexible way to classify your Opportunities. An Opportunity can have as many Keywords as you want, so you can use them for multiple reasons.
To choose a Keyword, click the + button.
If no Keyword fits, type the Keyword you wish to use, then click New Keyword... to create and add it to your Opportunity.
Here are a few examples of how you can use Keywords to classify your Opportunities:
Type of client
VIP
Repeat customer
Family/Friend
Buying preferences
Additional Photographer
2 Week coaching session
2 bedroom
Specific marketing campaigns
10% off referral
re-targeting ads
holiday landing page
When linking people to an Opportunity, you could begin by adding members of your team, like the lead salesperson or account manager, then add your customers.
Next assign their roles, such as decision maker, or IT Manager. Now when you contact a client, you can make sure you're speaking to the right person at the right time.
Now that you've added all the essential details, classified your Opportunities, and added everyone's roles, go ahead and save your Opportunity.
With all the details about an Opportunity captured in one place, your Team now has the tools to close more deals and take your business further.
Click here to Organize the Moving Pieces In A Deal and Build a Streamlined Sales Process.
Bottom Arrow
Open a drop-down menu.
Select a Token and press Return
Performs a slide over and displays the selected Object.
Select a Token and press Delete
Removes the Token.
Click a date field to open the date picker. Highlight either year, month, or date in the date field.
Increases the day/month/year. Decreases the day/month/year. Switches between year/month/date.
Up Arrow/Down Arrow/Left/Right Arrow + ESC
Close the date picker.
Option-Mouse Click
Hold Option and click a task checkbox to set the status of the task as ‘cancelled’. In DMA if you option-click an arrow in a token it will take you directly to that record in Daylite.
Option+Save button on New Objects
Holding down option when saving from the "create" window will take you to a new Object in the main window.
Option-Click+Drag On Appointments
Hold down option dragging a selected Appointment in the Calendar to duplicate it.
Command-A
Select All
Command-C
Copy
Command-E
Edit
Command-F
Find
Command-G
Find Next
Command-H
Hide Daylite
Tab
Go to the next field.
Shift-Tab
Go to the previous field.

If you have ever found yourself looking back through old emails trying to locate key details about a client interaction, or you’ve tried locating a conversation thread that remains elusive, then Daylite has the perfect solution.
We call it Daylite Mail Assistant; a powerful extension for Apple Mail.
Imagine...
Not just creating a new Contact from an incoming email, but actually linking all your email correspondences, Tasks, Appointments, Projects and Opportunities to the Contact, without ever leaving Apple Mail.
The Daylite Mail Assistant window is always open as you respond to your emails, making it easy to see all your related items in Daylite at a glance, and quickly link to other items as required.
Daylite Mail Assistant creates a more efficient workflow for all your emails, helping you focus on what's important to you.
Your clients.
The Daylite Mail Assistant window currently requires the Direct download version of Daylite.
To check which version of Daylite you have, and to switch to the Direct version if necessary, please review the help article titled
Although the Daylite Mail Assistant window comes installed with Daylite, it will need to be turned on and given permission to access Apple Mail.
Open Apple Mail and go to Settings > Extensions.
Click the checkbox beside Daylite Mail Assistant and confirm your choice by clicking the Turn On button in the alert that pops up.
If you have already been using the Daylite Mail Assistant extension, then launching Daylite will show the Daylite Mail Assistant window with instructions for enabling the required permissions for Accessibility and Automation.
Use the Open Settings buttons and enable the required permissions in Settings.
The Daylite Mail Assistant window will appear with instructions for enabling the required permissions for Accessibility and Automation. You will be required to turn these permissions on.
Use the Open Settings buttons and enable the required permissions in System Settings.
Accessibility Settings:
Automation Settings:
Now you can open Mail, and the Daylite Mail Assistant window will show information for the selected email message.
That's it!
You have successfully turned on Daylite Mail Assistant.
The Daylite Mail Assistant window can be attached to the Right Side or the Left Side of Mail. Once attached to either side, the window will resize automatically if you either move or adjust the size of the Mail window.
The Daylite Mail Assistant window can also be resized to fit comfortably, and overlayed anywhere on the Mail app. This is called Detached.
The Daylite Mail Assistant window shows automatically when you are using Mail, and hides whenever you either switch to another app or close Mail.
If you would like to temporarily close the Daylite Mail Assistant window, you can use the red close button in the window's title bar. The Daylite icon will be displayed in the top corner of the Mail window when closed, and you can click it to show the Daylite Mail Assistant window again, when you are ready.
If you would like to add an email and its contents to Daylite, just click the Add to Daylite button in the Daylite Mail Assistant window.
The Add to Daylite button will change to In Daylite, and the Daylite Mail Assistant window will add the email to Daylite. If the email is from an existing Daylite Contact, or there is a Daylite Contact in the To, Cc, or Bcc fields, the email will be auto-linked to the Contact, as well as the active Opportunity or Project the Contact is linked to.
From the Daylite Mail Assistant window, you can view a Contact's detail card by clicking on the arrow to the right of their name. From here you can view all of their details, but to see their full history in the Activity View, click the Show in Daylite button.
If you click this button Daylite will then show you the full history of this Contact, including the linked email in the Activity View.
There are two ways you can compose a new email message.
The first way is to select the Compose new message icon in Mail.
The second way is when you reply to an email message that has been sent to you.
Once you have composed a new message in Apple Mail and added all of your recipients, you can open Daylite Mail Assistant by clicking the icon in the toolbar. If you have auto-adding turned on, the email will be added to Daylite, otherwise you can click the Add to Daylite button. Any Daylite Contacts will be automatically linked to the email.
Adding an email to Daylite you're about to send is a quick and easy process, and is encouraged because then you have a record of any outgoing correspondence in one easy-to-view location.
Pro Tip:
If you have the auto-adding setting turned on, you don't need to open Daylite Mail Assistant in the Compose window. In this case, the email will be automatically added to Daylite when you send the email, as long as there is a Daylite contact in the To, Cc, or Bcc field.
As with any object created in Daylite, it is vital to link all the important information to your emails so everything is together in one place. Thankfully, Daylite makes this easy. In most cases, Daylite automatically links the most important information for you, such as the associated Contacts and any Opportunity or Project linked to those Contacts. But it's easy to add other things as well.
The Daylite Mail Assistant window shows information for the selected email message, including:
Whenever you add an email to Daylite, whether you add it manually or it is automatically added for you, any of the email participants with an email address matching an existing Contact in your Daylite Contact list will be automatically linked to the email. This includes both People and Companies.
By default, when a Person is linked to an email, the Person's primary Company is also linked. If you don't like this behaviour, you can turn it off by going to Daylite > Settings > Companies and unchecking the option Auto Link Person Notes and Emails to the Person's Default Company.
When you add an email to Daylite from or to a Daylite Contact, that Contact's currently active Project and/or Opportunity will be automatically linked to the email as well. If the Contact has multiple active Projects or Opportunities linked to them, those Projects or Opportunities will be shown as suggested links, and you can click the ones you want to have linked to the email.
You can also create new Projects and Opportunities directly from the Daylite Mail Assistant, making it easy to capture new leads (as Opportunities), or begin new Projects for a repeat client.
Whenever Daylite Mail Assistant identifies Contacts, Projects, or Opportunities that might be related to the current email, it will show them in a grey outlined button, making it easy for you to identify and link the correct information to each email. Clicking on a suggested item will link the item to the email, and if the email hasn't been added to Daylite yet it will also add the email to Daylite. The item will turn blue to indicate it is linked, and you can click the item again to unlink it.
In some cases an email might be related to someone who isn't actually a part of the email thread. When this happens the email can be added to that person manually. Use the magnifying glass icon to search for the Person and manually link them to the email. The email will now be added to that Person's history in Daylite. You can search for and link to other Daylite items as well.
Daylite Mail Assistant is an excellent capture tool that really helps to clear up your inbox, thanks in part to Tasks.
From any email that requires a follow-up or a next action, simply create a Task and it will be linked to the email and the person who sent it. Then you can review your Tasks any time you want to, either from the Contact's Activity View or from the My Tasks section of Daylite. Be sure to add a due date and reminder to your Task so you don't forget about it.
A great practice is to create a New Task reminding yourself to follow up with this email if you haven't heard back within a few days. Make sure to give your task a due date, and when you get your reminder, it will be linked to the email.
Pro Tip: Try to state clearly what needs to be done, and what the desired outcome would be when creating titles for your Tasks.
For example, rather than using the title Follow up, try something like Call Frank to see if he wants to move forward with the Project. Tasks written with the desired outcome are more helpful when reviewing your Tasks at a later date.
You can create a new Appointment directly from Daylite Mail Assistant, which is then viewable in your Daylite Calendar. The email and the Contact will be linked to the Appointment, making it easy to review the details of your Appointment later.
If you would like to assign a Category or any Keywords to your emails, you can add them from the Daylite Mail Assistant.
Do you want to manually add emails to Daylite, or would you prefer to let Daylite add them automatically? You can choose either option.
A message must be selected and shown in the Daylite Mail Assistant window before it is auto-added, including each message in a thread.
You can also choose which items to have auto-linked to an email when an email is added to Daylite, including Contacts, Users, Opportunities, Projects, and Attachments. Linking your emails to your Contacts, Opportunities, and Projects is especially important, because Daylite will then show your email communication chronologically in the Activity View in Daylite, making it easy to find your client email history later on.
To set up these options, go to Daylite > Settings > Mail Assistant.
Select whether you want to add emails manually by clicking the Add to Daylite button, or automatically when an email is viewed or sent.
Next, select which items you would like to have automatically linked to an email when the email is added to Daylite.
Don't worry, you can always unlink an item if necessary.
You can set a default Category or Permissions for any email that is added to Daylite.
Categories describe the email in a single word, such as Internal, Client, or Onboarding.
Permissions refer to an email being either Public or Private, or visible to a specifc team that has been set up in the Daylite Permissions settings.
This is helpful when dealing with sensitive subject matter that shouldn't be shared with everybody. For example, you could change the permissions so only the Management Team can view the email.
Navigate to Settings > Default Values > Emails and choose a Category or Permissions.
Here are three different scenarios where Daylite Mail Assistant can help.
First, create a new Daylite Contact. The name of the sender is displayed as a suggested Person with a "+" symbol, indicating they can be added to Daylite as a new Person.
Second, create a new Task. Often an email from a new contact requires a follow-up reminder or a next action. If you have already added your new contact to Daylite, then creating a new Task in Daylite Mail Assistant will automatically link the Task to that Contact.
Pro Tip: Set a due date and reminder on your Task so you're reminded about it later and it doesn't slip through the cracks.
Daylite Mail Assistant finds existing Contacts in Daylite based on their email address. So if someone you know emails you, but their Daylite Contact doesn't have that email address, you can search for them and add the new email address to their Contact record.
The Contact will appear as a suggested Person, and when you click on them a view pops up with the option to search Daylite. Search for the person's name, select the Person, and click "Add to Existing". Their new email address will be added to their existing Contact record in Daylite, and the Person will now be linked to the email.
Sometimes an email is related to a Contact who isn't actually a participant in the email conversation. Click the magnifying glass icon next to "Contacts" to search the Contact you want to link to this email. This is a one-time link only and it will not link future emails in the thread to this Contact automatically.
If the Contact you are searching for ends up not being in Daylite, the search view will give you the option to create a new Person or Company. After creating the new Contact, you can click the arrow next to their name to open their detail card, then click Edit to add any additional information such as Category or Keywords.
Pro Tip: If you're creating a new Contact from a generic email address such as [email protected], it's probably more useful to create a new Company rather than a Person, since those emails aren't usually from a specific person.
The Projects Board helps you visually track how your projects are progressing, identify the bottlenecks, and prioritize what’s most important so you can always deliver on your promises.
The Projects Board is available in Daylite on Mac, iPad, and iPhone. It offers an overview of how your Projects are moving through each Pipeline, and helps you identify which ones you should focus on.
The Projects Board in Daylite on Mac is located in the Sidebar under Objectives.
It is comprised of:
Command-J
Jump to Selection
Command-M
Minimize
Command-P
Command-Q
Quit Daylite
Command-R
Refresh
Command-S
Save the edit card
Command-T
New tab
Command-V
Paste
Command-W
Close window
Command-X
Cut
Command-Z
Undo
Command-]
Indents the selected task and makes it a sub-task of the task above it
Command-,
Open the Preferences
Command-[
Outdents the selected sub-task
Command-[
Back
Command-;
Expand/collapse fields in row
Command-Option-F
Go to Search
Command - Shift - Up Arrow
Moves task up one level
Command-Shift-Down Arrow
Moves task down one level
Command-Shift-] or Control-Tab
Next tab
Command-Shift-[ or Control-Tab
Previous tab
Control-R
Refresh the DMA panel in Mail from Daylite
Control-Command - J
Day View
Control-Command-M
Month View
Control-Command-W
Week View
Control-Command-X
Add email to Daylite from Mail (via DMA)
Control-Command-Z
Show/Hide Daylite Assistant in Mail
Control-Option-Command-X
Remove email in Daylite from Mail (via DMA)
Option-Command-J
Go to Date
Option-Command-M
Write Letter in Daylite
Option-Command-N
new main window
Option-Command-T
Special Characters
Option-Command-1
List
Option-Command-2
Multi-Column List
Option-Shift-Command-V
Paste and match style
Shift-Command-B
New appointment
Shift-Command-D
Send an email from Mail
Shift-Command-G
Find Previous
Shift-Command-K
shift-command-K
Shift-Command-O
New opportunity
Shift-Command-P
Page setup
Shift-Command-T
New task
Shift-Command-Z
Redo
Shift-Command-\
Show all tabs


The Pipeline Filter.
Filters.
Sort and View Options.
Stages.
Projects.
The Projects Board lets you see at a glance where there may be bottlenecks in your currently in-progress projects. This view can help identify areas of concern, such as projects that are stuck at a particular stage, so you can focus on moving them along.
In the example below, there are five Projects under Approval, meaning this may be an area you want to focus on to prevent a bottleneck in your process.
The Projects Board is tied directly to the Pipelines you create in Daylite Preferences.
In Daylite for Mac, navigate to Preferences > Pipelines.
Click the + button to enter Pipeline information. Be sure to select Projects and click Active from the Applies to section.
Click on New Stage to create a Pipeline Stage.
Click on + Add Stage to create additional Stages.
Select New task to create a Task that needs to be completed for each Stage.
Select New appointment to create an Appointment that needs to be completed for each Stage.
Select due and set the date to either after the stage starts, or before it ends.
Close the Preferences window and select the Projects Board.
Choose your Pipeline.
The Stages in the Pipeline are now an exact match for the Stages in the Preferences menu.
A Project must have a Pipeline assigned for it to be included in the Projects Board view.
Select which Project Pipeline you want to add a new Project to, then click New Project in the Projects Board.
The Projects Board shows a column called Not Started for any new projects. Projects stay here until moved to a stage in the Pipeline.
Move your Projects to the next Stage in your Pipeline by dragging them from one Stage to the next.
Dropping the Project onto a Stage's title prompts an Advance Stage window that lets you verify or change the Start Date and leave Notes.
The Projects Board only shows Projects that have a New or In Progress status. Projects in any other statuses will not be shown here, but are viewable in the Sidebar under All Projects. That is also why Projects disappear from the Projects Board when you change the Status to Cancelled, Deferred, Abandoned or Done.
As you begin to move your Project from one Status to another, there are four different Statuses that appear at the bottom of the Projects Board. These Statuses are:
Cancelled
Deferred
Abandoned
Done
Dropping an Project onto any of these Statuses prompts a window at the bottom of the Board to appear, which lets you verify or change the Status.
The Status is automatically updated in the Details and Activity View.
The Projects Board can show only one Pipeline at a time, since the Stages for each Pipeline are different.
Select the Pipeline you would like to view by clicking the Pipeline filter.
This option filters Projects by the owner or assignee. You can filter by individual Owner, or view All Owners at one time.
This option filters Projects by due date. You can look at due dates up to a year, both past and future.
This option filters Projects by the date the Project was created, up to a year, both past and future.
This option filters Projects by Categories, which can be designated in Daylite Preferences.
You can change how you view Projects by clicking ↑↓ Sort and choosing from the following:
Due Date organizes each Project by due date.
Created organizes each Project by the date you created it.
Name organizes your Projects alphabetically.
Priority organizes your Projects by priority.
Next Activity organizes your Projects by next scheduled Task or Appointment.
Days in Stage organizes your Projects by the number of days they have remained in one Stage.
You can view an Project's Linked People and Companies here.
A Project's next activity will appear here.
If a Project has a due date it will appear here.
The Projects Board tells you how many days an Project has been at the current Stage. This feature helps identify which Project may be getting bottlenecked, and how best to move them along to the next Stage. Moving the Project to the next Stage resets this number.
On a scale of 1-10, how important is this Project? You can quickly view the Project's Priority here.
You can quickly see who owns or is assigned to a Project by looking at the bottom right side of the Project Card. If applicable, a small photo of the owner will show.
View Options allows you to hide or show certain information from a Project's card, to help you focus on what is most important to you.
The Projects Board offers an exciting new way to view every project in each of your pipelines.
You can view your entire Projects Pipeline at a glance, to help identify areas of concern, focus on your top priorities, and deliver on your promises.


Every single book author will tell you the first page is always the most difficult. It's a blank slate, just waiting for you to fill. It can be scary, but it can also be exhilarating. Starting a new project might feel the same way at first, but Daylite makes it easy.
Whether deliverables for customers or internal initiatives, Daylite helps you execute on your plans by keeping everything in one place.
There are a few different ways you can create a new Project in Daylite, depending on where you are in the app.
First let's look at different ways you can start creating a Project, and then we will walk through filling in the details and look at what you can customize.
The first way to start a new Project is to click either All Projects or My Projects under Objectives in the Daylite Sidebar.
Select + New Project from the New Item button.
You can create a project from a new or existing Contact. For example, if you were on the phone with a client and wanted to create a new project for them, this would link the new project to the contact.
Click on People in the Contacts section of the Daylite Sidebar.
Select the … icon in the Activity View.
Select New Project from the menu.
Email is one of the most common ways a Project starts. Daylite includes the Daylite Mail Assistant, a plugin for Mail on the Mac. It allows you to capture new Projects straight from your inbox, and link the relevant email so you can reference it later from the Project Activity.
If you would like to add an email to Daylite, click the Add to Daylite button. The button will then change to In Daylite, which indicates that the current email has been added to Daylite.
Click New Project under the Objective section.
Another way to start a new project is from an existing Task. You can convert an existing Task into a New Project in a few easy steps.
Click on My Tasks under the Tasks section in the Daylite Sidebar, then select the Task you want to convert to a New Project.
Next, choose Edit > Convert Task to Project.
As you can see from the screenshot below, the Task has been successfully converted into a Project, and placed in My Projects
You can also create a new project from an Opportunity in much the same way you do for Tasks.
Click on My Opportunities under the Objectives section of the Daylite Sidebar, then select the Opportunity you want to convert to a New Project.
Choose Edit > New Project from Opportunity.
As you can see from the screenshot below, the Opportunity has been successfully converted into a Project, and placed in My Projects
Daylite gives you a lot of fields for your Projects. Just remember, you don't have to fill them all at once. Take your time, and fill in only the fields you have the information for. As your project takes shape, you can fill in more and more details.
Use the information you have now, and as you improve your processes, start using the different fields as needed.
Every project should have a project name, start date, and due date, as well as a description of the project in the details field.
You can enter keywords or categories for your project.
If you need to capture more information, click add field at the bottom of the project card and add the field you need.
Pro Tip:
Adding the same field over and over again?
Add it as a default!
Choose Daylite > Preferences and select Default Values. Click Projects and add the fields you want to always see.
Once you have the basics down, it is time to classify the Project. Classifying your Projects is where Daylite sets itself apart. With and , you can sort, filter, and segment your projects to learn what kinds of projects you are managing the most, and determine how to increase your productivity. With you can quickly identify who on your team is responsible for what, and who you should speaking with at a company.
A category is the top-level classification. A Project has only one category, so think about how you want to organize your Projects.
Here are a few examples of how you can categorize your Projects:
Product or service
Personal Coaching
Group Training
Speaking Event
To choose a Category, click on the Category pop-up menu. If no category fits, click Edit Categories... to open Daylite Category Preferences and create a new Category.
Keywords are a more flexible way to classify your Projects. A Project can have as many keywords as you want, so you can use them for multiple reasons. To add Keywords click on the + button next to Keywords and type the Keyword you want to add.
Here are a few examples of how you can use Keywords to classify your Projects:
Objectives
Website Revamp
Customer Acquisition
Increasing Customer Satisfaction
Link the people working on a project, like a project manager, designer, decision maker or other roles you may have. Then add your customers so you can make sure that if you need to contact them, you're reaching out to the right person.
Custom fields give you more flexibility. With 12 extra fields and 4 extra dates for Projects, you can choose what information you capture.
Choose Daylite > Preferences.
Choose Custom Fields.
Select Projects and type the title of the custom field you wish to use.
With all the details about a project now in one place, your team has the tools to execute your plans and take your business further. Now you're ready to and
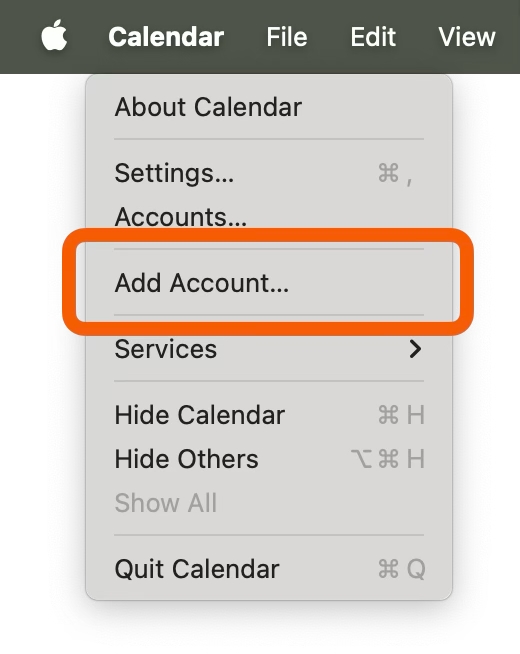


Link the project to people, by clicking Add Person.
You can also delegate this project to others by clicking the Delegate button.
Is this for you or a customer?
Internal
External
Who owns the Project?
Marketing
Human Resources
Executive team
Type of Client
Referral
Big Contract
Family/Friend
Additional service or product options
Additional Photographer
2-week coaching session
2 bedroom


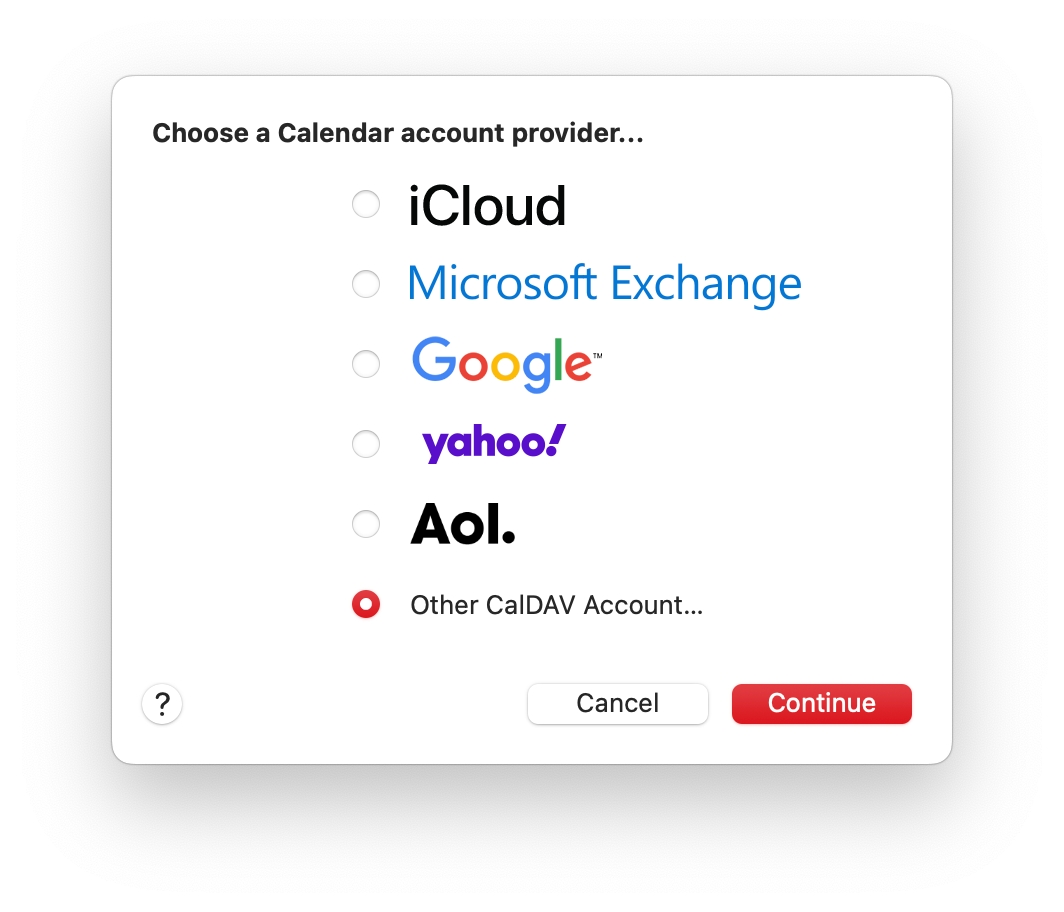
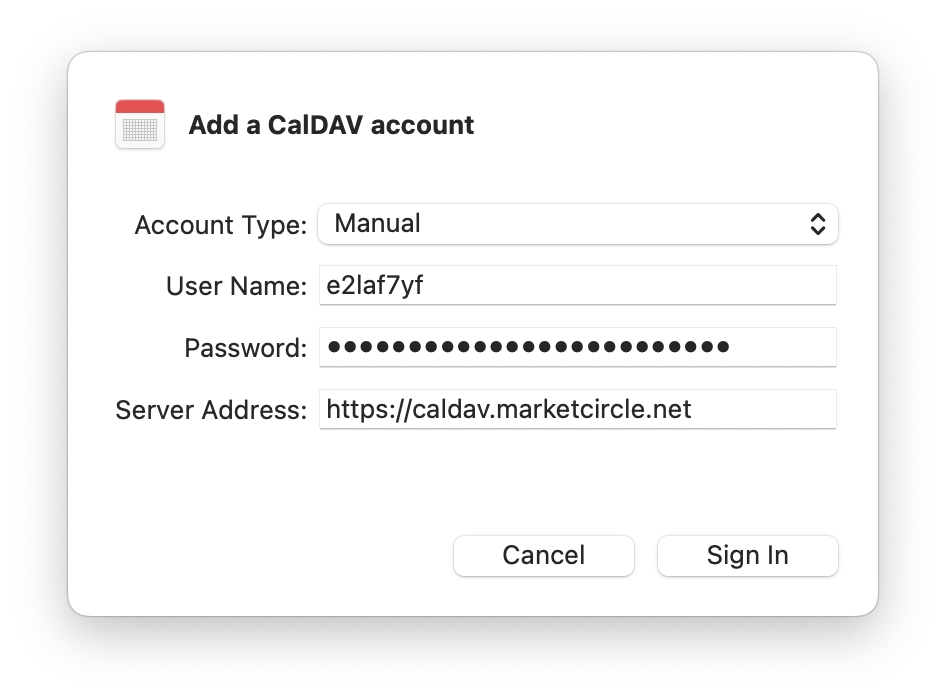
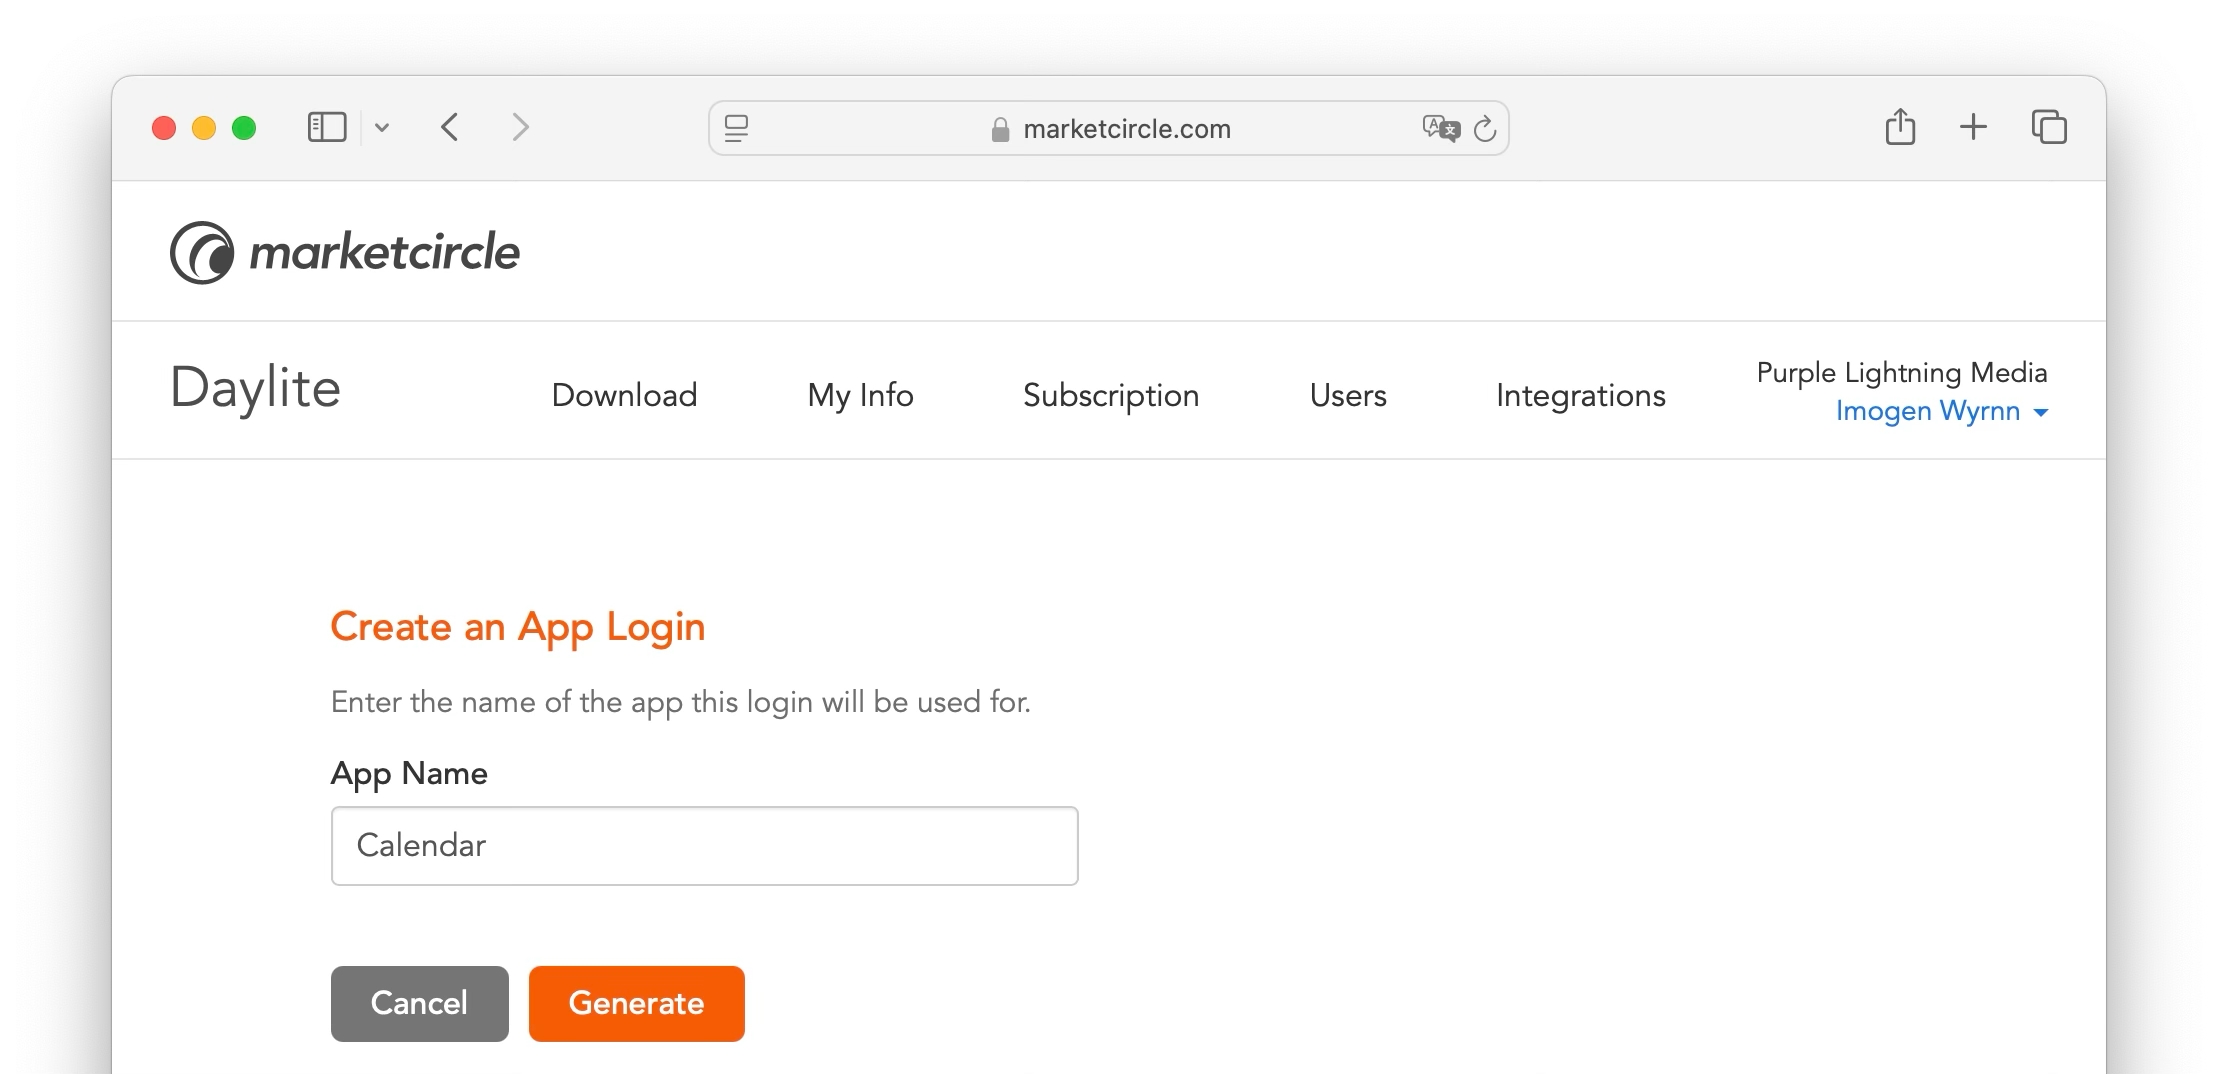
The Opportunities Board lets you visually track how many Opportunities are in your Sales Pipeline, see where each of your Opportunities are in the process, and helps you easily prioritize your most urgent or valuable Opportunities first.
The Opportunities Board is available in Daylite on Mac, iPad, and iPhone. It offers an overview of how your open Opportunities are moving through each Pipeline, and helps you identify which ones you should focus on.
The Opportunities Board in Daylite on Mac is located in the Sidebar under Objectives.
It is comprised of:
The Pipeline Filter.
The Opportunities and Total Value Count.
Filters.
Sort and View Options
The Opportunities Board for iPad and iPhone is located under the Objectives tab, with the same components as above.
The Opportunities Board lets you see at a glance where there may be gaps in your current Pipeline process. This view can help identify areas of concern, such as deals that are stuck at a particular stage, so you can focus on moving them along.
In the example below, there is only one Opportunity under Inquiry, meaning this may be an area you want to focus on to increase the number of Opportunities in this Pipeline.
This Pipeline is better weighted, with more Opportunities in the Inquiry stage, and fewer in Opportunities in the other Stages.
The Opportunities Board can show only one Pipeline at a time, since the Stages for each Pipeline are different.
Select the Pipeline you would like to view by clicking the Pipeline filter.
The Opportunities Board is tied directly to the Pipelines you create in Daylite Preferences.
In Daylite for Mac, navigate to Preferences - Pipelines.
Click the + button to enter Pipeline information.
Click on New Stage to create a Pipeline Stage.
An Opportunity must have a Pipeline assigned for it to be included in the Opportunities Board view.
Click New Opportunity in the Opportunities Board and select which Pipeline you wish to assign the New Opportunity to.
The Opportunities Board shows a column called Not Started for any new opportunities. Opportunities stay here until moved to a stage in the pipeline.
You can see the total number of Opportunities you have in the selected Pipeline, as well as their combined total value here.
Move your Opportunities to the next Stage in your Pipeline by dragging them from one Stage to the next.
Dropping the Opportunity onto a Stage's title prompts an Advance Stage window that lets you verify or change the Start Date, create Tasks and Appointments, and leave Notes.
The Opportunities Board only shows Opportunities that are in an Open state. Opportunities in any other State will not be shown here, but are viewable in the Sidebar under All Opportunities. That is also why Opportunities disappear from the Opportunities Board when you change the State to Lost or Abandoned for example.
As you begin to move your Opportunity from one Stage to another, there are four different States that appear at the bottom of the Opportunities Board. These States are:
Lost
Abandoned
This option filters Opportunities by sales person, or account holder. You can filter by individual Owner, or view All Owners at one time.
This option filters Opportunities by the date the deal should close by. You can look at forecasted close dates up to a year, both past and future.
This option filters Opportunities by the date the Opportunity was created, up to a year, both past and future.
This option filters Opportunities by Categories, which can be designated in Daylite Preferences. New Hire, Silver, Gold and Diamond Services have been created in this example.
This option filters Opportunities by how they were acquired. You can choose to filter by Cold Calls, Trade Shows, Referrals and many more. These options can be set in Preferences.
You can change how you view Opportunities by clicking ↑↓ Sort and choosing from the following:
Forecasted Close organizes each Opportunity in their Pipelines, so you can see when a sale is scheduled to wrap up.
Created organizes each Opportunity by the date you created it.
Name organizes your Opportunities alphabetically.
You can view an Opportunity's Linked People and Companies here.
Double click the Opportunity Card, then select edit to change this value.
You can view an Opportunity's Value and Probability of Closing here.
Double click the Opportunity Card, then select edit to change these values.
If an Opportunity has an upcoming Task or Appointment a notification will appear here.
Double click the Opportunity Card, and select Tasks and Pipelines to view or change the due dates.
If an Opportunity has a forecasted close date it will appear here.
Double click the Opportunity Card, select Details and Activity to view the forecasted close date, or select edit to change this value.
The Opportunities Board tells you how many days an Opportunity has been at the current Stage. This feature helps identify which Opportunities may be getting bottlenecked, and how best to move them along to the next Stage. Moving the Opportunity to the next Stage resets this number.
On a scale of 1-10, how important is this Opportunity? You can quickly view the Opportunity's Priority here.
Double click the Opportunity Card, select Details and Activity to view the priority, or select edit to change this value.
You can quickly see who owns or is assigned to an Opportunity by looking at the bottom right side of the Opportunity Card. If applicable, a small photo of the owner will show.
View Options allows you to hide or show certain information from an Opportunity's card, to help you focus on what is most important to you.
The Opportunities Board offers an exciting new way to view every opportunity at each stage in your pipeline.
You can view your entire Sales Pipeline at a glance, to help identify areas of concern, focus on your top priorities, and close more deals.


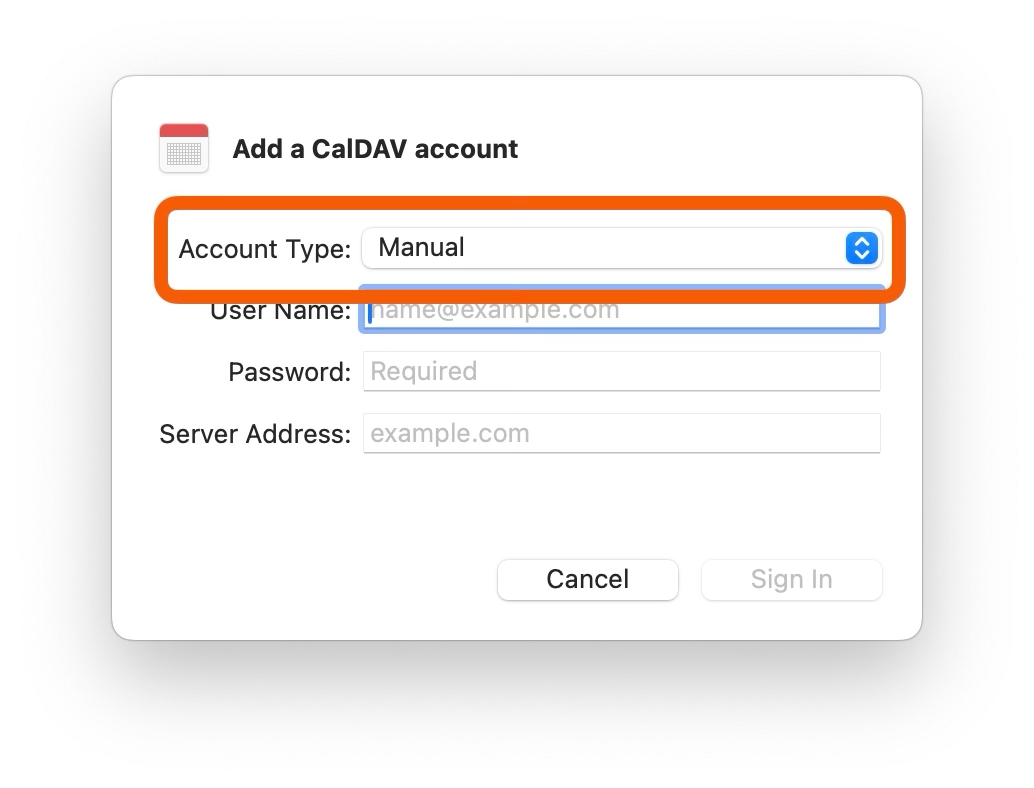
Stages.
Opportunities.
Click on + Add Stage to create additional Stages.
Select New task to create a Task that needs to be completed for each Stage.
Select New appointment to create an Appointment that needs to be completed for each Stage.
Select due and set the date to either after the stage starts, or before it ends.
Close the Preferences window and select the Opportunity Board.
Choose your Pipeline.
The Stages in the Pipeline are now an exact match for the Stages in the Preferences menu.
Won
Dropping an Opportunity onto any of these States prompts a window at the bottom of the Board to appear, which lets you verify or change the State as well as select a reason.
The State is automatically updated in the Details and Activity View.
Total Value organizes your Opportunities by their total value.
Probability organizes your Opportunities by the likelihood they will close. This percentage can be assigned to the Opportunity under Details and Activity.
Next Activity organizes your Opportunities by next scheduled Task or Appointment.
Days in Stage organizes your Opportunities by the number of days they have remained in one Stage.


